Puzzle box


Print Profile(5)


Description
Solve the top puzzle to open box.
Works great as a gift box to hold another gift.
There are 3 sizes.
Puzzle6-180
Outside dim: 153 x 94 x 60mm
build size: 153 x 179 x 37mm
Maximizes the build volume of A1 mini 180 sq
Puzzle6-200
Outside dim:200 x 121 x 50mm
build size: 131 x 200 x 32mm
maximizes the build volume of X1C. 250 sq
Puzzle6-247
Outside dim:215 x 128 x 60mm
build size: 247 x 214 x 37mm
maximizes the build volume of H2 325 sq
Puzzle 8-150
Outside dim: 150 x 94 x 100mm
build size: 150 x 179 x 56mm
Maximizes the build volume of A1 mini 180 sq
Puzzel 8-215
Outside dim:215 x 124 x 100mm
build size: 225 x 247x 32mm
maximizes the build volume of X1C. 250 sq
Puzzle8-247
Outside dim:215 x 145 x 100mm
build size: 247 x 280x 56mm
maximizes the build volume of H2 325 sq
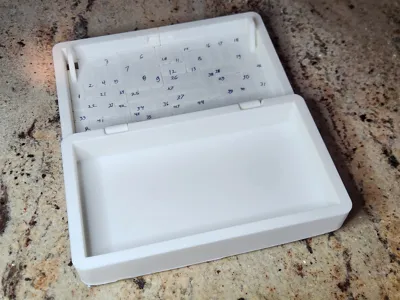
Mainly print in place. There is a backing plate for the puzzle pieces. Pint it first, and snap it in place before you take the puzzle off the build plate. Snap should be ok. After all the puzzle pieces have been moved. You might choose to glue the backing plate in place. If you do make sure no glue makes its way to the puzzle pieces. Before gluing make sure all the pieces move.
If you use a prismatic or textured build plate, you can see the carbon fiber texture in the pictures of the inside build plate. The top of the puzzle can take on the build plate. You can see in the photos the little multi colored circles from the prismatic plate.
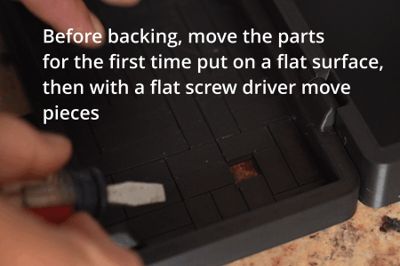
Because of the nature of 3d printing some of the pieces might need to be freed up the first time it is moved. If the filament is not calibrated or there is a little stringing connecting the pieces. Just move the pieces back and forth and it should work just fine. If you need to pry the pieces do it from the inside with the cover off. That way any dents are covered.
some hints about freeing pieces:
With the outside on the table move the pieces from the inside.
Use a flat screw driver to push the part.
If you can't move one piece, try moving the adjacent pieces first. Then go back to the other piece.
There is a video in the images showing freeing.
The hinge might need a little encouragement to free it up. once it moves move it back and forth to make it work smoothly.
The attached images have instructions for the puzzle. To lock just go in reverse.
This model has a lot of “print in place” issues. It works best to have the extrusion temperature low. This LOW is different for different filaments. Be careful that you don't set it high to increase speed.
A hint for freeing the pieces. On the inside number each of the pieces of the puzzle. See the image. It will help trying to sort out if the the pieces are separated. The written numbers are hidden when assembled.
Another hint is it does not need support. The slicer might warn you there are unsupported areas. These are print in place. so don't turn on support.
After the puzzle parts are freed. The top frame can be attached. The two straps go on the inside. These straps are meant to be glued in.
A hint for customizing using is adding a simple modifier changing the material for the pieces surface. I used the a text modifier to add a name. You may want to erase that object or edit the text.
Scaling the parts for a "print in place" like this are likely not workable. The puzzle depends on a gap. Scaling changes the gap size.
License
You shall not share, sub-license, sell, rent, host, transfer, or distribute in any way the digital or 3D printed versions of this object, nor any other derivative work of this object in its digital or physical format (including - but not limited to - remixes of this object, and hosting on other digital platforms). The objects may not be used without permission in any way whatsoever in which you charge money, or collect fees.
Comment & Rating (88)