Chrysler 2010 HB4 to HID Adapter


Print Profile(1)

Description
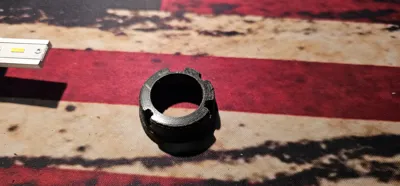
This is an adapter for Chrysler 300 HIDs. This should work on 2005–2010 Chrysler 300 C (and likely any Chrysler HIDs in that era {unknown for 2011 and newer}). This adapter is not a twist lock. This allows you to remove the HID bulb, and insert this and then be able to insert the HB4 bulb and maintain alignment. You will have to modify the wire harness.
Change filament 2 to PETG if you are using the 2nd plate for PEI plate!! Bamboo wont let me upload the 2 different types.
Be aware, that using a HB4 light does work.. The lens has a coating to color correct the bulb. What ever bulb you use, make sure its color is close to Xenon bulb ("cool white"). Also keep in mind, the headlights will be slightly dimmer due to the filtering and lens (this is the recommendation for the amazon non DOT approved LED light macers). It will still have that HID projector lens that some people just seem to love, despite the pain of having an antiquated ballast and arc lamp.
Instructions:
- Print this in nylon (don't be a dummy and use PLA or PETG), I used and recommend this from polymaker.
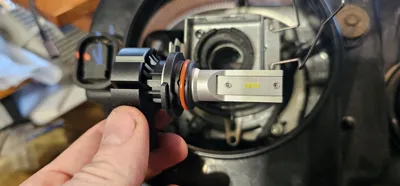
- You need a HB4 pigtail. I used this one.
- You will also need a HB4 bulb. A LED is recommend, as halogen will be even more dim. I used this one.
- Additionally, you should have 2 pink heat shrink butt connectors or some other water tight connector for the old harness to the adapter.
- Print the plate that is for you setup. Use the 2nd plate if you are printing on a PEI plate. The PETG will peal off easy after.
- Press by hand the printed part into the head light. Line up the grooves in the HID receptacle with the part (this part is designed to be a specifically clocked tight press fit).
- Insert the bulb into the printed part, it has matching notches.
- Use the OEM clasp to secure the bulb. Adjust the upper part to sit on the base as needed.
- The headlight assembly has a 3x3 (6 pin harness [2 wires on it]); you will be cutting this off. If you are unsure which it is, unplug it with the lights on and the low beam head light should shut off. Once cut determine which one is the positive wire with a volt meter and measuring the negative to a body ground (varies by year, model and trim [black with a stripe is common for switched ground, but not the rule]).
- Crimp (or otherwise attache the wire with your water tight connector) to the positive harness lead to the right wire of the pigtail (connection on the top, wire to the right [yellow wire if you bought the one i did]}. Crimp the other wire to the other one. Be sure its water tight connector or butt splice.
- Assemble and I guess enjoy the look with out the pain of old Chrysler tech {at least for low beam head lights}.
License
You shall not share, sub-license, sell, rent, host, transfer, or distribute in any way the digital or 3D printed versions of this object, nor any other derivative work of this object in its digital or physical format (including - but not limited to - remixes of this object, and hosting on other digital platforms). The objects may not be used without permission in any way whatsoever in which you charge money, or collect fees.
Comment & Rating (0)