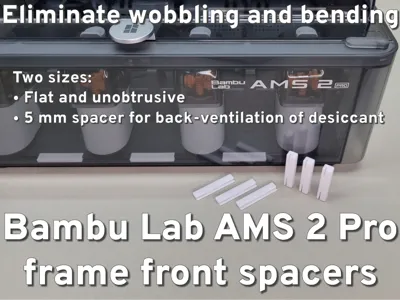
AMS 2 Pro frame front spacers - eliminate bending


Print Profile(2)

Bill of Materials

Description
Front frame spacer set for the Bambu Lab AMS 2 Pro – levels the warped front edge, removes wobble, supports even height across the frame, and keeps desiccant boxes aligned in high-temperature operation.
Boost Me (for free)
If you like this model, hit Boost or Follow. It keeps the filament rolling in and saves me from explaining another Bambu Lab bill at home.
I have this beautiful new Bambu Lab AMS 2 Pro and the main frame is a bit warped from the factory. It bends slightly in the middle and is wobbly. It doesn't affect the function but I don't like it. In addition, it is simply not possible to insert the desiccant container properly.
So here's the fix: three printed brackets that are pushed into the large recesses at the front, support the main frame and ensure that the entire main frame is at the same height at the front. In addition, any wobble is eliminated.
Choose the right filament
The Bambu Lab AMS 2 Pro is designed for filament drying by heat. As this device reaches temperatures up to 65 °C you should not use PLA for this model.
PLA is NOT suitable for remaining in the AMS 2 Pro at 65 °C as a structural model. Use at least PETG.
The models in the pictures was printed in Bambu Lab PC white with a 0.4 mm nozzle on a Bambu Lab P1S.
Before:

After

Anything else?
This model is awesome but there's more! A whole collection of great models. Special filament? Here you will find what you are looking for for your Bambu Lab AMS 2 Pro.
No spill AMS 2 Pro desiccant boxes collection
Installation
The AMS 2 Pro has to be dismantled for this, but this is super easy. Now is the opportunity to familiarize yourself with the device.
The instructions on the Bambu Lab Wiki are great, well illustrated and with extra video.
https://wiki.bambulab.com/en/ams-2-pro/maintenance/disassembly-and-assembly
Be careful with the cables, otherwise it's seriously easy. Once you have removed the main frame, take the spacer of your choice and install it as shown in the following pictures:


Now just reassemble. Make sure that the lugs at the bottom front of the AMS 2 Pro housing can snap into the recesses in the main frame. See also “Step 9 - Install the middle frame assembly and driven support sleeve assembly” in the instructions in the Wiki.
Boost Me (for free)
Support for this model helps fund 3D printing in a local school in Lower Saxony, Germany. Contributions go toward printers and filament for student maker and robotics clubs, including preparation for "Jugend forscht" competitions. Likes, follows, and boosts help increase visibility and indirectly support hands-on technical education.
Translation Notice: I am not a native English speaker. I write all descriptions in English to ensure the best automated translation into other languages. To make the text smoother and more readable, I use language tools to refine my wording.
Bill of Materials Notice: Hero Shot models are usually printed in Bambu Lab PLA Basic, primarily Pumpkin Orange, Purple and Matte Charcoal Black. The Bill of Materials contains the recommended filament for the model, which may differ from the filament used for the photos.
Purchases made via the BOM support my work through the Maker World Commission Incentive at no extra cost to you.
License
You shall not share, sub-license, sell, rent, host, transfer, or distribute in any way the digital or 3D printed versions of this object, nor any other derivative work of this object in its digital or physical format (including - but not limited to - remixes of this object, and hosting on other digital platforms). The objects may not be used without permission in any way whatsoever in which you charge money, or collect fees.
Comment & Rating (4)