3HU 10" inch rackcase for Mini-ITX board+FlexATX


Print Profile(3)


Description
I wanted to share my project for installing a complete rackcase into an 10" inch racksystem. I dont have the space for an 19" inch rack so i decided to use a 10" inch system but i havent found a case that matches my expetations.
Be aware that this build may be very tight depending on your configuration! This is due to the small dimensions of the 10” rack!The case has a depth of 205mm without the LAN and power cables. Make shure your rack can handle this!
Parts required:
- Flex-ATX PSU
- ITX-Board (complete kit)
- 4x M3 screws for the motherboard ( i have used M3 screws for mounting a 5.25" drive)
- 3x 6-32x1/4 UNC screws for power-supplies
- 12mm power button: https://de.aliexpress.com/item/1005005897030656.html?spm=a2g0o.order_list.order_list_main.167.73df5c5fIT3YU9&gatewayAdapt=glo2deu
- 3mm power-on-led + resistor (if needed)
- Cable with 4 wires https://www.amazon.de/dp/B07MKSXV1L?ref_=ppx_hzsearch_conn_dt_b_fed_asin_title_16
- 2,54mm plugs for front IO https://www.amazon.de/dp/B0DGLJ3W25?ref_=ppx_hzsearch_conn_dt_b_fed_asin_title_6
3x50mm fans. I used this ones: https://www.amazon.de/dp/B0791ZTZ32?ref=ppx_yo2ov_dt_b_fed_asin_title&th=1
USB-Ports for the front with USB: https://www.amazon.de/dp/B07SG2B2MB?ref=ppx_yo2ov_dt_b_fed_asin_title&th=1
- 80mm fan (if you use the Gigabyte MJ11-EC1 board): https://www.amazon.de/dp/B09VGX23DS?ref=ppx_yo2ov_dt_b_fed_asin_title
Parts required: (from Bambulab Store)
- 6x M3x10 countersunk screws (FHCS-AA188)
- 6x M3 square nut (AB015)
- 7x M3x6 countersunk screws (FHCS-AA085)
- 11x round threaded brass heat-insert nut (AB012)
Assembly:
1.Print all needed Parts. You can chose between the version with front-USB-ports and without the USB-ports. If you wanna use the Gigabyte MJ11-EC1 board, please print also the profile with the IO-shield and CPU-fan-mount. |  |
| 2. Preparing the front: Install the power buttton and the led. For my configuration i used a LED with a voltage of 3V and a resistor with 22 Ohms. For my configuration with the Gigabyte MJ11-EC1, I shortened the cable to 40cm. The connectors for the front IO must then be attached to the other side. The cable can be fastened underneath the 5.25” slot with cable ties. |
 |
| 3. (Front with USB-ports): Install the USB-ports with the included screws. |
|
| 4. Preparing the case: Insert the threaded inserts with a soldering iron |   |
| 5. Install the 3 50mm-fans by using the included screws (standard self taping screws for computer fans). For connecting the fans you can use a 1by3-y-splitter. In my build i simply soldered all three together. |  |
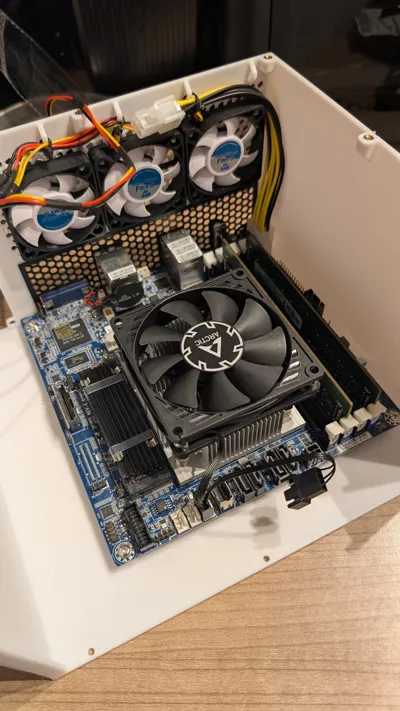
| 6. Installing IO-shield: you will need to modify your IO-shiled. The mainboard is so close to the edge of the housing that one side of the IO-Shiled has to be shortened to fit into the cut-out. |   |
| 7. Installing the motherboard. Use standrd M3-screws for mounting a 5.25"-drive in a drivebay. |  |
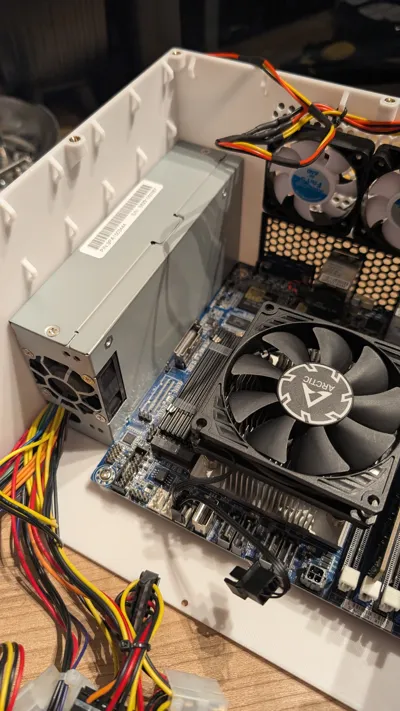
| 8. Installing the PSU: Install the power supply with the 3 6-32x1/4 UNC screws |   |
| 9. Before connecting the front and the housing, a drive can be installed in the 5.25” slot. | |
| 10. Insert 3 square nuts into the lower cut-outs of the front. To prevent the nuts from falling out, always leave the front with the visible side on the table! |  |
| 11. Slowly and carefully push the two parts together. Make sure that the cables are not crushed or otherwise in the way! Make shure you have connected all cables. |  |
| 12. When the two parts are pushed together, secure the parts with 3 M3x10 countersunk screws. |  |
| 13. Lay all cables and make sure that no fan is blocked. Use cable ties on the specially attached cable holders. |  |
| 14. Insert 3 square nuts into the upper cut-outs of the front. To prevent the nuts from falling out, always leave the front with the visible side on the table! Install the cover with 3x M3x10mm countersunk screws and the 7x M3x6mm countersunk screws. |   |
| 15. Congrats! It is finally done. You can now make a test-run and then install it in your rack. |  |


License
You shall not share, sub-license, sell, rent, host, transfer, or distribute in any way the digital or 3D printed versions of this object, nor any other derivative work of this object in its digital or physical format (including - but not limited to - remixes of this object, and hosting on other digital platforms). The objects may not be used without permission in any way whatsoever in which you charge money, or collect fees.
Comment & Rating (11)