Pokémon Galar Ponyta Night Light, no supports


Print Profile(1)

Description
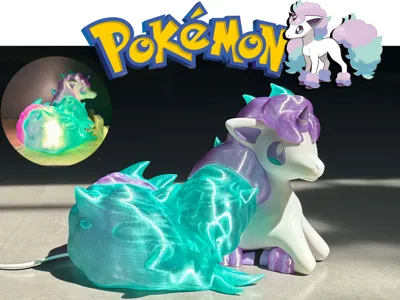
A nightlight featuring the Galarian Ponyta form. Inspired by the 24-hour ecological livestream preceding the release of Pokémon Sword and Shield. The moment the luminous rainbow pony emerged, all anticipation was soothed!

Compatible light sources: copper wire string lights or LED nightlights with a diameter less than 59mm (Maker's Supply MH001 recommended).
Copper wire string lights better recreate Galarian Ponyta's luminescence. The image below uses copper wire string lights:

The image below uses an LED nightlight (official lights are high-brightness; using standard filament for the mane and tail might yield superior results):

It can also serve as an ornament; translucent filaments exhibit excellent qualities under sunlight.
Dimensions: 21*18*15.5cm
Caution! This model involves intricate support removal, high assembly difficulty, and a significant risk of mane spaghetti; beginners should proceed with caution!
Boost Me (for free)
Thank you, Trainers, for your support! This encourages me to continue creating!
Important Notes:
1、Mane/tail components: Adhesive application is mandatory! Extremely long supports will inevitably collapse without adhesive.
2、Support removal is complex, and the mane/tail walls are thin; using flush cutters is recommended.
3、The bottom overhanging surface exhibits suboptimal results; perfectionists should sand it down.

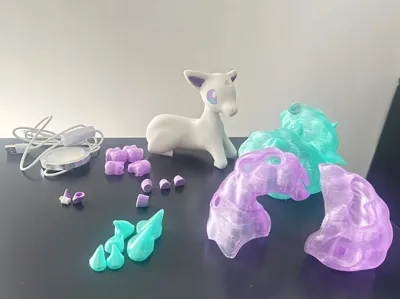
Assembly Instructions (only steps requiring mandatory adhesive are specified; others are direct insertion):
1、Ears + eyes → body

2、Hooves and the purple components in the image below are numbered; connect matching numbers (adhesive required), insert legs (front legs require adhesive), installation location shown below:

3、Adjust the angle of the purple mane and gently push it into the head. Installation point (adhesive required).

4、Insert the green mane into the purple mane. As shown, the connection point has a 4mm extension for adhesion (relatively thinner than other areas); apply adhesive to the outer surface of the green extension.

5、Ensure that after adhesion, the purple is on the outside and the green is on the inside. You can use a rod-like object to push and adjust the green component through the opening in the mane to secure it in the correct position.

6、Insert the LED light or copper wire string lights (distribute the string lights evenly).

7、Insert the tail into the body, and the power cord into the recess. Adjust the position of the purple and green tail components to ensure that the extension is purple on the outside and green on the inside.

License
You shall not share, sub-license, sell, rent, host, transfer, or distribute in any way the digital or 3D printed versions of this object, nor any other derivative work of this object in its digital or physical format (including - but not limited to - remixes of this object, and hosting on other digital platforms). The objects may not be used without permission in any way whatsoever in which you charge money, or collect fees.
Comment & Rating (6)