Cocktailmate by Creamslayer


Print Profile(1)

Bill of Materials


Description
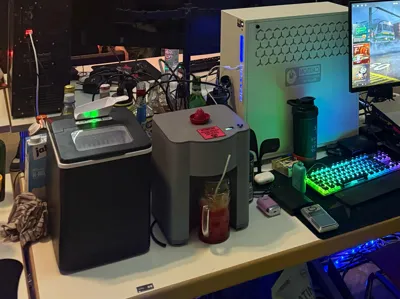
Cocktailmate V1.0
Ideal for parties, birthdays or LAN parties, who doesn't know it... as the level rises, the mixes slowly change... not with this!
With 8 liquid (non-carbonated) ingredients (up to 9 with an additional pump & relay), you can have a nice evening in a group or take it with you on a handcart and use it
With 4 powerful 500ml (juices & syrups) and up to 5 120ml (alcohol) peristaltic pumps, creativity knows no bounds
Of course, long drinks or shots can also be dispensed with this. A Tequila Sunrise is ready to drink in 22 seconds (350ml + 150ml ice) (2 types of Tequila, Grenadine, Orange Juice, Lime Juice)
The functions are limited to the essentials. In the near future, there will be an update with Esp32 to easily adjust recipes on your phone, as memory will no longer be an issue. Currently, 6 recipes can be hardcoded (thanks to Arduino Nano memory...), but this is clear and simple
Discord:
Table of Contents
1. Bill of Materials:
2. Code Instructions
2.1. Adjust Ingredients (Pumps)
2.2. Create New Recipes or Modify Existing Ones
2.3. Important Notes on Recipes
2.4. After the Changes
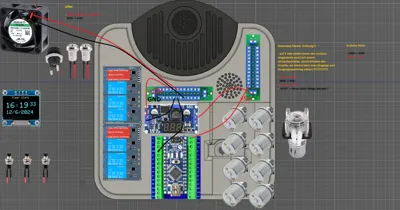
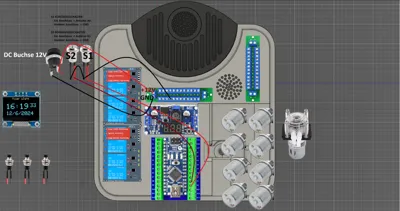
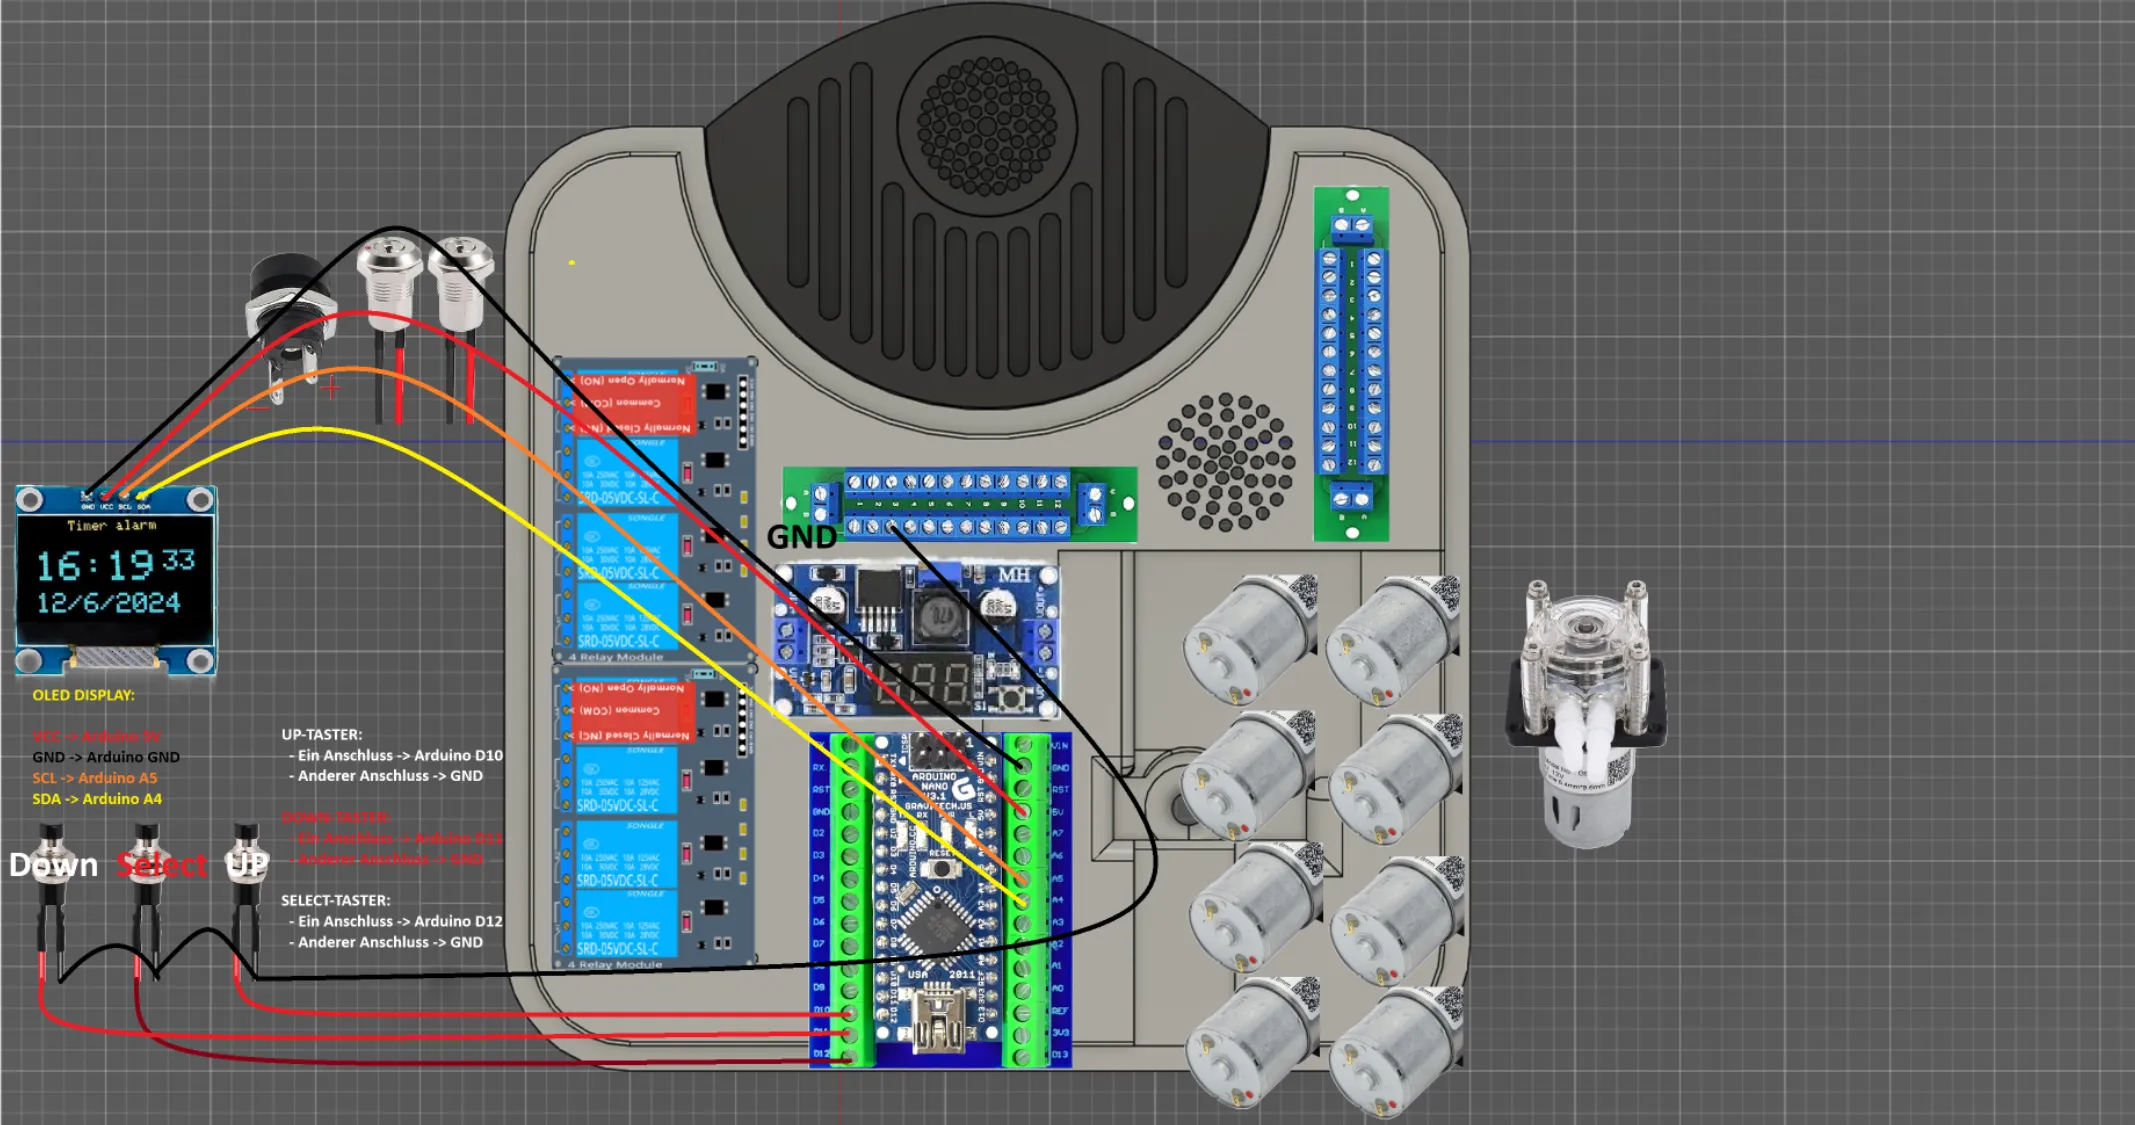
3. Circuit Diagram
1. Bill of Materials:
- 2x Power Distributor 12v: https://amzn.to/4imVW8p
- 2x 4 Channel Relay 5v with Optocoupler: https://amzn.to/422py62
- Optional for a 9th pump, an additional 5v 1 channel relay: https://amzn.to/4jdYuX8
- Up to 4x Peristaltic Pump G928 12v 500ml: https://amzn.to/4jgHv77 , https://amzn.to/3EaILZV , https://amzn.to/4ciZZ3U , https://amzn.to/3Gbnyzy … (Prices vary depending on the provider)
4x Peristaltic Pump G528 12v 150ml, if you want to install 9 pumps 5x or as a replacement for the G928:
https://amzn.to/42xaFbT , https://amzn.to/42wC2ml , https://amzn.to/4li12VN , https://amzn.to/3RGwPlG …..
(Prices vary depending on the provider)
- Hose Clamps 6mm: https://amzn.to/3YhVTDi
- Hose Clamps 9mm: https://amzn.to/3XNw8Lb (alternatively small cable ties)
- 2x Pneumatic 90 Degree Angle Connectors 6mm (24 pieces total), 4 more pieces needed for 9 pumps: https://amzn.to/3FVsE2R
- 1x 8mm to 6mm Pneumatic Connector Reducer: https://amzn.to/4cpdoYn
- 2x 10 Meter 6mm Pneumatic Hose (also available in transparent but was not deliverable, 6mm outer 4mm inner): https://amzn.to/3G8iZGg
- 1x 10 Meter 8mm Pneumatic Hose: https://amzn.to/43Bx5K9
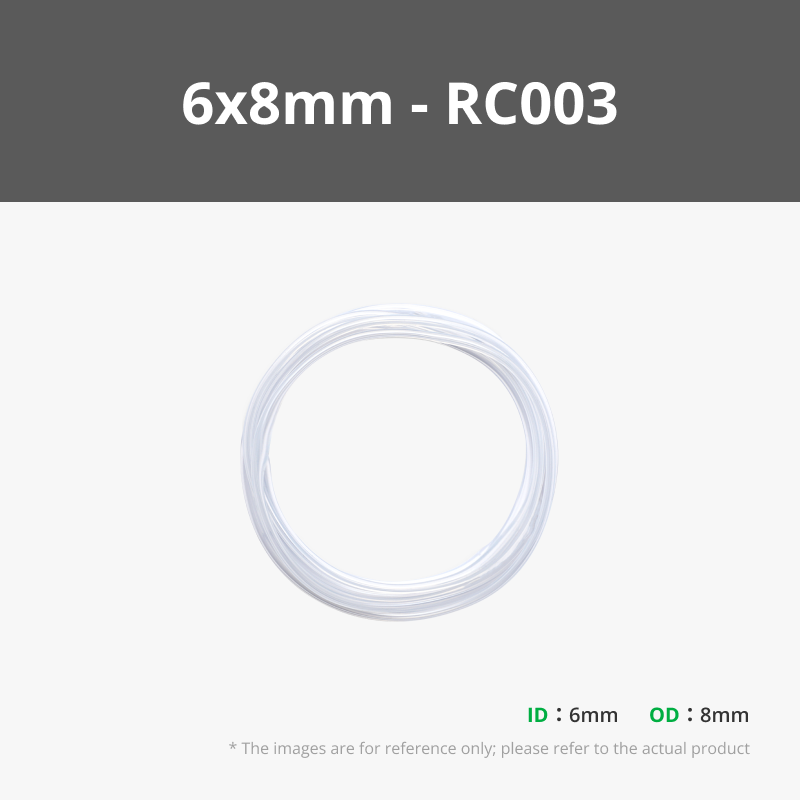
- 1x Silicone Hose 6x8mm 1 Meter: https://amzn.to/4lfNsm5
- 1x 12mm Key Switch (2 are needed): https://amzn.to/4cpaXoP
- 3x Pneumatic Push-in Connectors 6mm with Screw Fitting (9 pieces): https://amzn.to/42A35x6
- Alternative to 13. 1x 6mm OD 1/8 inch Thread Pneumatic Push-in Screw Fitting (8-9 pieces): https://amzn.to/4jk2W6y
- Alternative to 13. 9x 6mm IQS Shott Push-in Connectors with Cylindrical Internal Thread G 1/8: https://amzn.to/42kgrfG
- 1x Push Button 7mm 12v 3A SPST 2 (3 pieces): https://amzn.to/3RE6mVW
- 1x DC Socket 12v 5.5x2.1mm: https://amzn.to/42pZKQb
- 12v Power Supply 120w: https://amzn.to/4jlQ14i
- Alternatively for battery operation (For the battery type you have at home): https://amzn.to/4iYZFtT
- Step Down 36v to 5v 2A with Display: https://amzn.to/42a5Qnq
- Signal Cable for Display, Push Buttons and Signals: https://amzn.to/4jgOBZj
- 1mm² Cable for Motors and General Power Supply e.g.: https://amzn.to/3GGqCE4
- Glass Straw 7mm for Suction: https://amzn.to/41ZeSVF
Arduino Nano Kit with Display Board etc: https://amzn.to/3Ynyn83
Or alternatively 22.-23.
- Arduino Nano with Expansion Board (only one is needed) (USB-C ): https://amzn.to/4i4oJhF
- ELEG00 0.96 inch OLED Self-Luminous (only one is needed): https://amzn.to/43IcbZR
- 24x Screws: M3x 8mm for PCBs and g928 to g528 Adapter
- Chipboard Screws: 2x Countersunk Head 6mm x 50mm, approx 25x Countersunk Head 4mm x 25mm, approx 25x Countersunk Head 4mm x 16mm
- 4x Fan Screws (Usually included with PC fans): https://amzn.to/3YiQLyQ
- Automotive Connectors for the Push Buttons on the Lid: https://amzn.to/44ddW1d
- Server Fan 40x40: https://amzn.to/4lyGFnI
You will end up at approx. 600€ (on Amazon)
with the filament at approx. 650€
Tools nice 2 have:
- JOKARI 20050 Wire Stripper Super 4 plus: https://amzn.to/3DY3S1H
- Crimping Pliers Kit with Sleeves: https://amzn.to/3EaHhz2
- Cordless Soldering Iron: https://amzn.to/4jjudpR
2. Code Instructions
Instructions for Adjusting Recipes and Ingredients for the CocktailMate
Coude.ai will gladly explain how to adjust the recipes and ingredients in your cocktail machine. This guide is intended for beginners and will walk you through the process step by step.

2.1. Adjust Ingredients (Pumps)
The ingredients are defined in the config.h file. For each pump, there are three important settings:
- PUMP[X]_INGREDIENT: The name of the ingredient (e.g., "Vodka")
- PUMP[X]_PIN: The Arduino pin to which the pump is connected
- PUMP[X]_RATE: The flow rate of the pump (how many ml per unit of time) (For normal viscosities G928 =110 G528 = 325)
To change an ingredient:
- Open the config.h file
- Search for the corresponding pump block (e.g., PUMP0_INGREDIENT)
- Change the name in quotation marks (e.g., from "TequilaSilver" to "Rum")
Example for changing Pump 0:
c
// From:
#define PUMP0_INGREDIENT "TequilaSilver"
#define PUMP0_PIN 2
#define PUMP0_RATE 325
// To:
#define PUMP0_INGREDIENT "Rum"
#define PUMP0_PIN 2
#define PUMP0_RATE 325
2.2. Create New Recipes or Modify Existing Ones
Recipes are defined in the Recipes.cpp file. You can change an existing recipe or add a new one.
Change an existing recipe:
- Open the Recipes.cpp file
- Search for the desired recipe (e.g., "Tequila Sunrise")
- Adjust the ingredients or quantities
Example for changing the Tequila Sunrise:
c
// From:
const char *const sunrise_name = "Tequila Sunrise";
const char *const sunrise_p1_ingredients[MAX_INGREDIENTS] = {"TequilaSilver", "OSaft", "TequilaGold", "Zitronensaft", nullptr, nullptr, nullptr, nullptr};
const long sunrise_p1_amounts[MAX_INGREDIENTS] = {40, 210, 20, 20, 0, 0, 0, 0};
// To:
const char *const sunrise_name = "Rum Sunrise";
const char *const sunrise_p1_ingredients[MAX_INGREDIENTS] = {"Rum", "OSaft", "TequilaGold", "Zitronensaft", nullptr, nullptr, nullptr, nullptr};
const long sunrise_p1_amounts[MAX_INGREDIENTS] = {60, 190, 20, 20, 0, 0, 0, 0};
Add a new recipe:
IMPORTANT: Do not exceed the maximum number of 6 recipes! The Arduino Nano has limited memory, and more than 6 recipes can lead to crashes and malfunctions.
If you want to add a new recipe:
- It's best to replace an existing recipe instead of increasing the total number
- If you still want to add a seventh recipe, you must remove another one
Example for replacing an existing recipe:
c
// For example, change "Blue Riviera" to "My Cocktail"
const char *const blueriviera_name = "My Cocktail";
const char *const blueriviera_p1_ingredients[MAX_INGREDIENTS] = {"Rum", "Ananassaft", nullptr, nullptr, nullptr, nullptr, nullptr, nullptr}; const long blueriviera_p1_amounts[MAX_INGREDIENTS] = {50, 150, 0, 0, 0, 0, 0, 0};
const char *const blueriviera_p2_ingredients[MAX_INGREDIENTS] = {"Grenadine", nullptr, nullptr, nullptr, nullptr, nullptr, nullptr, nullptr}; const long blueriviera_p2_amounts[MAX_INGREDIENTS] = {20, 0, 0, 0, 0, 0, 0, 0};
2.3. Important Notes on Recipes
- Each recipe has two phases (phase1 and phase2) that are executed sequentially
- The quantity of an ingredient is specified in milliliters (ml)
- Unused ingredients must be marked with nullptr
- The corresponding quantities at unused positions must be set to 0
- The ingredient names must exactly match the names defined in config.h
- Keep the number of recipes at a maximum of 6 to avoid memory issues
2.4. After the Changes
After changing the files, you must:
- Recompile the code
- Upload to the Arduino
3. Circuit Diagram


*All links are affiliate links but do not lead to a valid account (link shorter)
The machine has been tested and works perfectly :)
26.04.2025: Circuit diagram and code added, as well as drip tray 500ml!
If someone wants to make a better circuit diagram, I would be happy. I hope it is reasonably understandable.
You can upload the code to the Arduino Nano via VS Code, for example.
Have fun
Boost Me (for free)
It would be great if you could boost me, it was a bit of work :)
SALE, DISTRIBUTION, and RENTAL are not permitted and are expressly prohibited!
Documentation (2)
License
You shall not share, sub-license, sell, rent, host, transfer, or distribute in any way the digital or 3D printed versions of this object, nor any other derivative work of this object in its digital or physical format (including - but not limited to - remixes of this object, and hosting on other digital platforms). The objects may not be used without permission in any way whatsoever in which you charge money, or collect fees.
Comment & Rating (16)