Search models, users, collections, and posts

Unifi UCG-Fiber 19-inch Rack Mount

IP Report

Print Profile(2)

All
P1S
P2S
H2D
A1
X1 Carbon
H2S
X1
H2C
X1E
H2D Pro
X2D
P1P
A2L

Left side - PETG HF - 0.2mm layer, 4 walls, 20% infill
Designer
10 h
3 plates
5.0(47)

Right side - PETG HF - 0.2mm layer, 4 walls, 20% infill
Designer
19.1 h
5 plates
4.9(44)

Open in Bambu Studio
Boost
242
947
159
127
1.9 k
955
Released 

Bill of Materials

Maker's Supply Kits and Parts
Select all
M3x12 SHCS Machine Screw (20PCS) - AA038
M5x12 FHCS Machine Screw (5PCS) -AA001
Bambu Filaments
Select all
Black (33102) / Refill / 1 kg
ABS Black (40101) / Refill / 1kg
ABS
x1
Black (45101) / Filament with spool / 1kg
ASA
x1
List other parts
  • M5_Hex_Nuts x 3:

Description

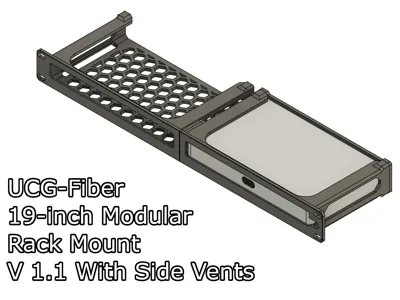
A modular, 2-part, 19-inch rack mount for the Ubiquiti Unifi UCG-Fiber cloud gateway.


This mount is part of a 19-inch modular rack mount system I designed. You can mix and match the modules with other mounts. Take a look at my models here to find out the other 19-inch mount modules.

Boost Me (for free)

I make these models for free, and it takes time and material to test them out. Your boost will help me keep releasing new models! Thank you!

Membership

Want to support me further? Or sell my prints? Please consider one of my membership tiers. Thank you!

Join

Do you like my models? Consider buying me a coffee ;)

Updates:

  • 15 May 2026: I've released version 1.1 of this model, based on feedback from the community. Thanks again! Change log:
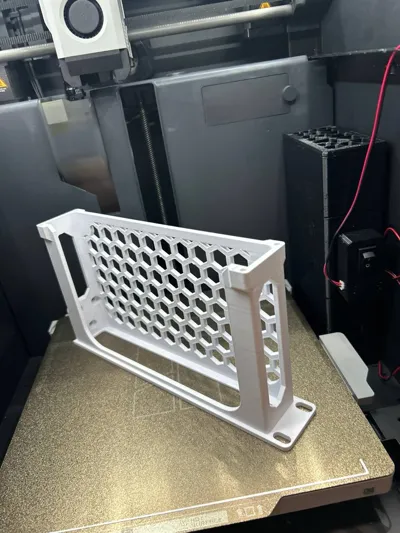
    • Added side vents for increased airflow.
    • Increased the internal spacing by 0.2mm on all sides.
    • Small tweaks on the hex pattern to make it easier to print with the side vents.

Which model to print?

This model comes in 6 variants. 4 for the right-side mount, and 2 for the left-side mount.

  • Right side (screw side):
    • With front cutout for power cable routing
      • With holes for M3 thread inserts. → UCG-Fiber 19i RM for Thread Inserts - Right (Screw).stl
      • With holes for attaching the screw directly into the plastic. → UCG-Fiber 19i RM - Right (Screw).stl
    • Without the front cutout
      • With holes for M3 thread inserts. → UCG-Fiber 19i RM NC for Thread Inserts - Right (Screw).stl
      • With holes for attaching the screw directly into the plastic. → UCG-Fiber 19i RM NC - Right (Screw).stl
  • Left side (hex nuts side):
    • Without the front cutout
      • With holes for M3 thread inserts. → UCG-Fiber 19i RM NC for Thread Inserts - Left (Hex).stl
      • With holes for attaching the screw directly into the plastic. → UCG-Fiber 19i RM NC - Left (Hex).stl

You can use the same back plate regardless of the chosen variant.


Each version is optimized for certain scenarios. If you don't know which one to print, follow the instructions below:

  • UCG-Fiber with its screen aligned with the front of the mount:

If you're mounting your UCG-Fiber leaving the screen in the front, use one of the left-side mounts. This will give you a cleaner look and still allow access to the SSD tray.
 

  • UCG-Fiber with its ports aligned with the front of the mount:

In this case, prefer one of the right-side mounts. There are versions with a power cable cutout for better cable routing. This also gives you access to the SSD tray.

Required parts

  • 4x M3x10 or 4x M3x12 for the back plate.
  • (Optional) 4x M3 thread inserts. If you're using the Thread Insert version.
  • 3x M5 screws (Min size: 12mm, recommended size: 16mm).
  • 3x M5 hex nuts.


Mount Assembly

OBS.: The modules used in this tutorial are only for illustration purposes, and I'm using them for the whole series. It might not reflect the models you download from this page.

  • To assemble the parts, insert the 3 screws into the Right module.
  • Then align it with the Left module.
  • After that, insert the hex nuts in the screws, and using a screwdriver or allen key.
  • Tighten the screws until you start feeling resistance and the nuts are securely into place. After that, you can install the mount in your rack.

Print Settings

Rafts:

Doesn't Matter.

Supports:

No.

Resolution:

0.2 or 0.24

Walls/Perimeters:

4.

Infill:

20% or more.

Filament:

PETG, ABS, ASA, PC, Nylon.

PLA could work, but pay attention to the glass transition temperature of your filament manufacturer.

Comment & Rating (159)

(0/1000)

It works. combined the unify lite 16 and fiber modules. I did notice a little sagging in the middle. The three screws are as tight I can get them. The print was done in pla, might that be why it's a little flexible?
The designer has replied
designer
1
Reply
Heya! I believe that's a product of combining Two heavy devices, and that's the area that has less support for that weight. I believe that adding something else below should greatly help. Also, from my tests, when I used a 2U module on the other side, that also helped a lot due to the higher rigidity. But in your case, even a blank below should help. Thanks for the feedback!
0
Reply
Replying to @mauker :
Ok so its not due to it being printed in standard pla. I'm probably going to rig up some support without sacrificing a whole U. Thanks for your work, once printed it looks amazing in my network cabinet.
0
Reply
Replying to @sudosamurai :
I think increasing the number of wall loops could also help. But you gave me food for thought. Perhaps I can make a modification for those who are mounting two heavy modules. Thanks again!
0
Reply
Love your models, keep up the great work!
The designer has replied
designer
1
Reply
Thanks a lot for the review! :)
0
Reply
Do you have the STL for the left side with the keystone jacks?
0
Reply
Replying to @encoad :
0
Reply
I printed it with PETG, but the part fits so extremely tightly that I didn't end up using it The screw holes also have an issue because those on the cover are smaller than those in the holder where the screws are meant to be screwed in, so I had to redrill them
Show original
1
Reply
I have the same issue. All of the holes are smaller than standard m5 screws (the heads and threaded portions both) and the nuts don't fit either. At least the hardware I've bought off amazon. Can't assemble the piece until I can either find ones that fit or rework the model. Otherwise the model is great.
0
Reply
i don't have a UCG-Fiber yet, so this is just from a theoretical perspective : considering that you already warned with the UCG-Max to use heat resisting material, because it can reach up to 90°C at the bottom, i wonder how well the UCG-Fiber is going to fare, considering it has two SFP+ slots, thus potentially (depending on the configuration) reaching those 90°C easily (probably even more), and the fact that due to the size the structure of the printed part is even thinner? i feel like this one may be an ABS/ASA only model for this reason ...
6
Reply
I've been using a ucg-fiber for a while and it has never reached anything close to "burn-fingers" level of heat. Granted I use the rj45 port for wan and not the sfp port.
0
Reply
Print Profile
Right side - PETG HF - 0.2mm layer, 4 walls, 20% infill
Printed good. Fit was a snug, but worked well. Allowed me remove a 2U shelf and looks good. Now i can start cleaning up the rest of the rack. Printed the UCG Fiber and 2.5POE mounts. I had to mirror the 2.5POE mount to get the nuts to fit.
profile
1
Reply
Boosted
Print Profile
Right side - PETG HF - 0.2mm layer, 4 walls, 20% infill
great model to put UCG fibre in a 1U
profile
1
Reply
Would it be possible to have a version where it is on the right side of the rack, front ports and power cable, but Fiber unit upside down? So the unit is on the right side of the rack, but the power cord is going to the left? This makes it line up great with a rack mounted Pro Max 16 to use a short DAC cable. Was also curious if you thought the "back support" screw addition in this design is helpful for something like this? https://makerworld.com/en/models/1602487-dell-optiplex-7020-19-inch-rack-mount?from=search#profileId-1689317
(Edited)
0
Reply
Great print.
0
Reply
printed great and helped keep the install clean.
0
Reply
Boosted
Print Profile
Left side - PETG HF - 0.2mm layer, 4 walls, 20% infill
Awesome for starting to get my 19” rack organized. thank you!
0
Reply

License

If you want to use this model commercially, please join my membership.
Join Now
This user content is licensed under a
Creative Commons Attribution-Noncommercial-Share Alike