Precision Bed Scraper


Print Profile(10)


Bill of Materials


Description
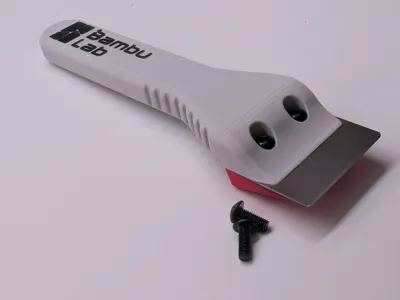
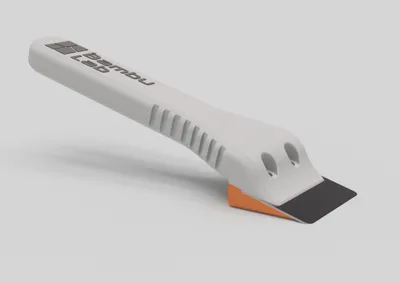
This is a precision scraper that uses Bambulabs scraper blade. It prevents damage to the bed by carefully angling/spacing the blade off the bed.
IMPORTANT: This scraper is NOT designed to use the stock scraper screws because they are too long and stick up to be convenient. This scraper is designed for M3x8 Button Head Screws.
Features
- Precisely angled/spaced blade to prevent bed damage and ease scraping
- Smooth front with lift assist where the blade meets the handle, nothing catches an edge as you try to lift it up
- Using short low profile screws (m3x8 button head) to avoid having the screws stick up
- Pleasant to grip with rounded sidewalls and grip ridges
- Compact size
Blade Orientation
To avoid damaging the bed, the bevel of the blade is facing downwards. This prevents the edge from making contact with the bed. Please install the blade in the correct orientation.

Required materials
- Bambulab Scraper Blade (new style with only one primary bevel)
- 2x M3x8 button head screws. You can use cylinder head screws if it does not bother you they stick up beyond the handle. Flat head screws would also work. I would not recommend countersunk screws, as they're likely gonna end up to short or long for the screw hole.
Print Parameters
The model is split into two plates, and the foot is tuned on the A1 to give an ideal amount of clearance to the plate using 0.08mm layer height. Other layer heights might work for the foot, but I haven't tried. The handle is at 0.12mm layer height on the second plate, but its dimensions aren't critical and any layer height will work.
I am using 0.25mm elephant foot correction to avoid any ridge at the bottom below the 45° overhang.
Ironing is not recommended. It does improve the top surface finish considerably, but unfortunately it also tends to mess up with the text on top and introduces slight ridges at the top edge.
Assembly Instructions
- Print both pieces
- Insert the blade snug into the foot, the ridges on the foot and holes in the blade need to line up
- Hold the foot with the blade and the handle together in one hand and align the screw holes
- Screw in both m3 screws
If the screws are too tough going in your filament, use a bit of lubricant on the screws. Silicone grease works well.
License
You may create derivative works based on this object, provided that all such derivative works are published exclusively on the MakerWorld platform and include proper attribution to the original creator. You may not share, upload, host, distribute, or publish this object—or any derivative work of this object—on any other digital platform, marketplace, or distribution channel. Commercial use of this object and any derivative works is strictly prohibited. This includes, but is not limited to, selling, renting, sublicensing, or using the object in any context in which you receive monetary compensation or other financial benefits.
Comment & Rating (1127)