Modular under-cupboard or wall mount spice rack V2


Print Profile(5)


Description
This is version 2 of my modular under-cupboard spice rack, based on feedback from users. The changes are:
- There is now a strip down the back to prevent jars sliding out the back if the rack is not mounted against a wall.
- The plate and rack have been modified to add a stop so the rack cannot slide out the back of the plate.
- There is a small lip on the lower front edge of each jar holder to stop the jars sliding forward too easily, especially useful if the rack is used free-standing.
- There are holes in the side of each rack and clips to join them together, again useful if the racks are used free-standing.
- Modules added for 3x2 and 3x1 jars, alongside the original 3x3 jars.
- Now includes plates for mounting on a wall, as an alternative to mounting under a cupboard
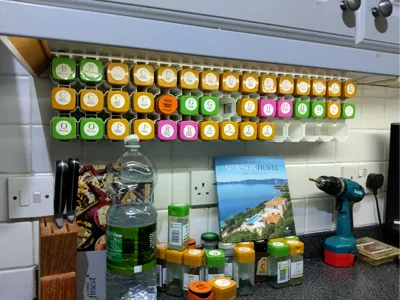
We had a cupboard full of jars of spices and herbs, and it was impossible to find anything unless it was on the front row. You couldn't see the tops of the jars as they were stacked two layers deep.
I couldn't find what I wanted to organise these jars elsewhere, so I designed this rack. Note we shop at Tesco in the UK and the rack takes Tesco jars which are 100mm high and about 43mm square (not really square, but 43mm is the maximum dimension). This seems to be a pretty common size, so hopefully it'll work for you too.
Under cupboard mounting:
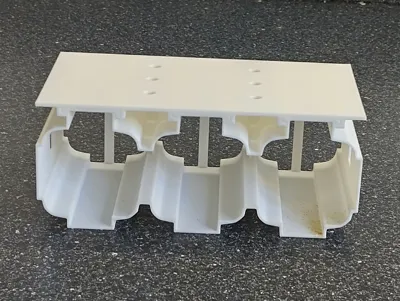
This spice rack utilises the dead space under your wall cupboards. It makes it easy to find the jar you need, and it frees up valuable cupboard space for other things. It is a modular design, with each module holding nine jars. Each module comes in two parts, first there is a mounting plate you screw to the bottom of your cupboard, and then the rack itself which slides in to the plate. I used four 15mm x 3.5mm countersunk screws to attach each plate, but probably roundhead screws and washers would spread the load better.
Wall mounting:
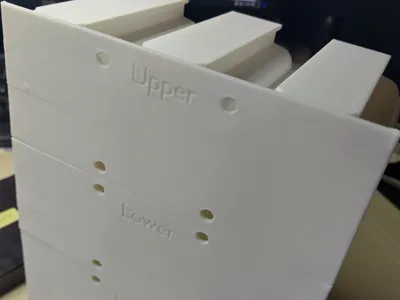
There is a profile with wall mounting plates in case you prefer that to mounting under cupboard. There are two plates, an upper one and a lower one. The lower one is not technically required, but does make it look nicer. The plates are named on the back for identification. Use them with the writing the correct way up. Screw the upper one to the wall, fit one or two lower ones to the rack (two for the 3x3 rack, one for the 3x2 rack), then push the rack on to the upper plate. I don't recommend screwing the lower plates to the wall as the tolerances are such that if they are not positioned very accurately you may have trouble getting the rack on.
You may have to separate the two ends of the clips on the plate with a finger nail, as they are printed very close together. If you have issues with the bottom edge of the plate warping, try turning off the aux fan, as it is likely due to excessive cooling.
Free standing use:
The rack can be used free-standing on a work surface or cupboard shelf, and comes with clips to join multiple modules side by side if needed. It should mount vertically as well as horizontally (as I did in my photos), but I've not tried that myself.
Printed in white PLA, with 0.28mm layer height.
Boost Me (for free)
Just leaving this boost button here in case you have one to spare..
License
You shall not share, sub-license, sell, rent, host, transfer, or distribute in any way the digital or 3D printed versions of this object, nor any other derivative work of this object in its digital or physical format (including - but not limited to - remixes of this object, and hosting on other digital platforms). The objects may not be used without permission in any way whatsoever in which you charge money, or collect fees.
Comment & Rating (52)