Search models, users, collections, and posts
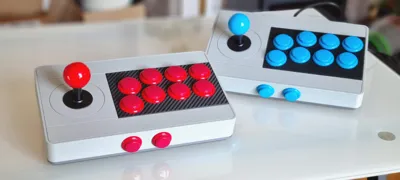
Retro Arcade Stick
IP Report


Print Profile(2)

0.2mm layer, 2 walls, 15% infill
Designer
7.8 h
3 plates

Full top version 0.2mm layer, 2 walls, 15% infill
Designer
4 h
1 plate
Open in Bambu Studio
Boost
522
1429
105
69
958
415
Released
Bill of Materials
Maker's Supply Kits and Parts
Select all


Description
What you need :
- Buttons, stick and controller like this one https://www.amazon.fr/dp/B01HJKLAV6?ref_=ppx_hzsearch_conn_dt_b_fed_asin_title_1
- M3 brass inserts https://www.amazon.fr/dp/B0BZVGQ91H?ref_=ppx_hzsearch_conn_dt_b_fed_asin_title_2
- M3 screws https://www.amazon.fr/dp/B09BJFM8W4?ref_=ppx_hzsearch_conn_dt_b_fed_asin_title_3
Description :
This model is 250 x 150 x 47 mm so it fits my Bambu P1S print bed.
I was inspired by the design of the 8BitDo Arcade Stick.
I used the Textured PEI Plate for the top and bottom parts and the 3D Effect Carbon Fiber Plate for the buttons base.
If you don't want to make a multicolor model there is a file for that (Arcade-stick_top-full)
Printing :
I used basic print settings with a 0.4mm nozzle and 0.2mm layer height with supports and brim activated.
It is a little less than 300g and around 8hours of printing

Assembly :
- Print the top part and remove the supports.

- With a soldering iron, place the inserts. There are 4 for holding the stick and 7 more to close the box.

- Print the buttons base.

- Snap it into the top part, it should be enough but you can glue it if you want.

- Screw the stick in place.

- Insert the buttons.

- Connect everything to the controller board.

- Screw the bottom part and add small non-slip pads for better grip

- And voilà ! That's it, enjoy
License
This user content is licensed under a
Creative Commons Attribution-Noncommercial-Share AlikeRemixes (5)
Click to see more
Comment & Rating (105)