Sun God Bird Gold Foil Pattern - 3D Printed Fabric
I. Concerning the Sun God Bird
A Landmark of Chinese Cultural Heritage—The Sun God Bird Gold Ornament Period: Late Shang Dynasty (approximately 1300-1046 BC) Dimensions: Outer diameter 12.5 cm, inner diameter 5.29 cm, thickness 0.02 cm, weight 20 g Discovery Site: Jinsha Site, Chengdu, in 2001 Craftsmanship: At least including hot forging, hammering, shearing, polishing, and openwork, with a gold content as high as 94.2% Current Location: Sichuan Provincial Museum, Jinsha Site Museum
The entire ornament's pattern is rendered using openwork, divided into inner and outer layers. The inner layer features twelve equidistantly spaced, rotating, tooth-like rays. The outer layer comprises four birds flying counterclockwise. The four birds' heads and feet meet, all flying in the same direction, opposite to the rotation of the inner vortex. Some research suggests the four outer birds represent the four birds carrying the sun, also symbolizing the cyclical changes of the four seasons; the twelve rays of the inner layer represent the twelve months of the year. This is physical evidence of the ancient Shu people's sun worship; it is possible that the ancient Shu people already understood the concepts of years, seasons, and months, as well as their origins. The Sun God Bird was the totem of early Shu tribes. ‘Birds circling the sun’ embodies the soaring dreams of ancient Chinese people, their yearning for the sun, and their reverence for light. The Sun God Bird pattern conveys the spiritual meanings of pursuing light, unity, progress, and harmonious inclusiveness. Its composition is rigorous, lines are fluid, and aesthetic appeal is abundant, even today it remains timeless. It is a perfect fusion of the ancient people's philosophy of “harmony between humanity and nature,” their rich imagination, extraordinary artistic creativity, and superb craftsmanship.
❶ On August 16, 2005, the Sun God Bird gold ornament stood out from over 1600 candidate patterns and officially became the emblem of China's cultural heritage. ❷During the 2008 Beijing Olympics, the Sun God Bird gold ornament was displayed at the entrance hall of the large-scale exhibition “Chinese Memory—5000 Years of Civilizational Treasures,” where it was presented to the global audience. ❸In 2013, the State Administration of Cultural Heritage included the Shang and Zhou Sun God Bird gold ornament in the “Third Batch of Cultural Relics Prohibited from Exhibition Abroad.” ❹On April 22, 2016, the Sun God Bird gold ornament was one of the exhibits at the “Ancient Shu Exploration—Essence of Relics Excavated from the Sanxingdui and Jinsha Sites” exhibition.
——Primary Source: Capital Museum [Chinese Memory—5000 Years of Civilizational Treasures—Part Two (①Sedimentation of Rituals)]
——Documentary “Why China” Trailer Clip
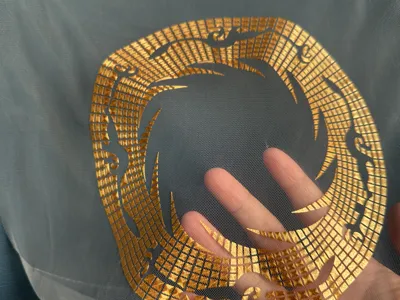
II. Inspiration and Design
Initially, I had no intention of entering the fabric printing competition due to my unfamiliarity with it. After seeing many entries utilizing parameterized logical dot matrix models, I decided to give it a try. I have many parameterized models, but they all felt soulless (primarily because my A1 couldn't print them). Given the printer's capabilities, how could simple designs be elevated to greater depth and aesthetic appeal? My first thought was “A Thousand Li of Rivers and Mountains,” but the concept proved difficult to implement. Then, I considered the main stadium of the Chengdu Universiade—a common architectural design pattern—the stadium's curtain wall dome pattern →→→ The Sun God Bird.
So, I began implementation. During the design phase, I explored numerous options for filling the Sun God Bird's interior void (some shown below):
And the three-dimensional effect:
However, after printing, I felt these additions were superfluous. I ultimately decided to leave it unadorned, using a flat top to better showcase the gold material's luster.
III. Fabric Printing Experience Sharing
Because I used the A1, there are few places on this print bed where clips can secure the thin gauze. Therefore, strong magnets were used for fixing. As this was my first attempt, there were many aspects requiring attention: bed levelness, printing accuracy, nozzle size, pathing, and gauze placement. Within such a thin height range, achieving a metallic sheen required careful consideration of material, printing speed, and slicer settings; it took a considerable amount of time to complete a single print to ensure sufficient adhesion between the particles and the bed, while maintaining accuracy.
To achieve a better luster:
1️⃣In slicer settings, select “rectilinear infill pathing” 2️⃣Reduce nozzle diameter (0.2) 3️⃣Print speed at 50%, especially for the first layer and the last few layers after the gauze is laid 4️⃣Use silk gold PLA In short, it took a lot of time, and I am grateful for the support and answers from my Bambu Lab friends in the apparel field. Overall, I am satisfied with the result.
If needed, please leave a comment, and I will describe in detail the various problems I encountered~
This user content is licensed under a Standard Digital File License.
You shall not share, sub-license, sell, rent, host, transfer, or distribute in any way the digital or 3D printed versions of this object, nor any other derivative work of this object in its digital or physical format (including - but not limited to - remixes of this object, and hosting on other digital platforms). The objects may not be used without permission in any way whatsoever in which you charge money, or collect fees.


Comment & Rating (0)