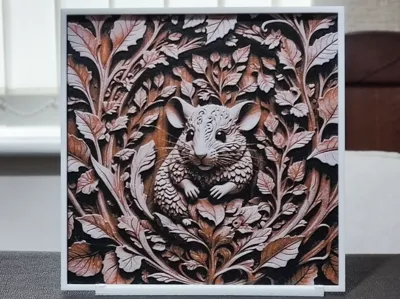
Wood Carving Mouse - HueForge 3 Color


Print Profile(1)

Description

WARNING! Bambu have in their wisdom chosen to convert all uploaded files from v1 of Bambu Studio to v2. The problem with this is that anyone downloading a v2 file and attempting to use it on v1 or in a different slicer such as Orca will lose everything except the geometry. Colour changes will be gone.
So, for the avoidance of doubt, DO NOT ATTEMPT TO PRINT THIS OR ANY OTHER FILE ON MAKERWORLD UNLESS YOU ARE USING V2 OF BAMBU STUDIO. Additionally, the new prime tower is much larger than the previous one and because of this decision from MakerWorld, it now conflicts with the model on many designs including this one. I simply do not have the time to re-slice, reprint and re-upload over 150 print profiles , so my suggestion is to turn the prime tower off or resize it. DO NOT ATTEMPT TO PRINT THIS DESIGN WITHOUT DOING ONE OR THE OTHER.
THIS IS A STUPID DECISION ON BAMBU'S PART THAT WILL CAUSE A LOT OF PROBLEMS FOR DESIGNERS WHEN PEOPLE ATTEMPT TO PRINT THEIR CAREFULLY CRAFTED DESIGNS AND DISCOVER THAT THEY DON'T WORK THROUGH NO FAULT OF THE DESIGNER.
Ever since I designed my Paper Art Portrait (available on my profile) I've been intrigued by the perception of depth that can be given in a HueForge. It's tricky to pull off, especially so if you're trying to give the impression of it being made from natural materials. This is the first of three designs on a similar wood carved theme. I'm enjoying designing these, but they do take a lot of time so uploads may be a little slower than usual if I continue designing more.
It can be difficult to get a HueForge right with a limited colour palette, but I'm challenging myself to design HueForges that look great, using subjects I enjoy, using as few colours as possible along with keeping printing and slicing time to a minimum. It's not always possible, and It's not easy to achieve when it is possible, but it is rewarding when you finally get it right.
Boost Me (for free)
If you like any of my designs, please consider boosting them. It's free for you to do, but any designer will tell you that creating these designs takes many hours, a great deal of effort, and multiple prints to get things just right. It's a good way of showing your appreciation at no cost to yourself.
Very few people seem to leave reviews or comments on designs, and it's incredibly important to designers so they know if they're getting things right. So, please leave a comment or review. I like to learn, so constructive criticism, suggestions for future designs and your genuine feedback are always welcome.
All the settings and colour changes are in the print profile, but should you not have an AMS, after slicing, replace the colour changes with pauses and make manual colour swaps as detailed below. I'd strongly suggest not changing any other settings in the slicer, as my printing profiles are highly customised to produce the best quality HueForge.
If you decide to resize any of my designs, you can only resize on the X & Y axes. DO NOT RESIZE THE Z AXIS! If you choose to ignore this instruction, it will change the layer heights that the colours change at and destroy the end result.
From this design onwards, I have implemented a height adjuster (at the suggestion of @obnaes). This will only work if you use my print profile! This one change knocks nearly an hour off the printing time by changing the layer height of the border from 0.04mm to 0.20mm. It has no detrimental result to the finish of the design whatsoever.
One final thing - please don't turn ironing on for the top surface. This shouldn't need to be said, but HueForges rely on texture and interplay with light. Ironing will reduce the quality of the image. It's turned off in my print profile for this exact reason.
Print at 100% infill with a layer height of 0.04mm with a base layer of 0.16mm
The Model is 150x150mm in size
You may print at higher layer heights below the Min Depth of 0.48mm
The Max Depth is 2.2mm and the Actual Depth is 1.5mm
Filaments Used:
PLA Deeplee Black Transmission Distance: 0.8
PLA eSun Orange Transmission Distance: 5.6
PLA Deeplee White Transmission Distance: 5.6
This print uses 3 unique filaments
Swap Instructions:
Start with Black
At layer #14 (0.68mm) swap to Orange
At layer #21 (0.96mm) swap to White for the rest.

License
You shall not share, sub-license, sell, rent, host, transfer, or distribute in any way the digital or 3D printed versions of this object, nor any other derivative work of this object in its digital or physical format (including - but not limited to - remixes of this object, and hosting on other digital platforms). The objects may not be used without permission in any way whatsoever in which you charge money, or collect fees.
Comment & Rating (10)