Spider Robot


Print Profile(1)

Bill of Materials
- ArduinoNano x 1: https://de.aliexpress.com/item/1005007066680464.html?spm=a2g0o.order_list.order_list_main.28.7cf65c5fDYhFVr&gatewayAdapt=glo2deu
- Stepper Motor incl. Driver x 1: https://de.aliexpress.com/item/1005006804841105.html?spm=a2g0o.order_list.order_list_main.22.7cf65c5fDYhFVr&gatewayAdapt=glo2deu
- Powerbank Case x 1: https://de.aliexpress.com/item/1005002679392500.html?spm=a2g0o.order_list.order_list_main.16.7cf65c5fDYhFVr&gatewayAdapt=glo2deu
- VTC6 Battery x 1: https://de.aliexpress.com/item/1005007413619590.html?spm=a2g0o.productlist.main.3.64c3372dRQs6Jx&algo_pvid=7269c7bd-3e9d-4393-b39f-d68fb74178fe&algo_exp_id=7269c7bd-3e9d-4393-b39f-d68fb74178fe-1&pdp_ext_f=%7B%22order%22%3A%2242%22%2C%22eval%22%3A%221%22%7D&pdp_npi=4%40dis%21CHF%2129.58%2114.79%21%21%21238.93%21119.46%21%402103891017431050039842680ed2ab%2112000040651648595%21sea%21CH%211699480038%21X&curPageLogUid=GJ9QCw921Kn0&utparam-url=scene%3Asearch%7Cquery_from%3A
- Distance Sensor x 1: https://de.aliexpress.com/item/1005005467178145.html?spm=a2g0o.productlist.main.1.42f1441F441Fjr&algo_pvid=7c712159-ebc9-452a-b70c-a2867e740438&algo_exp_id=7c712159-ebc9-452a-b70c-a2867e740438-0&pdp_ext_f=%7B%22order%22%3A%223235%22%2C%22eval%22%3A%221%22%7D&pdp_npi=4%40dis%21CHF%211.27%211.27%21%21%211.41%211.41%21%402103890917431050524727362ed42b%2112000033197296308%21sea%21CH%211699480038%21X&curPageLogUid=C9CsNLt80qRw&utparam-url=scene%3Asearch%7Cquery_from%3A
Description

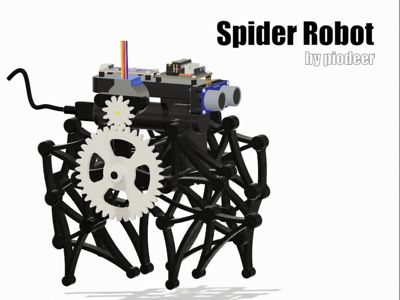
Motorized Spider Robot
Experience the mesmerizing motion of this motorized spider robot, a remix of LoboCNC’s project on Printables. Designed for ease of assembly and smooth operation, this version uses only four basic parts for the main body structure, making it an ideal introduction to kinetic sculptures.
Key Features
- Simplified Construction: The leg units print pre-assembled, and the crankshaft is a single monolithic piece.
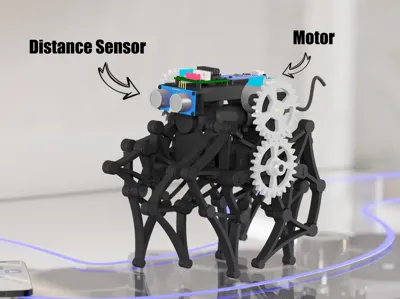
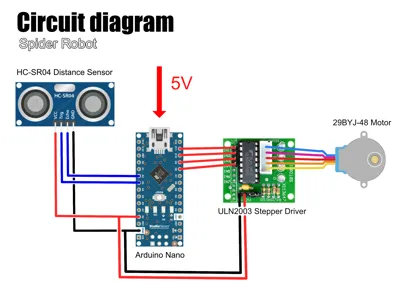
- Motorized Motion: Powered by an Arduino Nano, a 18650 battery power bank from Aliexpress, and a 28BYJ-48 motor with a ULN2003 driver.
- Distance Sensing: Features an HC-SR04 distance sensor for automation.
- Versatile Display Options: Watch it walk across your desk or mount it on the included stand as kinetic art.
Printing Instructions
- Recommended Material: PLA for its rigidity and yield strength.
- Supports: Required only for the overhanging shafts on the crankshaft.
- Printing Adjustments: Reduce print speed for small perimeters to improve layer adhesion on vertical shafts.
Required Parts
- 8 x Legs
- 1 x End
- 1 x End-Motor
- 2 x Side Rods
- 1 x Shaft
- 2x Battery Holder
- 1x Top Cover
- Small Gear, Big Gear
- Optional: Stand (for display)
Assembly Guide
- Prepare the Legs
- Free the pivots by gently flexing each joint until movement is smooth.
- If joints are stiff, carefully insert a razor blade between links.
- Apply a drop of light oil to each joint and wipe off excess.
- Assemble the Side Rods
- Align the legs with the side rods as shown in the provided diagrams.
- Ensure the flat sides of the rods face inward for aesthetic alignment.
- Connect the Frame
- Insert the side rods into the designated slots on the end and end-motor pieces.
- Place the crankshaft into the center hole of the end piece.
- Secure the end-motor piece over the crankshaft and side rods.
- Attach the Connecting Arms
- Rotate the crankshaft to align the flat sections with the arm clips.
- Attach the arms in the correct sequence to ensure synchronized movement.
- Electronics Installation
- Mount the Arduino Nano, ULN2003 driver, and HC-SR04 sensor.
- Measure and adjust the screw hole distances if necessary, as the Arduino holes may be slightly small and the ULN2003 holes not perfectly symmetrical.
- Connect the 18650 power bank for motorized operation.
- Final Assembly
- Press the big gear onto the crankshaft.
- Press the small gear onto the motor.
- Secure the motorized components and confirm smooth operation.
Now your motorized spider robot is ready to come to life! Activate the motorized system for a controlled and interactive experience.
Components:
This remix is based on

License
You shall not share, sub-license, sell, rent, host, transfer, or distribute in any way the digital or 3D printed versions of this object, nor any other derivative work of this object in its digital or physical format (including - but not limited to - remixes of this object, and hosting on other digital platforms). The objects may not be used without permission in any way whatsoever in which you charge money, or collect fees.
Comment & Rating (6)