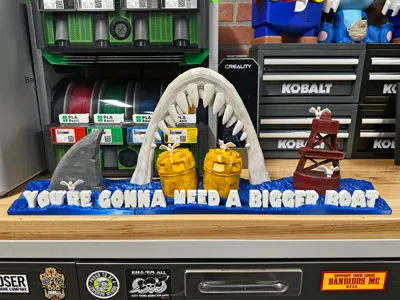
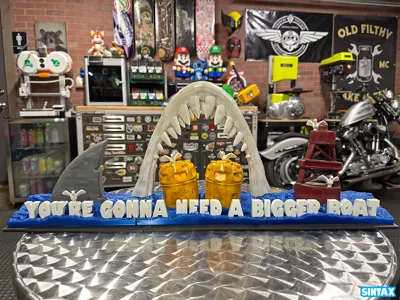
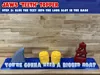
Stern Pinball: Jaws "Teeth" Topper


Print Profile(1)

Bill of Materials


Description
For Non-Commercial, Personal User Only
You are permitted to download and use this model for your own personal projects only. You may not distribute, sell, or share the digital files of this model with others, nor create and sell physical objects based on this model in its current, modified or adapted form.
About This Model
If you have a Stern Jaws pinball machine, and long to fill that void atop the backbox without dropping a grand on the official topper, this “Teeth” edition of my Bigger Boat Topper is for you! Just check out some of the highlights for this model:
- Easy to print and even easier to assemble. The use of basic Super Glue is all you'll need!
- Features a bold, commanding look that enhances the amazing backglass artwork.
- While an AMS is recommended for the Seagulls, printing them in solid white makes this AMS free!
- Fully compatible with my Stern Topper Plate, which can be printed from here.
Get Ready To Print
The default print profile has a total of nine plates and all the recommended settings have already been entered for each of them. I have personally printed this model six times prior to posting it here. I have also printed this exact print profile using the “Handy” iPhone app. Please see my note below the following plate breakdown.
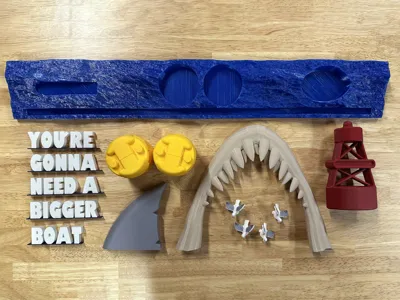
Plate 1 - 3: Water
- Plate Type: Bambu Cool Plate SuperTack
- Filament: Sunlu PETG Transparent Blue
- Settings: Layer Height (0.2) / Infill (10% Gyroid) / Outer Brim
- Description: These are lengthy prints with a large surface area so an outer brim is used. You may also need a glue stick.
Plate 4: “Bigger Boat” Text
- Plate Type: Bambu Textured PEI Plate
- Filament: Bambu PLA Matte - Ivory White
- Settings: Layer Height (0.16) / Infill (15% Gyroid) / Painted “Mouse Ear” Brims
- Description: The letters are printed FACE DOWN on a Textured PEI Plate for a professional finish. Glue stick recommended.
Plate 5: Orca Barrels
- Plate Type: Bambu Cool Plate SuperTack
- Filament: Bambu PLA Basic Sunflower Yellow
- Settings: Layer Height (0.16) / Infill (15% Gyroid) / Ironing (60 mm/s, 30% , 0.15 mm / Auto Support (Tree Organic)
- Description: There is perimeter of easily removable tree supports for the overhang at the top. Ironing Settings for a smooth finish.
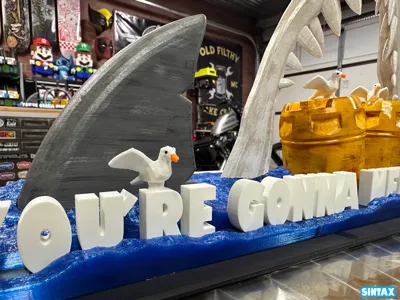
Plate 6: Shark Fin
- Plate Type: Bambu Cool Plate SuperTack
- Filament: Bambu PLA Matte - Ash Gray
- Settings: Layer Height (0.16) / Infill (15% Gyroid)
- Description: Easy print with no need for supports or a brim.
Plate 7: Buoy
- Plate Type: Bambu Cool Plate SuperTack
- Filament: Bambu PLA Basic Maroon Red
- Settings: Layer Height (0.16) / Infill (15% Gyroid) / Auto Support (Snug)
- Description: Remove the supports from the undersides and glue the halves together, using the “plugs” has alignment pins.
Plate 8: Teeth
- Plate Type: Bambu Cool Plate SuperTack
- Filament: Bambu PLA Matte Bone White
- Settings: Layer Height (0.16) / Infill (15% Gyroid) / Outer Brim / Auto Support (Organic Tree)
- Description: Despite the funky plate alignment, this prints perfectly on an X1C / P1S. If you are an A1 user, the “bed slinging” nature of your printer may cause stability issues.
Plate 9: Seagulls
- Plate Type: Bambu Cool Plate SuperTack
- Filament: Bambu PLA Matte Ivory White, Matte Charcoal, Basic Ash Gray, Basic Sunflower Yellow
- Settings: Layer Height (0.16) / Infill (10% Gyroid) / Outer Brim / Auto Support (Organic Tree)
- Description: The A1 shines here thanks to the speedy color swapping. You can also bypass the AMS and print in solid white. Take your time removing the supports from under the wings and head as to not break the model.
Assemble The Model
Assembly is very straightforward as, apart from the teeth, there are specific cutouts in the base for each item. You can find photos of the below steps in the overall model gallery.
Step 1
- Going in the order of printing plates, align the three ocean base plates in the order: Left, Center, Right.
- Apply Super Glue on both the left and right side of the center piece and attach the left and right accordingly.
- Important: Make sure the channel the text fits into remains aligned across all three pieces!
Step 2
- Using Super Glue to secure each piece, attach the Shark Fin, Orca Barrels, and Buoy to their matching locations in the base.
- Note: For the Shark Fin, insert the left (rounded) edge first and then push down the right (flat) side until it “snaps” in place.
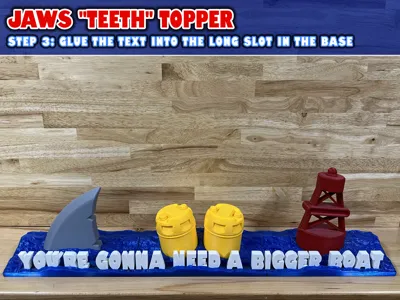
Step 3
- Using Super Glue to secure each piece, attach the letters to read “You're Gonna Need A Bigger Boat” into the front channel.
- Note: It may seem obvious, but make sure each of the segments is facing forward.
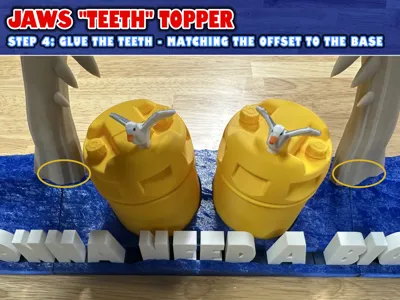
Step 4
- Before using Super Glue to attach the teeth to the base, locate the correct mounting location where the “ocean waves” match the recessed cutout in the bottom of the Jaw. Use the installation photos 4a - 4c if you need help finding the correct spot.
- Once you locate the corresponding mounting position on the base, use Super Glue to attach the Teeth (jaw bone).
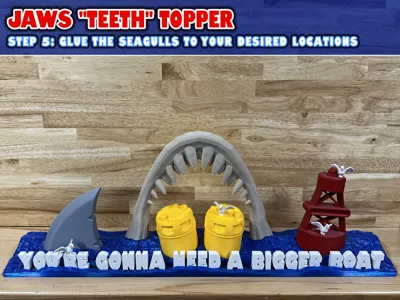
Step 5
- Decide where you want to place your Seagulls (if at all) and use a drop of Super Glue on their feet to attach them where desired.
Mounting The Topper
There are several ways you could mount this to the top of your backbox, and since you just printed and assembled this model, I'm going to assume you are crafty enough to figure out a way.
I highly recommend that you print out my Stern Topper Plate model (which is linked here) and glue this finished Jaws topper to it, making one solid and fully connected piece. The entire topper (with attached plate) can then be attached to the top of the backbox per Stern's official installation instructions using the four screws that are already there.
About The Model Photos
The assembled topper shown in some of the photos was printed using the filament mentioned above. Before assembling the topper per the above instructions, each printed model was hand painted / distressed using a variety of acrylic paints and model washes, along with a matte gloss clear coat application.
Documentation (7)


License
You shall not share, sub-license, sell, rent, host, transfer, or distribute in any way the digital or 3D printed versions of this object, nor any other derivative work of this object in its digital or physical format (including - but not limited to - remixes of this object, and hosting on other digital platforms). The objects may not be used without permission in any way whatsoever in which you charge money, or collect fees.
Comment & Rating (47)