Desiccant Sifter


Print Profile(3)

Bill of Materials

Description
If you use any type of slotted container with desiccant beads to keep your filament dry, then you've surely had little bits and pieces of the desiccant fall out through the slits - especially after you've heated the beads to recharge them. Not only is this annoying, but the fragments are abrasive and can cause all sorts of problems around your 3D printer. This Desiccant Sifter makes it easy to separate intact desiccant beads from broken beads, fragments, and dust - keeping your beads inside your desiccant container where they belong!
UPDATE March 22, 2026: (Finally!) Updated Meshes to make side edges lower for a less tight fit in the Base slots, shifted holes up a bit, staggered alternate hole rows, and rounded bottom corners more for easier insertion.
This Desiccant Sifter is composed of six printed parts that can be easily assembled and disassembled - with neodymium magnets used to magnetically attach some of the parts (as described below). It has been designed for the widely-available desiccant beads that are typically 3mm to 5mm in diameter.
In addition to the printed parts, you'll need neodymium magnets and super glue (details below). Though not required, it's helpful to also have a magnet insertion tool, such as my Magnet Insertion Tool (Low Profile), to help ensure that all the magnets are inserted with the same polarity.
NON-PRINTED PARTS:
------------------
1 - sixteen 6mm round by 3mm high neodymium magnets
2 - super glue (or similar permanent metal + plastic adhesive)
PRINTED PARTS:
--------------
1 - Base - the main structure to which all other printed parts are attached
2 - Bad Drawer - slides into the Base - a short, wide drawer to catch desiccant bead particles smaller than the slits in the Mesh
3 - Good Drawer - slides into the Base - a tall drawer to catch intact beads - holds about 1/4 liter (~1 cup) of beads
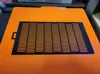
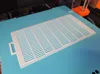
4 - Mesh - slides into the Base - separates good (intact) beads from fragments (2 Mesh slit sizes have been provided)
5 - Shield - attaches magnetically to the Base - keeps beads inside the Desiccant Sifter as they roll down the Mesh
6 - Top - attaches magnetically to the Base - makes it easy to pour desiccant beads into the top of the Desiccant Sifter
The following photo shows all the printed parts:

PRINTING + ASSEMBLY:
--------------------
All parts of the Desiccant Sifter can be printed in PETG or PLA on any 3D printer with a build area of at least 240mm wide by 136mm deep by 164mm high.
The Base must be printed with organic (tree) supports AND a support blocker near the top (not required if your printer has a really large build area) - as seen in the following screenshot and provided in the included 3MF files. Otherwise the Drawers will not slide into the Base and/or the supports will not fit on the build plate for many printers:

This is how the supports for the Base should look:

After printing the Base, you need to super glue eight 6mm by 3mm neodymium magnets into the holes on top of the Base - being sure that all magnets for the entire Desiccant Sifter are installed with matching polarity!
The Bad Drawer has a notch on the bottom that aligns with a bump inside the Base to keep the Drawer in place during use. It doesn't require any particular print settings.
The Good Drawer has a notch on the bottom that aligns with a bump inside the Base to keep the Drawer in place during use. It doesn't require any particular print settings.
Two Mesh versions have been provided - "desiccantSifterMesh-2c" has 2mm wide slits, and the larger (preferred) "desiccantSifterMeshLarger-2c" has 2.4mm wide slits. Only one Mesh is required, but you can print both and easily swap them out as desired. The Mesh doesn't require any particular print settings.
The Shield attaches magnetically to the lower section on the Base to help keep the desiccant beads inside the Desiccant Sifter as they roll and bounce down the Mesh. The Shield 3MF file includes a pause at layer 18 (z= 3.6mm) where you must insert four 6mm by 3mm neodymium magnets into the holes on the Shield - being sure that all magnets for the entire Desiccant Sifter are installed with matching polarity!
The Top attaches magnetically to the highest point on the Base to help direct desiccant beads into the Desiccant Sifter. The Top 3MF file includes a pause at layer 18 (z= 3.6mm) where you must insert four 6mm by 3mm neodymium magnets into the holes on the Top - being sure that all magnets for the entire Desiccant Sifter are installed with matching polarity!
USAGE:
------
1 - Insert the Bad Drawer, the Good Drawer, and a Mesh into the Base. Then attach the Shield and the Top.
2 - Either pre-measure the desiccant beads to be sifted - no more than about 1/4 liter (~1 cup) at a time OR carefully watch the Good Drawer as you slowly pour desiccant beads into the Top to make sure that the beads remain below the top of the Good Drawer - otherwise it will be difficult to remove the Good Drawer from the Base (if that happens, simply remove the Bad Drawer, the Shield, and the Top and tip the Base on its side to pour the good beads into another container)
3 - Remove the Bad Drawer and discard the bead fragments
4 - Remove the Good Drawer and pour the good beads into another container (note that a second pass through the Desiccant Sifter can help remove stray fragments that made it into the Good Drawer)
The following photo shows desiccant beads about to be poured into the Desiccant Sifter:

The following video shows the desiccant bead sifting process in action:
NOTES:
------
To allow modifications, I have provided STEP (.stp) files.
3MF files have been provided for Prusa Slicer (has "-Prusa" in the filename) and for Bambu Studio (has "-Bambu" in the filename).
The Base seen in the photos was printed in Prusament PETG Ultramarine Blue Transparent with a 0.4mm nozzle at 0.2mm layer height with a 5% grid infill, automatic organic (tree) supports on the build plate only, and a Support Blocker that suppresses automatic supports above layer 800 (z= 160mm) or so - allowing the Base to print on most non-Mini 3D printers.
The Meshes seen in the photos were printed in various brands and colors of PETG and PLA with a 0.4mm nozzle at 0.2mm layer height.
The Bad Drawer seen in the photos was printed in Prusament PETG Neon Green Transparent with a 0.4mm nozzle at 0.2mm layer height.
The Good Drawer seen in the photos was printed in Prusament PETG Neon Green Transparent with a 0.4mm nozzle at 0.2mm layer height.
The Shield seen in the photos was printed in Sunlu White PETG with a 0.4mm nozzle at 0.2mm layer height with a 5% grid infill and automatic organic (tree) supports on the build plate only.
The Top seen in the photos was printed in Sunlu White PETG with a 0.4mm nozzle at 0.2mm layer height with a 5% grid infill.
Be sure to check out my other designs - including universal key covers and a diverse collection of household accessories and 3D printing tools - on Printables at https://www.printables.com/@PhilCaruso/models AND on MakerWorld at https://makerworld.com/en/@PhilCaruso
Comment & Rating (62)