Skadis Table Clamp Cover Bracket


Print Profile(4)


Description
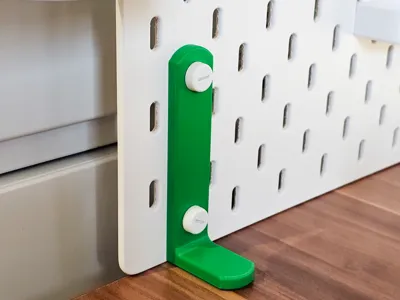
I designed this cover bracket based on community requests to match the table clamp's color to the board. However, it can also serve as a stylish accent for your desk. 4 Variants are available:
- 5mm Hole Variant: In this version, the thumb screws press against the bracket, causing them to stick out approximately 2mm more. This variant is not compatible with the Skadis Table Clamp Cover Bracket, as the extra thickness interferes with the Skadis-style bracket. However, if you want to cover the thumb screw while maintaining its original dimensions, this is the better choice.
- 15mm Hole Variant: This version provides just enough space for the thumb screw to "sink in," ensuring a flush fit. It is compatible with the aforementioned Skadis-style cover bracket, but ensure there is approximately 2mm of clearance between the table clamp and the Skadis-style bracket for a proper fit.
- Foot-Only Variant: This version is designed specifically for use with the Skadis-style cover bracket. It covers only the exposed portion of the clamp. To attach it securely, a small piece of double-sided adhesive tape is required. Compared to the 15mm Hole Variant, this design eliminates the need for any clearance between the clamp and the Skadis-style cover bracket.
- Clean Variant: Based on @Ruarc_'s idea to remix the model for a ‘stealth’ version with no visible screws.
Printing & Installation
Ensure the inside of the bracket is free from any support material. Slide the cover onto the clamp before mounting it. Make sure the bracket’s holes align with those of the clamp. Insert the thumb screws and tighten them to secure the bracket to the clamp’s back piece. Optional: To cover the thumb screw as well, use this Screw Cover:

Skadis Collection
I am constantly developing more IKEA Skadis attachments. Check out my
- IKEA Skadis Shelves, Trays and Container Collection
- General IKEA Skadis Collection
- IKEA SKADIS Boards Collection
Boost Me (for free)
Hey friends! I’m doing this purely as a passion project in the little free time I have (juggling two full-time jobs and a family). If you have questions, requests, or feedback, feel free to shoot me a DM — I’d love to hear from you when I get the chance. Boosts and support mean the world and help keep this hobby alive — thank you so much!
License
You shall not share, sub-license, sell, rent, host, transfer, or distribute in any way the digital or 3D printed versions of this object, nor any other derivative work of this object in its digital or physical format (including - but not limited to - remixes of this object, and hosting on other digital platforms). The objects may not be used without permission in any way whatsoever in which you charge money, or collect fees.
Comment & Rating (22)