Scroll Frame for Embroidery / Cross Stitch


Print Profile(1)

Description
⭐ This is a work in progress! If you print this please share your feedback so I can improve it. ⭐
This scroll frame is designed to be modular so you can make one that fits your needs. The width is flexible, and two different length stretcher bars are provided. This frame uses imperial hardware as that's the easiest to find where I am, but I'm happy to make a metric version upon request.
Hardware Needed
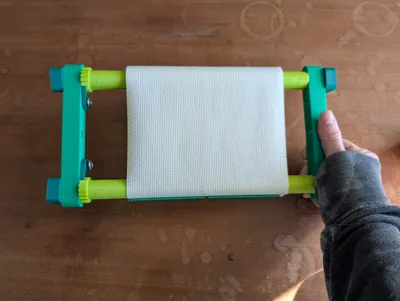
- ¼ inch threaded rod in a length 3" longer than your desired working area (model in photo uses 12" rod)
- Two ¼ inch by 1 inch long screws
- Two ¼ inch by 3/16" nuts
All hardware needs have the same threading, 20 threads per inch is common and easy to find in most US hardware stores.
Printing
You will need to print
- Two side bars
- Two mirrored dowel gears
- Two dowel caps
- Enough dowel middle pieces to make two dowels in your desired length
- Two mirrored pawls
- Enough clips to cover most of the width of your fabric
- Four plastic nuts
There are three plates of parts which are color coded for looks but can also be the same color if you prefer. The plates as they are currently set up will give you a frame with a working area of about 3" x 9". If you'd like more vertical space you can print the longer side bars, which bring the vertical space to 7". To make the frame wider just print as many of the middle dowel segment as you need. Two lengths are provided, 4.25 and 8 inch. If you find you are in need of a different length please reach out to me, I'm happy to export it in the size you need.
Assembly
- Push the pieces of the dowels together to make two dowels of the same length
- If needed, cut your threaded rod to length
- Push the rod through the dowels, centering them with at least an inch threaded rod sticking out either end
- Drop a nut into each of the two outside slots on the side bar. Using the 1" screw, attach the pawls so the lip aligns with the indentation on the side bar and the pawls point to the ends of the bar.
- Slide the side bar over the ends of the rods with the gear. The pawls should align with the gears.
- Thread the large plastic nuts over the two ends of the rods. Don't tighten them fully, just enough to keep things from sliding out
- Place the other side bar on the other ends of the rods and thread plastic nuts over the end
Use
- Place your fabric with the end about 1" past the groove in one of the dowels
- Place clips along the fabric, anchoring the tab in the groove. The “tail” of the clip should point to the outside of the frame.
- Gently rotate the dowel until the other end of the fabric is about 1" longer than the other dowel. Use your finger to push the pawl into place so it doesn't unwind
- Place clips on the fabric over the second dowel
- Engage the second pawl and gently rotate until the fabric is under tension. Do not over tighten! You don't need a ton of tension, just enough to hold the fabric smooth.
Known issues
- Sometimes the threading on the nuts is a bit too tight to easily thread onto the rod. If this happens, take one of the screws and a screwdriver. Use them to clear out the threads on the nut.
- The pawls are a bit “sticky” and may need some help falling into place on the gear
Boost Me (for free)
If you like this model please consider giving it a boost!
License
You shall not share, sub-license, sell, rent, host, transfer, or distribute in any way the digital or 3D printed versions of this object, nor any other derivative work of this object in its digital or physical format (including - but not limited to - remixes of this object, and hosting on other digital platforms). The objects may not be used without permission in any way whatsoever in which you charge money, or collect fees.
Comment & Rating (53)