Goku Daima Super Saiyan 4 fanart


Print Profile(1)

Bill of Materials


Description
Boost Me (for free)
Thanks so much for all the love showed!!! ;) Remember that a Boost is a way to support our work for future projects.

REMEMBER!!!…,
your support is what helps us publish our work on Makerworld!
So if you enjoyed printing our work, we'd be so grateful if you could contribute by liking our work,
following the page, and sharing your review and photos (we love it)!
And, of course, a little push with Boosts is the best way to keep going!
THANK YOU!!
*More from Mix&Bits on our Patreon:
Get them during all month of May!!


*UPDATE. We added a second set of hands in the last bed. This fist version produce less supports (that were hard to remove) and are easier to print as well.
-------
Hello everybody,
Ready for a new Daima fanart character?
Here is what you asked for!
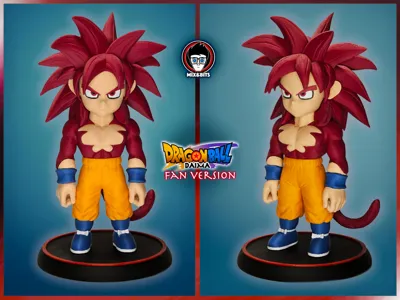
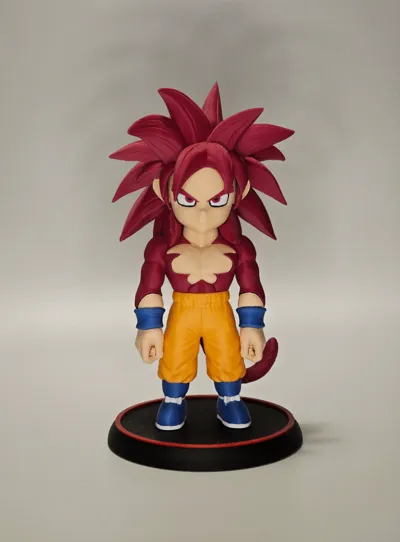
We are happy to show you Goku super saiyan 4 Daima version, all split in pieces as you like!
A little bit over 15 hours for this piece! we hope you like it!
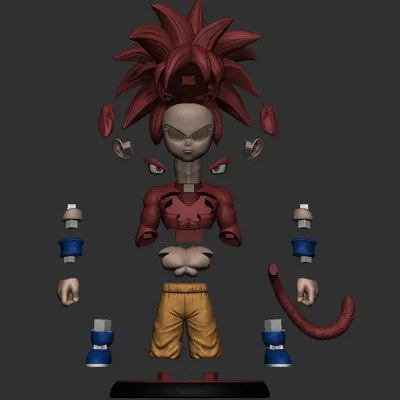
We split the parts in several beds as it was quite a challenge print all the pieces of one color together in the same bed, not for the quantity but rather for the natural difficulty of some of them.
For example, we didn't have, as usual, any problema to print the hair (we actually printed them twice), but due to the fact that we know that is a difficult print, we rather not put the together with the chest.
Also, some of you might like to print the hair in a different tone of red from the body fur (you choice), we like the colors that we chose very much and we'll make a list at the end of the description!
We happily used some of Bambu's pla new shades!! Beautiful ones!
So Let's start with the assembling!

There are several pieces just mirrored so take a good look to the pic here above!
Most tricky part is reppresented by the hands, wrist band and wrists. Once you mount the bust shouldn't be so difficult to understand where the pieces correctly go but keep in mind that the wristband have the connector (male) going toward outside (as in the pic).
Other than this you will need to follow the correct procedure to build the head in steps.
Hair must be the first piece. Attach the ears, then the lower quifs. Only after this you can procede to push inside the face, and the, lastly the eyes. Follow this steps so it won't be too difficult to fit the ears in the head.
The rest is quite straight forward!
Filament list!!
The hair and fur: we were unsure if using a dark wine red or something going more toward the pink.
Then we saw the new Bambu Plum matte color and we decided to give it a try and we were quite positively surprised!
Nice, isn't it?
As we were ordering filament from Bambu we looked for more colors.
Trousers: The mandarin matte from Bambu is perfect!
Boots and wrist band: Again Bambu! Matte marine blue!
Then white (matte!!!! it's important! needs to be matte for less bleeding and check the flush volume between black and white and red/plum and white for the eyes!!!) and black.
Skin, we are using Aurapol nude color (sorry Bambu, you need to come out with a good skin color pla!)
That's it!!!
Enjoy printing this little monkey :Dù
PS! We've just released the new model classic Dragon Ball Z collection on our Patreon! Second character: Goku kid (first episode).


License
You shall not share, sub-license, sell, rent, host, transfer, or distribute in any way the digital or 3D printed versions of this object, nor any other derivative work of this object in its digital or physical format (including - but not limited to - remixes of this object, and hosting on other digital platforms). The objects may not be used without permission in any way whatsoever in which you charge money, or collect fees.
Comment & Rating (271)