Search models, users, collections, and posts

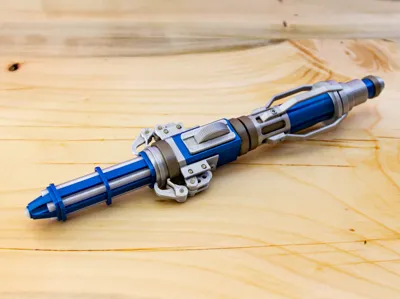
Twelfth Doctor's Sonic Screwdriver

GIF

Print Profile(1)

All
X1 Carbon
P1S
P1P
X1
X1E
A1
A1 mini
H2D
H2D Pro
H2S
P2S
H2C
X2D
A2L

No AMS  0.12mm layer
No AMS 0.12mm layer
Designer
6.9 h
5 plates
4.7(11)

Open in Bambu Studio
Boost
130
329
34
36
212
89
Released 

Bill of Materials

Maker's Supply Kits and Parts
Select all
Bambu Filaments
Select all
Iridium Gold Metallic (13400) / Filament with spool / 1 kg
Clear (32101) / Refill / 1 kg
Black (10101) / Refill / 1kg

Description

Content has been automatically translated.
Show original

Hello everyone 😊


Today, I invite you on a journey through space and time to rediscover the sonic screwdriver of the Twelfth Doctor, Peter Capaldi 🚀✹


Since discovering Doctor Who, I have been captivated by its adventures, often inspired by its benevolence, and always enthralled by its universe that has taken me on so many journeys.


Here you will find his most iconic tool, capable of opening any door (except wooden ones, sorry, I haven't updated it yet)!


Whether you are a fan of the series like me or simply curious, I hope this sonic screwdriver will immerse you in the Doctor's universe.


But before starting the print, let's do it right, let's start with the basics:


"Never be cruel, never be cowardly, and never eat pears! Remember that hate is always foolish, that love is always wise. Try always to be kind, but always be brave. Laugh loud! Run fast! Be good!"


Happy printing everyone 😊


đŸ”č Features:


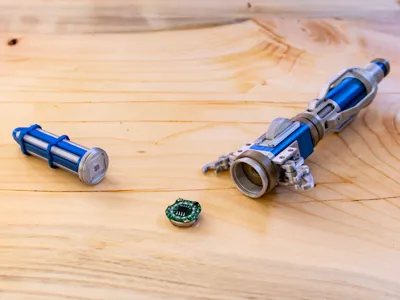
✅ Fully 3D printable, no screws
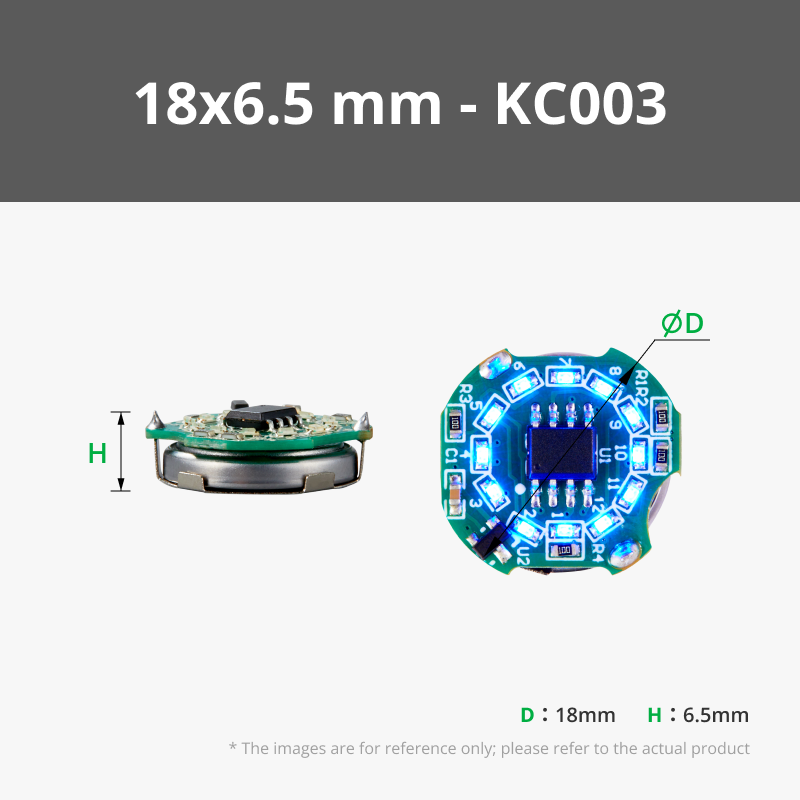
✅ Can be made luminous with the "Ring LED Magnetic Control Switch KC003 or KC011
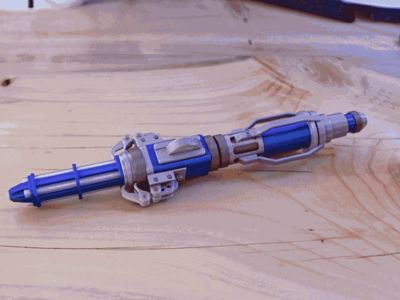
✅ Ready to print

✅ 1:1 scale replica, true to the original, normally


đŸ”č Assembled dimensions:

  • H x W x D 228.5 x 48.7 x 35.7 mm


Boost Me (for free)

If you enjoyed this model, a boost would be a fantastic way to support my work and encourage me to create even more free designs for the community! đŸš€đŸ”„ Thank you! 🙌

😎 More of my creations 😎

Roll's stand - adjustable smartphone support
The Light Bulb - Ceiling Light

Documentation (1)

Assembly Guide (1)
Notice de montage.pdf

Comment & Rating (34)

(0/1000)

My Daughter is a huge fan of Dr. Who, she loves this sonic..... I only started this print yesterday, so it will be a few more before the LED module arrives for installation. I used: Giantarm Silk PLA - Silver BL Basic PLA - Blue BL Translu PETG - Brown BL Translu PETG - Clear Elegoo PLA+ - Black The only issue I had, was with the part named "Corp métal - piÚce 5" in the 3mf. The first copy I printed broke at 4 delicate spots that connect to the top portion...... I was able to glue that back on and it's not too noticable. Then during assembly, I broke the thing in 2 more places... 'SMH' I was able to glue those up as well though.... I figured my settings were off so I attempted to print a second one, which I tossed out once it broke it the same spots. I had already glued the first one up just fine so no need to go through it again..... While not really necessary, I am going to be tinkering with my print settings to see if I can't get a stonger copy of that specific piece, as well as some slight changes to the support settings to help with removal. Fun project overall, I apprectiate your efforts on this. Kudo's & Boosts to you my friend. (The second image is just for reference. It's the part that I got clumsy with.)
(Edited)
The designer has replied
designer
1
Reply
Hello, and thank you very much for your comment 😊 Indeed, this piece is unfortunately quite fragile I considered potentially decomposing it to facilitate printing, but I haven't yet found a good way to assemble it without glue In any case, I am delighted that you and your daughter enjoy this model 😊 PS A little tip in the "Piece 14 - Translucent Tube3MF" section, I left a space inside each of the five tubes so that you can insert a strand of PETG filament to create a fiber optic effect and better transmit the light from the LED module 😊 As shown in the second image, you can see although it's very subtle that I added a strand of PETG to each tube, and four strands in the center Have a lovely day 😊
(Edited)
Show original
0
Reply
Replying to @Sebastien_Jmnz :
ohhhhh! Ok, that’s going to be even better once the “fiber optic” strands are installed. We got the led module installed, but I had to use the 3mm magnet that came with it, as well as a second 2mm in order for it to trigger the light properly. I tried 2x 3mm, but it put the magnet too close to the module so it would turn on but not change or turn off again.. thank you!
0
Reply
Lovely print with very clear instructions, however I am confused about the ring light.. I can't get it to to work.. I've attached some pictures.. put simply, the magnet has to hit or get near the led to make it light up.. I put it in the correct place so that the chip and the light is facing "up", towards the end of the screwdriver (pointing at the translucent part). But with the screws in it, the switch won't go all the way up, meaning you can't get the magnet to reach the LED unit.. also, the translucent part takes up the space where the LED goes, meaning it won't fit. unless the LED part should be glued to the ring around it, in which case you get a chunk of translucent sticking out, which means it won't look like your GIF in the description, where the translucent part is totally inside the housing... I hope that makes sense, any help would be appreciated!
(Edited)
The designer has replied
0
Reply
Hello, thank you for your comment To answer you more effectively, here is one of the project photos, and as you can see, your translucent tubes need to be inserted further to align correctly with the male screw part, this will give you more space to place your LED ring, and then simply glue the magnet as indicated in the manual 😊
Show original
0
Reply
Replying to @Sebastien_Jmnz :
hi, thanks I'll have a look at that and see if I can get it working!
0
Reply
This was such an easy print. every thing fits super wel together
designer
1
Reply
Boosted
Gorgeous! I will be able to offer it to a fan of the twelfth doctor, he will love it! Not having the right colors I used: * Dark blue from Bambulab * Silk gold from Overture * Dual color silk from Flashforge * Phosphorescent from Anycubic (glows in the dark) Assembly is not easy. I had to re-print the large bottom piece because I broke it while removing supports. The second one also broke despite 100% infill, I think it's due to the difficult-to-remove supports. So I glued it back together with superglue. Assembling steps 16 and 17 is difficult and I broke a few pins (also glued back with superglue). Finally, I had to use a hammer to force the pieces from steps 16 and 17 to fit together, even trim a little to make them fit (Bambulab P1S used, 0.4 nozzle). I can't wait to receive the light ring for the final result! Thank you for this creation which was a pleasure to assemble!
(Edited)
GIF
Show original
designer
1
Reply
Print Profile
No AMS 0.12mm layer
Kudo's & Boosts to you my friend.
profile
1
Reply
4.5/5 near perfect but plates 2 and 5 are difficult. broke many pieces during assembly but eventually got it.
0
Reply
finally done! don’t have the right blue, so I printed it in navy blue, and didn’t have petg transparent, so it doesn’t glow as much. it took a lot of tweeking, involving placing the magnet on a round support, and completely mutilating one piece just to fit in! plus the light was much more expensive then I thought. still worth it though, I will give this to my friend for a present!
0
Reply
Print Profile
No AMS 0.12mm layer
amazing! I printed it for my friend, still haven’t given it to him yet though. printed great! I’m going to paint the blue a lighter shade
0
Reply
Boosted
Print Profile
No AMS 0.12mm layer
Appreciate how intricate the model is. But kind of fragile. One The top beige part that has the big screw broke while screwing in, so I reprinted the part with 100% infill. The small hinges were really brittle and couldn't install them but it's still pretty like this. Overall I love it and cant stop holding and playing with it.
0
Reply
Boosted
Print Profile
No AMS 0.12mm layer
first off, this is an amazing model! it looks so good! It fit together great as well. The only problems I ran into stem from the print profile in regards to strength. I had to make some tweaks so that it didn’t break as I started assembling it. The long parts on plates 2 and 5 I had to print several times because the screw part came off the body, once I took the infill up to about 50-60% it stopped breaking. Thank you for making this model!
profile
2
Reply

License

This user content is licensed under a Standard Digital File License.

You shall not share, sub-license, sell, rent, host, transfer, or distribute in any way the digital or 3D printed versions of this object, nor any other derivative work of this object in its digital or physical format (including - but not limited to - remixes of this object, and hosting on other digital platforms). The objects may not be used without permission in any way whatsoever in which you charge money, or collect fees.