AmScope Linear Rails


Print Profile(1)

Description
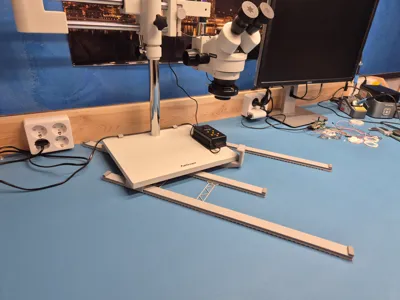
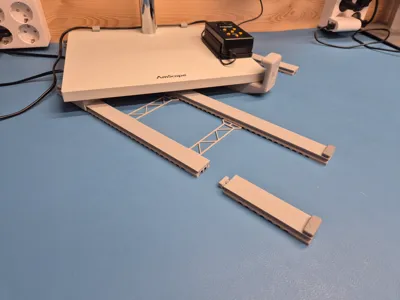
This is a set of linear rails that I designed to use with my AmScope microscope for easy movement on the bench to get it out of the way when it’s not or in use.
Other brands of microscopes may work, depending on the size of the base plate and feet.
This design was made for the AmScope base plate with the following dimensions:
Base size: 330 x 280 x 16 mm
Feet cc: 275 x 225 mm
Feet height: 10mm
Feet dia: 17/14 mm
Features
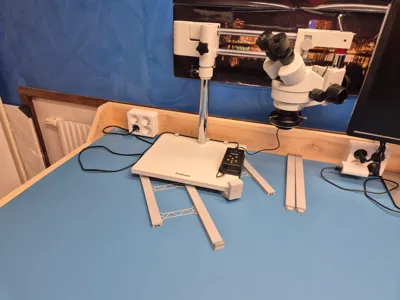
- Three sets of rails are supporting one feet each on the microscope base
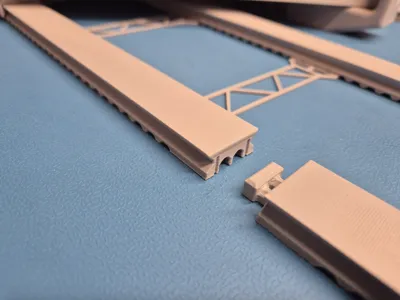
- Each set of rails are made of two parts (one Type1 and one Type2) combined to get any total length of 200mm, 300mm, 350mm, 450mm or 600mm.
- A handle is supporting the fourth/narrowest feet on the microscope base
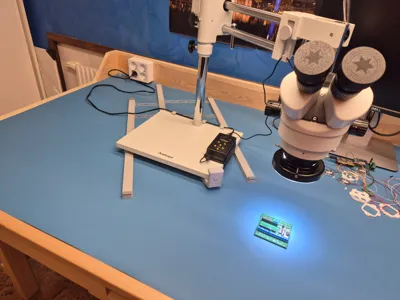
- The rails can easily be separated if more bench surface is needed when the microscope is not in use.
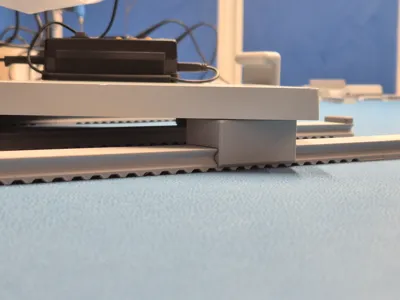
- The rails are recommended to be held in place by the parallel locks as the rails tend to move on the bench if not perfectly parallel aligned.
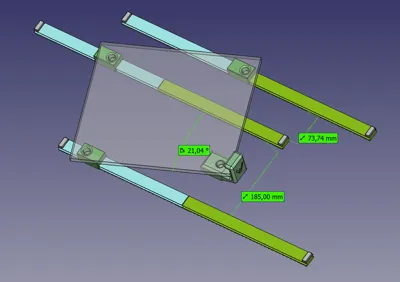
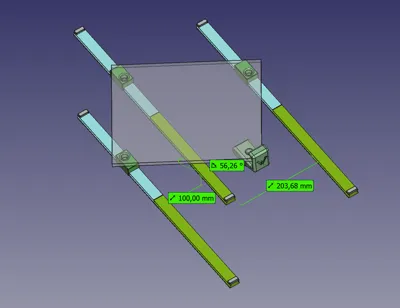
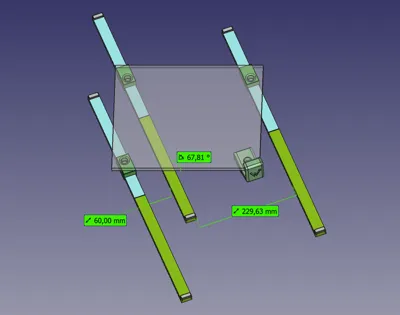
Three sets of length/angels are available to those from. (only one set needed)
- 60mm/230mm = 68 deg
- 100mm/204mm = 56 deg
- 185mm/74mm = 21 deg
There are a lot of parts here... Do I need it all? What should I do and what should I print? Help!
You don’t need to print all parts as there are several different sizes to allow some customization.
- First, estimate the total length of the rails needed by measuring the distance from the place that the microscope is stored to the place when it’s used.
- Choose one Type1 and one Type2 rail that combined gives the required length.
(eg if 450mm is needed you can use a 300mm Type1 and a 150mm Type2. If 300mm is needed use a 150mm Type1 and a 150mm Type2 and so on)
- Print three sets of the desired rails (for a total of six parts).
- Print three “slides” and six bumpers
- Mount the three sets by snapping the Type1 and Type2 rails together. Mount one “slide” on each set of rails and put the bumpers in place.
- Align the rails by roughly putting them in place and place the microscope base plate on top of the “slides”. The feets on the base plate shall be placed in the holes on “slides”. It’s recommended to remove the microscope and just use the base plate for easier aligning.
- With the rails at the desired place and angle, measure the distance between the rails and print the parallel locks with the length closest to the measured distance. The number of locks needed depends on the rail length, but two of each is probably a good start.
- Ensure that all rails are correctly placed in relation to each other and mount the parallel locks. They can usually be placed by lifting the rail a little and just slide in the lock underneath.
- As an option/alternative to the parallel locks there are a set of spikes that can be used to get better grip on a softer surface if needed.
- Print the handle and place it under the fourth feet of the base plate.
- Put the microscope back on the base plate and enjoy the easy movement! 🙂
Printing tips
Rails, slides and parallel locks
- PETG is recommended as it has quite low friction and allows some flexing for the snapping connections.
- Standard settings 0,2 mm layer height
- Ironing on sliding surfaces for rails and slides is recommended for smoother and quieter function.
Rails: Ironing on “Topmost surface”
Slides: Ironing on “Top surfaces”
- Slower speed will often improve print quality. I use a flow rate of 12mm³/s for PETG.
- No support needed
- Dry before print!
Bumpers
- TPU is recommended, but PETG or even PLA will probably work quite well if it's not hit too hard.
- Standard settings 0,2 mm layer height
- Slower speed will often improve print quality. I use a flow rate of 5mm³/s for TPU.
- No support needed
- Dry before print!
The handle
- PLA or PETG can be used
- Standard settings 0,2 mm layer height
- Support is needed
Post processing
- Some attention to the interlocking sections between the Type1 and Type2 rails are recommended to ensure that the rails can be easily snapped together with no height differences. The edges can easily be cleaned with a small blade knife if necessary.
- Ensure that all sliding surfaces and edges are clean and smooth.
- If the rails are used on a hard surface, some kind of rubber or furniture paws can be glued under the rails and the handle for smoother function.
Dictionary
As I initially didn't intended to publish the project the filenames are in Swedish, but as it turned out quite well I thought it hopefully may be useful to some others too.
Even if I don't think/hope it will cause any major issues I’ll bring a little “dictionary” for translation. 🙂
Skena = Rail
Vagn = Slide
Stoppkloss = Bumper
Handtag = Handle
Parallellås = Parallel lock
Dubb = Spike
Comment & Rating (0)