♪ Customizable Helmholtz Resonator ♪


Print Profile(1)

Description
♪ The Helmholtz resonator ♪
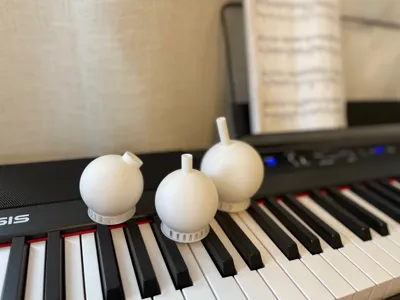
This is a Helmholtz resonator. It is a musical instrument/tool that anyone can use, requiring no skill at all! It takes sounds and vibrations from the air and amplifies them in a chamber. These vibrations resonate throughout the chamber and then are emitted through the neck at a specific frequency (high frequencies sound “squeaky” and loud, and low frequencies sound deep and are harder to hear). The model is customizable, so you can customize it to your liking or a specific frequency. A fun little idea you can do with these is using the supports for the model as a stand, which you can see in the pictures. You can even use it as a spinning top (another fun little thing I found out)! I have also made a parametric model in Fusion 360, if you prefer to further your customization. I have also included a frequency calculator in a Python script below if you want to test your frequency. If you like this model, be sure to like and download it! It would be even better if you gave me a boost as well! Thanks :)
How to Use
To use the Helmholtz resonator, you need to know what the parts of it are. Here is a diagram of a Helmholtz resonator:

The opening is where vibrations/sounds are emitted and inputted. Wider openings have higher frequencies, while narrow openings have lower frequencies.
The opening/neck/tube is where vibrations/sounds travel to and from the cavity/chamber. Longer necks have low frequencies, while shorter necks have higher frequencies.
The cavity/chamber is where the resonance occurs. A larger chamber produces low frequencies, while
small chambers produce high frequencies.- The equation shown at the bottom of the graphic is to calculate the approximate frequency produced by the Helmholtz resonator.
How to use the resonator:
Step 1: Put your lips on the opening to cover it. If the opening is too wide, try to position the opening below your bottom lip.
Step 2: Tilt the Helmholtz resonator at a downward angle, so that there is a gap between your upper lip and the opening.
Step 3: Blow into the tube/neck from the opening, but make sure to not blow too hard. You'll need to adjust the angle and strength/focus of your breath in order to get the best sound. You'll know when the resonator is working properly when a hum comes from it at a clear pitch. You may need to change the position of the resonator on your mouth if there is no clear sound coming out.
How to customize in Makerworld:
When you click the “customize" button in MakerWorld, you'll be taken to a page like this. Scroll through the ”parameters" tab on the left.

There are 5 parameters listed there. Their description is shown below:
- Chamber D determines the total chamber diameter (mm)
- Wall T determines the chamber's wall thickness (mm)
- Neck D determines the neck's total diameter (mm)
- Neck L determines the total neck length (mm)
- Resolution determines how high quality the model is (# of faces becomes increased or decreased)
Before you adjust anything, be sure to read through the “Notes” and “Limit log” listed in the "Code tab on the left. Reading the limit log is especially necessary to make sure that your model doesn't bug out, as it states the limits of certain parameters that must be kept for them to work properly! Once you're ready, change some of these parameters you've scrolled through to customize your model. Once you're satisfied, click "download" to save your model.

Now you have successfully customized your Helmholtz resonator! If you want to take this further, you can use the steps below to calculate your frequency, simulate your frequency, and find your exact frequency.
How to use the frequency calculator
The frequency calculator I made will tell you the frequency of your Helmholtz resonator. Go to this website:
https://www.online-python.com/Z0pFmknCgW
(if you want to use something else to run the Python code, like the VScode application, which I use primarily, you can go to the included website and copy-paste the code into your coding application)
From there, click the green “run” button and answer all the questions it gives you. Afterward, it will provide you with a frequency:
(Image below is showing script from the Beta version. Your script will look different. This script is not allowed for reposting or commercial use. Only personal use is permitted. Contact me for more info)

The frequency depicted in the image was 247.16 Hz based on the calculations in the code. Just know that this won't be exact, as things like rough surfaces, material quality, print quality, CAD precision, etc. can affect the frequency.
If you want to fine tune for a specific frequency (find a specific frequency), go to this website:
Online Tone Generator - generate pure tones of any frequency
Input your generated frequency and compare it to the frequency you made from your printed model. Higher frequencies sound “squeakier” while lower frequencies are deeper and lower in tone. Adjust your model to generate the desired frequency if needed.
If you want to know the exact frequency you printed model makes, go to this website:
Online Pitch Detector - Easily find the pitch of any sound
Select “start pitch detection” and play your Helmholtz resonator. It should give you a mostly accurate frequency of your Helmholtz resonator. Adjust your model if needed.
I hope you enjoy this model and have fun playing around with it! ♪♪
License
You shall not share, sub-license, sell, rent, host, transfer, or distribute in any way the digital or 3D printed versions of this object, nor any other derivative work of this object in its digital or physical format (including - but not limited to - remixes of this object, and hosting on other digital platforms). The objects may not be used without permission in any way whatsoever in which you charge money, or collect fees.
Comment & Rating (7)