eSUN Silica Desiccant Core Drybox⧸Wiry v1


Print Profile(4)


Bill of Materials


- None x 1: Have fun!
Description
 Collection Tip: Bambu Lab A2L: A2Lineage Design Journey
The A2Lineage Design Journey combines proven designs with new developments created specifically for the A2L platform.
Existing models only become part of this collection after verification on the actual machine. Compatibility is never assumed and every model must earn its place through testing and real world use.
New designs will join the collection as the platform evolves, while established favorites transition only when they truly meet my standards. |
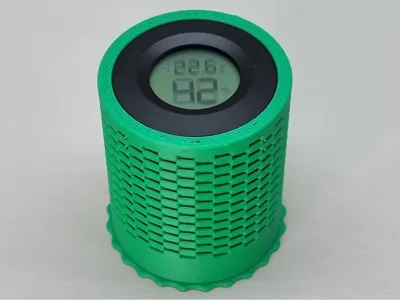
Ultra light, fast printing and precision fit desiccant container for eSUN cardboard spools with full height capacity, rock solid design and optional round hygrometer integration.
 Designed as part of an evolving system for filament storage and moisture control.
Each desiccant holder is conceived, printed, and tested in real day to day use, not just tuned for screenshots. Airflow, capacity, refill handling, AMS compatibility, and long term durability are explored across multiple iterations. Spool Desiccant Collection: Spool Drying ⧸ Dry Filament
Follow me If dry filament matters to you. A like or a boost directly supports further testing and new designs driven by daily use, not trends. |
Yet another spool silica gel desiccant container? Not quite the case.
This container fits the eSUN cardboard spools precisely, prints fast, is more stable and uses less material compared to other models.
This model is part of the Spool desiccant holders collection. Do you have a spool that is not in the collection? Let me know and I'll take care of that!
Bold claim, but I have tested the most popular models:
- If they are more stable, they use significantly more filament.
- If they are printed faster, they are less robust or borderline squishy.
- If they use less filament, they are smaller. This model with the same dimensions is lighter.
Do the test yourself, a print takes just over half an hour (without preparation time) and uses just over 15 grams of filament (with Bambu Lab Basic PLA).
Particularly suitable for storing filaments in large boxes. This model is also great for vacuum sealing filament rolls in bags.
Did I mention that a round hygrometer can also be used as an option?
Attention, use the right print profile for your nozzle. The wall thickness of the model is optimized for the respective nozzle diameter. I recommend a 0.4 mm nozzle for unfilled filaments and a hardened 0.6 mm for carbon-, glass-, wood fiber or filaments containing particles.
0.6 mm nozzles can of course also be used with unfilled filaments if the model is to have extra oomph, but in my opinion this is not necessary.

Filament list
Choose a filament suitable for your temperature range. The AMS 2 Pro heats up to 65 °C, probably even warmer in some places. PLA already deforms massively here, I have tested this. Furthermore, PLA is not suitable for functional parts with thin walls, as it tends to become brittle.
I have divided all filaments into four tiers according to their heat deflection temperature, whereby each higher tier can of course also be used for all lower tiers. If you use a filament that is suitable for your temperature range, the desiccant can remain in the spool during filament drying and be regenerated along with it.
I strongly advise against any PLA.
I recommend PETG HF for AMS classic and general usage.
I recommend ASA-CF for the above, AMS 2 Pro and AMS HT.
I recommend PAHT-CF for the above, blast drying oven and other filament dryers, up to 150 °C*.
*Please note that silica gel beads with indicator are typically regenerated at 110 to 120 °C and the indicator can be destroyed at temperatures above 150 °C. I have tested regeneration at 65 °C and 85 °C, and this is sufficient if carried out occasionally.
I use 3DLAC Stick on the textured PEI build plate as an adhesive and release agent for PETG HF and ASA-CF. For PAHT-CF I use the smooth PEI build plate and Magigoo for PA as adhesion promoter.
Tier C 45 °C: Bambu Lab AMS and direct
- 52 °C PLA Galaxy (brittle, unsuitable for this model)
- 53 °C PLA Silk Dual Color (brittle, unsuitable for this model) (only 0.4 mm nozzle)
- 55 °C PLA-CF (brittle, unsuitable for this model) (0.4 mm or 0.6 mm hardened nozzle)
- 55 °C PLA Glow (brittle, unsuitable for this model) (0.4 mm or 0.6 mm hardened nozzle)
- 55 °C PLA Sparkle (brittle, unsuitable for this model)
- 56 °C PLA Marble (brittle, unsuitable for this model)
- 57 °C PLA Basic (brittle, unsuitable for this model)
- 57 °C PLA Wood (brittle, unsuitable for this model)
- 58 °C PLA Matte (brittle, unsuitable for this model)
- 60 °C PLA Silk+ (brittle, unsuitable for this model) (only 0.4 mm nozzle)
- 62 °C PLA Metal (brittle, unsuitable for this model)
Tier B 65 °C: Bambu Lab AMS 2 Pro
- 69 °C PETG HF - recommended by the designer
- 70 °C TPU 85A / TPU 90A (soft, unsuitable for this model) (only 0.6 mm nozzle)
- 70 °C TPU 95A HF (soft, unsuitable for this model)
- 70 °C TPU for AMS (soft, unsuitable for this model)
- 74 °C PETG-CF (0.4 mm or 0.6 mm hardened nozzle)
- 74 °C PETG Translucent
- 87 °C ABS
Tier A 85 °C: Bambu Lab AMS HT
- 99°C ABS-GF (0.6 mm hardened nozzle recommended)
- 100 °C ASA (0.4 mm nozzle recommended)
- 110 °C ASA-CF (0.6 mm hardened nozzle recommended) - recommended by the designer
- 113 °C PC-FR
- 117 °C PC
Tier S 180 °C: Convection Oven
- 186 °C PA6-CF (0.6 mm hardened nozzle recommended)
- 186 °C PA6-GF (0.6 mm hardened nozzle recommended)
- 194 °C PAHT-CF (0.6 mm hardened nozzle recommended) - recommended by the designer
- 205 °C PET-CF (0.6 mm hardened nozzle recommended)
- 227 °C PPA-CF (0.6 mm hardened nozzle recommended)
- 264 °C PPS-CF (0.6 mm hardened nozzle recommended)
Inspiration
Inspired by the clever structural wall design of this Model, by @Darwinian, this version was built entirely from scratch in parametric OpenSCAD, optimized for faster printing, lower material usage, and spool-specific precision fit with optional hygrometer integration.
Passion for detail
Every detail was not just put on the literal, but on the actual scale. The various approaches were then tested in practice for both suitability and stability. The solutions chosen are not new, but they are new in this model combined.

The walls of the container are largely made from a single wall line.
This saves both filament and printing time, and there is practically no stringing in the model. A retract and z-hop are only required at layer changes or when printing several models. In addition, the seams can be practically invisible.

A close-up of the wall structure.
The stacked layers on the spokes, between which the outer walls following the radius of the circle as secants are drawn, are clearly visible.
All lines are straight, so the short bridges are printed perfectly without support material
The slight rounding of the lines is due to the optimisation of the slicer and the printing speed.

Rectilinear infill is generated using object modifiers to create the mesh in the container base and lid.
Rectilinear infill has the advantage that no paths are crossed during printing and therefore the nozzle does not scratch through ready printed material. This infill is also robust, light and quick to print. Three bonus points.

The cut-out for the round hygrometer uses exactly the right amount of material.
A clamping mechanism? The hygrometer already has that. Recesses? Not necessary. The hygrometer sits embedded and flat with the floor without the need for support material. With the right design decision, support material can often be avoided.

Threads optimized for 3D printing.
The threads are designed with an flank angle of 45° to ensure easy printing and maximum durability.
A blunt start and a blunt end save material and make it easier to find the thread when screwing in.
The tolerance was chosen so that the threads can be printed with any properly adjusted printer and any Bambu Lab printer anyway.

Arachne versus classic wall generator? Not really a question.
Well visible in Bambu Studio: Arachne uses ‘Inner wall’ to fill gaps, Classic uses ‘Gap infill’. For this reason, and because Arachne can calculate walls much more efficiently, classic is a whole 8 minutes slower.
Boost Me (for free)
Support for this model helps fund 3D printing in a local school in Lower Saxony, Germany. Contributions go toward printers and filament for student maker and robotics clubs, including preparation for "Jugend forscht" competitions. Likes, follows, and boosts help increase visibility and indirectly support hands-on technical education.
Translation Notice: I am not a native English speaker. I write all descriptions in English to ensure the best automated translation into other languages. To make the text smoother and more readable, I use language tools to refine my wording.
Bill of Materials Notice: All filaments shown in the pictures are listed in the Bill of Materials.
Purchases made via the BOM support my work through the MakerWorld Commission Incentive at no extra cost to you.
License
You shall not share, sub-license, sell, rent, host, transfer, or distribute in any way the digital or 3D printed versions of this object, nor any other derivative work of this object in its digital or physical format (including - but not limited to - remixes of this object, and hosting on other digital platforms). The objects may not be used without permission in any way whatsoever in which you charge money, or collect fees.
Comment & Rating (68)