Steel String Mandolin (Take 2)


Print Profile(1)

Bill of Materials


- Gotoh M120 mandolin tuners x 1:
- loop-end mandolin strings (light10-34) x 1:
- M6 nut (or ¼-20 nut) x 1:
- M6 washers x 2:
Description
Steel strings are used for many musical instruments because they provide the clarity and projection just not possible with synthetic strings. This is especially true for a bluegrass instrument like the mandolin that has to compete with banjos and fiddles. But the extreme string tension of steel strings makes for a unique design challenge.
This is my second design for a steel string mandolin. It features the use of PET-CF for increased stiffness and dimensional stability under the 150 lb combined string tension. The use of PET-CF eliminates the need for additional metal ribs, making it much easier for the novice to construct.
The other big simplification is that I integrated the frets right into the fretboard, eliminating the need for any special luthier skills. Steel strings will eventually wear down the 3D printed frets, but the fretboard screws on (rather than traditionally being glued on) so that the fretboard is easily replaceable.
Lastly, I've included a wall bracket specifically contoured to fit the neck and headstock of the mandolin.
Hardware Items Required
1 set Gotoh M120 mandolin tuners (~$35)
1 set loop-end mandolin strings (light gauge 10-34)
8 M3 x 8mm socket head screws - Maker's Supply P/N AA037 (or 4-40 x 3/8")
9 M3 x 5mm flat head screws - Maker's Supply P/N AA187 (or 4-40 x ¼")
1 M6 x 35mm socket head screw - Maker's Supply P/N AA225 (or ¼-20 x 1.25")
1 M6 nut (or ¼-20 nut)
2 M6 washers
2 M4 x 25mm button head screw - Maker's Supply P/N AA069 (or 8-32 x 1")
Supplies: 2-part epoxy (15 - 60 minute set time), isopropyl alcohol for epoxy cleanup, rags
Tools: spring clamps, screw driver, hex wrenches
Printing
I highly recommend you use the 3MF file as provided. There are a lot of subtle details (choice of plate type, filament types, variations from default settings) that are kind of important. Also, a couple of the objects (the body and back) are actually multi-part objects with specific settings (perimeters, infill, etc.) required for each part.
Assembly
1. Start by pressing the decorative squares into the headstock as shown in the second photo above. If they seem like they might come loose, use a dot of superglue or epoxy to hold them in place.
2. Glue the headstock to the neck using your 2-part epoxy as shown in the 3rd photo. Use plenty of glue to make sure any gaps are filled. Clamp the joint while the epoxy sets. There will be some squeeze-out of the glue but it can be wiped away cleanly with isopropyl alcohol on a rag. (This is where you really need the minimum 15 minute set time.)
3. Screw the fretboard to the neck using the flathead screws. The screwheads are recessed so that you can install the cover dots over them. There are two dots that match the color of the fretboard that go into the holes at the first fret. The 9 other contrasting dots go in the rest of the holes. (See the 4th photo.) The dots should press in lightly as you'll need to remove them to change out the fretboard if necessary. If they don't fit nicely, reprint them scaled up or down slightly.
4. Glue the bezel into the sound hole with epoxy. You don't need much glue, so there shouldn't be much squeeze-out to clean up.
5. Apply a bead of epoxy to the lip on the back and then glue it onto the body. Here, you'll want an ample amount of glue to fill any gaps. You'll need plenty of rags and alcohol to wipe off excess glue as this can get a little messy. Secure the back with strips of 25mm wide masking tape every 75mm or so around the perimeter.
6. After the epoxy has set for at least 24 hrs., you can bolt the neck to the body using the M6 / ¼-20 bolt, washers and nut. It's a little tricky holding onto the nut through the sound hole, but it's a little easier if you hold the mandolin vertically with the neck pointing downwards. Make sure the nut is pretty snug as the entire 150lb string tension is countered by this bolt.
7. Install the ferrules for the tuners in the head stock and screw the tuner plates into the underside of the headstock.
8. Install the 8 M3 / 4-40 screws in the holes in the soundboard. 4-40 screws go in without any tapping, but you may need to use an M3 tap (or drill the holes a little larger) to get M3 screws started. (See the 7th photo)
9. Use the M4 / #8 screws to install the strap pins at the tail and heel of the neck.
10. You are now ready to string up the mandolin. Start by installing the one G string and one E string. While the strings are still pretty loose, slip the bridge under the strings. The scale is 13.5" (343mm) so you can measure from the 0th fret to the bridge to get the approximately correct position. Once these two strings are fully tensioned, Play each string open and then fretted at the 12th fret. If the note at the 12th fret is sharp or flat, slide the bridge up or down until the note at the 12th fret is exactly 1 octave above the open string.
11. Check the action of the strings at the 12th fret - is should be about 1.5mm. If the action is too high, you can take a file to the string notches in the bridge to lower individual strings.
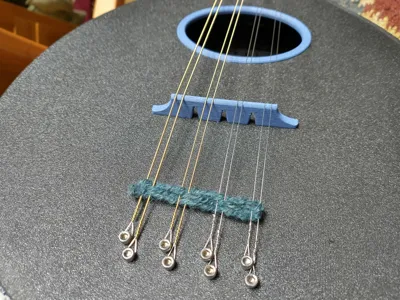
12. Lastly, the section of the strings between the bridge and the loop-ends can created some unwanted tones. To damp these out, you can weave a piece of string or yarn through the strings as shown in the 7th photo.
Comment & Rating (34)