Search models, users, collections, and posts

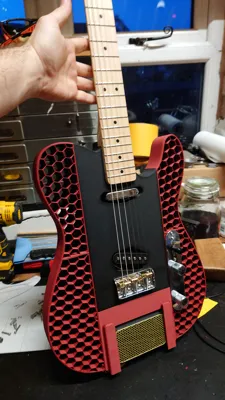
Modular Guitar (Built-in Amp!)

Print Profile(2)

All
P1S
X1 Carbon
X1
P1P
H2D
A1
H2D Pro
H2S
P2S
H2C
X1E
X2D
A2L
A1 mini

0.2mm layer, 10 walls
Designer
31.2 h
6 plates
4.5(4)

Dowels
Dowels
Designer
1.1 h
2 plates

Open in Bambu Studio
Boost
972
1866
63
45
560
16
Released 

Bill of Materials

Maker's Supply Kits and Parts
Select all
D10x3 mm Round Magnet (20PCS) - CA009
50mm Wire Pair with SH1.0(5PCS) - IC005
7mm Round Magnetic Connector (2Pair) -XE003
Bambu Filaments
Select all
Iris Purple (14700) / Filament with spool / 1 kg
List other parts
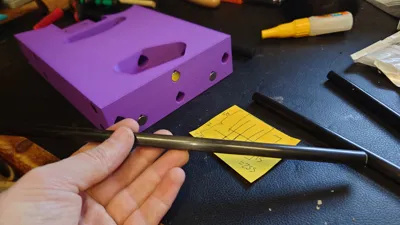
  • Rods/Dowels x 3: 10mm_Diameter

Description

VERSION 2 OUT NOW!!


I'm an amateur luthier, so thought I would try my own take on a 3D printed guitar! The main aim of this was to create something which would last. So central to the design is the ability to strengthen the print with 10mm rods. These could be wooden dowels or metal tubes. I opted for carbon fibre rods - they are dimensionally accurate and very stiff. My concern was that (if using PLA) the body could creep over time - causing the guitar to go out of tune and eventually structurally fail. I've not printed any other guitars because I always worry about this! So hopefully the carbon rods and the string-through design avoid this. 


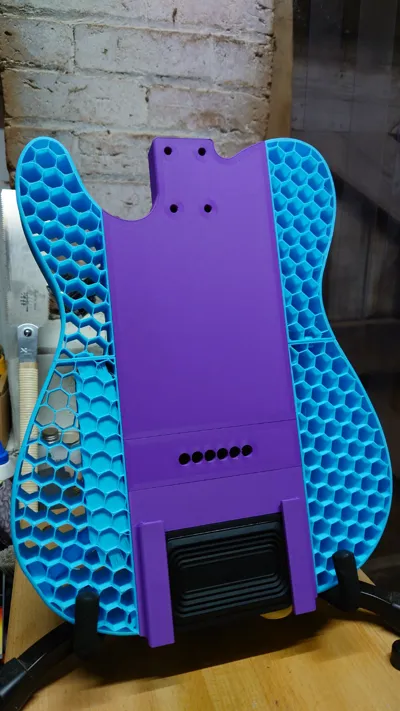
I also wanted the guitar to be modular, seeing as it needed to be printed in sections anyway. So everything attaches magnetically and you can swap out each piece for different colours/patterns/hardware. This will add to the longevity; if you find that a part has begun to creep, then you can print a new one, rather than the entire guitar. 


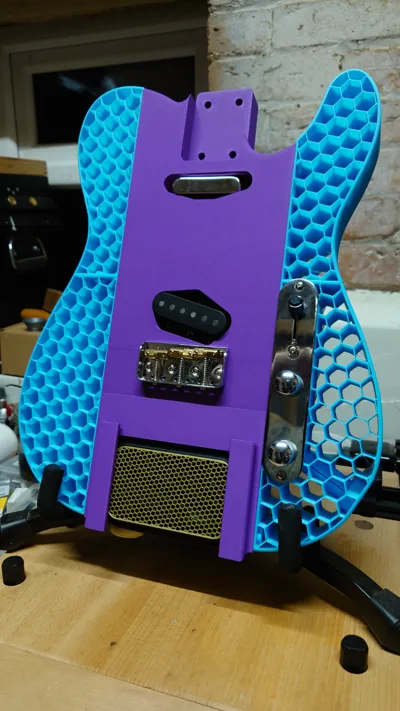
Finally, as it was already modular, I thought I would have some fun with it! The central module would have just been blank. So, instead, I made it fit a Positive Grid Spark Go amplifier. This turns it into an excellent travel guitar! 

(The Fusion 360 file contains a normal central module if you would prefer this)


You will need:

10mm x 3mm N52 grade magnets (x58)

10mm diameter rods (x3)

 7mm Round Magnetic Connector With SH1.0 Connector (2Pair) | Bambu Lab UK Store 

Electronics (telecaster neck and bridge pickups, telecaster control wiring harness)

Fender-style telecaster neck. 

Neck screws/bolts

Tuners

Strings! 


Cut the rods to length -1 x  255mm  and 2 x 240mm

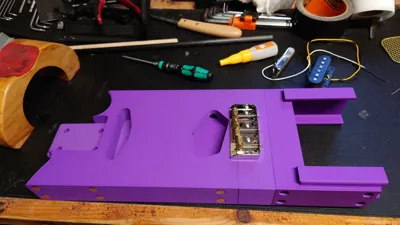
Super glue the magnets into place to ensure they do not come loose. Make sure they press in flush with the surface. 


The only slight problem for the modular aspect is the electronics. Because I wanted this to be easily assembled with off-the-shelf parts, this necessitated using a traditional telecaster-style control cavity. So there will be wires running from one of the side modules to the “core” module. I have utilised some wago connectors as a quick disconnect. But ideally I would like there to be some form of magnetic pogo pin connector. When I have figured something out I will update the design! 


I have added the Fusion 360 file so that you can customise the modules to fit your hardware. In theory it should work with standard telecaster hardware - whether from a cheap kit or an old donor guitar. But there can be variations in neck pocket depth/shape or the position of screw holes. Speaking of screw holes…these are not modelled for the same reason. One exception is the holes for the strap button; I wanted this to be stronger so it would not rip out. However, if you use the included print profile, the walls should should be thick enough for you to drill the holes for pickup mounting etc.
I do plan on creating a pickguard for this. But it will need to also attach magnetically (to keep things modular) so will require a different model. I'm sure I will end up creating more modules for different functions and shapes if this gets popular. Watch this space!


Finally, I do highly recommend using the included print profile. These are big pieces so tweaking was needed to avoid warping - especially if you want the hexagonal pattern on the sides. This is achieved by deleting the top and bottom layers. This has the bonus that you can easily change to different patters by choosing other infill types. However, at low infill densities it will struggle to grip the plate. Printing a solid piece would avoid this, though. I would also very much recommend using a fibre-reinforced filament. I used PLA-CF for the final version and this really helped with keeping dimensional accuracy - leading to everything fitting properly when joined. 


Comment & Rating (63)

(0/1000)

Cool Projekt. I modified the left and right modules. Printed in BambuLab PLA-CF
The designer has replied
designer
1
Reply
That looks SO GOOD!! Please upload the profile for others. Love the look of that! I've changed the licence so you can post remixes if you wish.
(Edited)
0
Reply
Replying to @alxtech :
Cool. Thanks for changing the typ of license. The next days I'll upload the remixed version.
designer
2
Reply
Boosted
Great project that made someone happy as a great birthday gift! (Inspired by the model from @gabber130779 Thanks !)
The designer has replied
Show original
designer
1
Reply
Wow that's incredible!! How did you go about making the LED module? That looks absolutely brilliant!
(Edited)
0
Reply
Boosted
Replying to @alxtech :
It’s thanks to you! I 3D-printed front and rear plates to close off the upper section. Inside, I added a color LED strip that reacts to sound, connected to a rechargeable 18650 battery with a USB-C charging module. For the front plate and lettering, I simply recessed the shape with the “Daddycaster” text, then printed a transparent PETG “Daddycaster” insert that clips into the front plate.
0
Reply
This is absolutely brilliant! I particularly love the inclusion of the Spark Go in the body. I don't see any pics of it with the neck on and fully strung up. Have you actually finished it and tested it under string tension?
The designer has replied
0
Reply
Yes! (sort of) I had it strung up for a few days (and it worked great). But that neck is now back on the original guitar. So it has been tested but not long-term yet. I'm disappearing on holiday soon. But when I'm back I plan to test a version 2 with several improvements. p.s. - thank you for the boost!
2
Reply
Replying to @alxtech :
Looking forward to V2. I've been looking around at telecaster kits to get the hardware, but they're surprisingly pricey! BTW where did you get that bridge? it's not the standard tele bridge and could be tough to source.
designer
1
Reply
Replying to @Nduanetesh :
I found the same, here in the UK. I think the most cost effective is finding a used Squier on ebay. By the time you've bought cheap hardware and the filament etc. you're basically at the cost of a new Squier tele anyway. The bridge I used is one by Wilkinson but there are other "short bridge" designs out there. A normal tele one should fit. I just wanted to be able to take the pieces apart easily.
0
Reply
Print Profile
0.2mm layer, 10 walls
Other Issues:upper surface defects.
The profile uploader has replied
0
Reply
Thanks for the feedback! Have you got any photos? It sounds like you may have had some warping, but would be good to properly diagnose so I can adjust the profile.
(Edited)
1
Reply
This is almost certainly a warping issue, or perhaps over/under extrusion, not a problem with the model or profile.
(Edited)
profile
1
Reply
it didn’t pull up from the bed so I don’t think it’s warping. but yeah could be under extrusion. love this model tho I’m excited to put it together and play it.
(Edited)
profile
1
Reply
I haven't printed this yet but plan to eventually. I want to support those who make such high quality, well-thought out and useful models and providing the f3d source is going above and beyond!
The designer has replied
designer
3
Reply
Very much appreciated, thank you! I do plan on creating a version 3 once I am finished with my other guitar project. If there's anything you'd like to see then let me know!
0
Reply
This is amazing work! I would only ask that if you are planning to do a new version, consider making the modules/parts small enough to be printed on an a1 mini. I want to print a guitar but no one designs one that will fit a smaller printer :D
designer
3
Reply
This
0
Reply
Would you be able to list the specific hardware and electronics you used? I want to make sure I have all the right parts.
4
Reply
If you wanted longevity, why not just print at 100% infill? It would just as tough if not more tough than a wooden guitar and it would never creep. Edit: Sorry, regardless of my comment, you did a heck of a job and should be wicket proud of this! It is fantastic!
(Edited)
The designer has replied
designer
1
Reply
Haha no worries, great question! The honest answer is just an abundance of caution. Ultimately you can whack the settings up to 100% and forego the rods if you want. I would still use some kind of dowel/rod to make sure the bridge module can't rotate. But it might well be absolutely fine if glued. Another decent option might be glueing everything apart from the amp module - it'd save on a lot of magnets! I'll be uploading another profile with some simple printable dowels to facilitate this. There will probably be an updated version too, now I have had some time to test it more.
2
Reply
From a stress-bearing structure perspective, 100% infill does not necessarily guarantee superior strength ultimately
Show original
designer
8
Reply
100% infill will cause the entire part to deform severely due to cooling stress Basically only printers with active chamber temperature control can print it FDM printed parts primarily rely on the walls for strength You can try setting the number of walls to more than 20 and the top and bottom layers to more than 5
Show original
1
Reply
where do you get the built in amp?
The designer has replied
0
Reply
It's the "Spark Go" by Positive Grid
0
Reply
Replying to @alxtech :
cool, thanks
0
Reply
great job! this is super cool. I also have a project to integrate the spark go amp in a guitar, but I wanted to have the guitar body be the casing for the electronics, need to open my amp to see how everything is laid out and if it'll be doable... these magnetic connectors will be game changing too!
The designer has replied
designer
1
Reply
That would be awesome to integrate it even further. I'd love to see that! One of the things I want to fix with v3 is the access to the power button. If you could just relocate it then that'd be even better.
(Edited)
0
Reply

License

This user content is licensed under the MakerWorld Exclusive License.

You may create derivative works based on this object, provided that all such derivative works are published exclusively on the MakerWorld platform and include proper attribution to the original creator. You may not share, upload, host, distribute, or publish this object—or any derivative work of this object—on any other digital platform, marketplace, or distribution channel. Commercial use of this object and any derivative works is strictly prohibited. This includes, but is not limited to, selling, renting, sublicensing, or using the object in any context in which you receive monetary compensation or other financial benefits.