Search models, users, collections, and posts

SnapaTrack - The Snap Fit Track and Trucks Set

GIF
GIF
GIF

Print Profile(12)

All
P1S
P1P
X1
X1 Carbon
X1E
A1
H2D
H2D Pro
H2S
P2S
H2C
X2D
A2L
A1 mini

Track Parts 0.2mm layer, 2 or 3 walls, 15% infill
Designer
23.7 h
6 plates
4.6(8)

Fire Truck Part 1 - 0.2mm layer, 2 walls, 15% infill
Designer
1.8 h
2 plates
5.0(5)

Pick Up Truck - 0.2mm layer, 2 walls, 15% infill
Designer
2.9 h
3 plates
5.0(4)

Ambulance Part 2 - 0.2mm layer, 2 walls, 15% infill
Designer
1.6 h
1 plate
4.7(3)
Click to see more

Open in Bambu Studio
Boost
528
1224
206
224
1.3 k
662
Released 

Bill of Materials

Maker's Supply Kits and Parts
Select all
SnapaTrack - ZH070

Description


Update 03/07/2025

As requested Female to female connector parts and male to male connector parts designed and uploaded.

Only STL's so far.  Profile has been added.

For those that would like to try printing the track connectors without the brim, a new stl titled ‘Track Connecotr Without Brim’ has been added.  No profile will be provided for this part. 


PLEASE NOTE THAT ONE HARDWARE KIT IS FOR ONE VEHICLE ASSEMBLY ONLY.


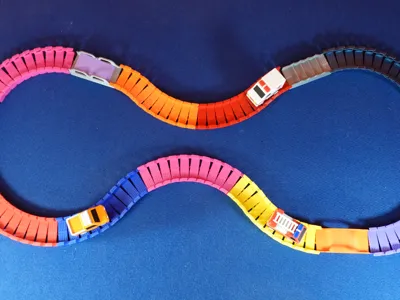
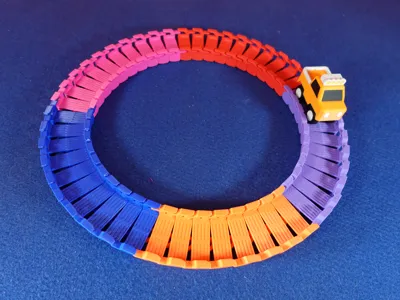
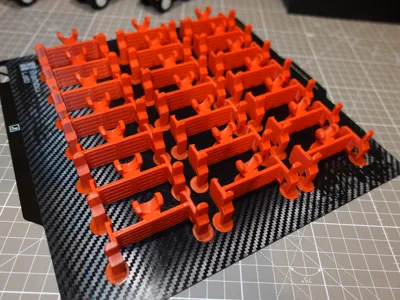
SnapaTrack.  The 3D printable snap fit track with accessories and trucks.  Make the track as long, short and as crazy as you like ( depending on your filament availability ).  Add the bridge, the splitter and even the see-saw accessories to include some obstacles for your vehicles.  You even have three vehicles to choose from.


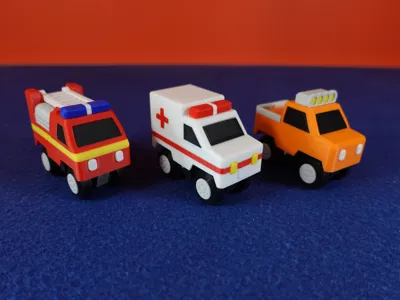
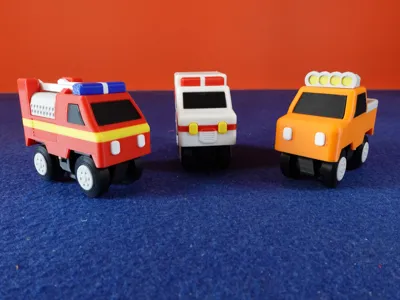
Choose between the Fire Engine, Ambulance and Pick Up Truck.  Please note, each hardware kit is for one vehicle assembly only. 


This is part of the Maker Creator program with Bambu Lab / MakerWorld.

To purchase the hardware required for the vehicles please use the BOM link below.  The link will take  you to the appropriate hardware page on the Bambu Lab store.  The link also means I get a small percentage from your purchase and helps me to keep creating. 


Notes, Tips and Tricks, Do’s and Don’ts for Printing SnapaTrack Parts.

Please note some of the parts may cause a choking hazard, so these 3D printed toys are not recommended for children under the age of 5.

Possibly most importantly, not every material is suitable to be a SnapaTrack part.  Below are all of the materials I have tested so far along with findings.  The only material that broke straight away was PLA Matte.  This just snapped immediately.  So stay clear of this material when printing SnapaTrack parts.  All other materials you see listed below haven’t broken on me once. 😊


Tested FilamentsSuitableNot SuitableAdditional Comments
Bambu PLA BasicYep  
Bambu PLA Matte Do not use 
Bambu PLA Silk Do not use 
Bambu PETG BasicYep Removing the brim is a bit of a pain.
Basic PlA MetalYep  


Please note for the below parts, a brim has been added to the model to improve printability.  But it does mean that the brims will need to be peeled off once the Snap Fit track parts are printed.


Some parts will require support blockers.  So for these parts please refer to the assembly guide to see how you add support blockers onto a model in the Bambu Studio slicing software..  Also, some other parts require filament changes mi-print.  The assembly guide will show you how to do this as well.


For further details regarding assembly and tips and tricks, please download the assembly guide.


If you are interested in other projects I am working on, please check out my linktree for links to my socials.
https://linktr.ee/neil3dprints?utm_source=linktree_profile_share&ltsid=90561f58-cb38-4dd3-959e-6b5495eca7cd


The BOM link below will take you to Bambu Labs Makers Supply page.  :-)

PLEASE NOTE THAT ONE HARDWARE KIT IS FOR ONE VEHICLE ASSEMBLY ONLY.


Documentation (1)

Assembly Guide (1)
Truck Assemble Guide WOP 18042025.pdf

Comment & Rating (206)

(0/1000)

Boosted
Pinned by Designer
Print Profile
Track Parts 0.2mm layer, 2 or 3 walls, 15% infill
Printed beautifully and was a huge hit with my son. We’re printing lots more track and will add to our car collection soon. Great work!
2
Reply
i keep getting this print problem on plate 6, any ideas?
The designer has replied
designer
2
Reply
I see. First let's try slowing the print down by 50% and see how you get on. Let me know if that solves the problem for you.
0
Reply
Thanks for the quick response 👍sorry I meant plate 5. is plate 6 sliced the same way? I’m new to the hobby so still learning. I’ve printed plates 5 & 6 twice before with no problems. I’ll try and figure out if I can slow the printing down just before it starts the “bridge” bit. also I could be completely off the mark but could the printing be made to print right to left instead of left to right to stop the “back leg” being pushed over to the right, if that makes sense
(Edited)
1
Reply
Replying to @user_82435791 :
ok so I’ve just done a new print and I paused it at 12mm or layer 60 (just before it bridges) and reduced the speed to 50% and it’s still doing it!!!!! I’m using an A1 and a Bambu basic filament. like i previously mentioned the first 4 batches printed fine. I’m using Bambu studios for the slicing/printing and the hotplate has just been cleaned throughly and not having any adhesive problems
(Edited)
0
Reply
Same issue as others, see images
The designer has replied
0
Reply
You can try adjusting the slicer so the inner walls print before the outer walls. Slowing the speed down. Also Try adding supports everywhere. I also added a single track part as a STL, in case you'd like to reorient the part yourself and then try printing it.
0
Reply
Replying to @neil3dprints :
Thank you, wanted to provide feedback to close the loop on this if anyone else has a similar issue. As the only change, I added "Tree Slim" supports and now it works! Hope this helps future prints.
0
Reply
After four failed attempts, I finally found the solution for myself 👉 Original Bambu Filament Whether Sunlu, Elegoo, or eSun, all caused the same print failure for me With Bambu Filament, however, everything runs absolutely smoothly I have since printed four plates in a row without a single error Just tested with eSun again ... and another print failure Maybe this experience will help someone!
Show original
1
Reply
Boosted
Superb work! Thank you and my deepest respect! The print turned out perfect and everything is nicely stable 👍🏻 A quick question, one of my vehicles is faster than the other… I've checked the wheels multiple times, they are straight and have freewheel. In my opinion, it can only be the motor itself, a Monday morning product?! Has anyone had similar experiences?
The designer has replied
Show original
designer
1
Reply
Great work and thanks so much for the compliment. Regarding the motor I tested numerous motors. The only time one would slow down was when the batteries were in need of charge. Although the ambulance is a little heavier than the pick up truck. So that would slow it down slightly. But that shouldn't make that much of a difference. Hope this information helps.
0
Reply
But a problem motor, honestly I haven't come across one yet.
0
Reply
Boosted
I've already tested two pairs of new batteries without success. Even with low resistance (when the vehicle drives up the bridge) the motor only whirs and the vehicle stops :/ I'll disassemble the vehicle again and examine the motor. But thank you for your replies 👍🏻
Show original
0
Reply
Hi! Thank you so much for putting this together. My 2yo loves the “WEEOWEEEOOO” (fire truck) and I am impressed with how easily everything went together so far. Random, but is it possible makerworld changed the length of the cord that comes with the motor? My cable isn’t long enough to reach the power distribution board.
The designer has replied
0
Reply
Hmm...... it should be a longer cable. You are actually not the first person I know of to have come across this problem. Someone in France had this issue as well and ended up approaching Bambu Support to get a longer lead sent out to them. As a temporary fix, try modifying it so only one self locking button is in use. So instead of having the lights come on, use the lights cord and have the motor working instead. Let me know how you get on.
1
Reply
Replying to @neil3dprints :
Thank you so much! I’ll reach out to support.
0
Reply
Boosted
Replying to @neil3dprints :
I bought 2 sets and the cable had 2 different lengths, I solved it but it's not good that they change the lengths
Show original
0
Reply
Nice print, however, the car doesn't move up. I completely rewired it, changed the battery, and unfortunately, it stays still while the wheels keep spinning. That's not supposed to be normal, is it? Any tips, or has anyone encountered the same issue and knows the solution
The designer has replied
Show original
0
Reply
A couple of people have come across this problem. I'd say first check the O rings, to make sure they're installed or need a wash. Then try turning the top light off and see how it runs then. If it still doesn't work right, then I can only suggest unassembling and reassembling the entire thing. If this is the case, no idea what actually causes it. But the unassembly and reassembly can magically solve the issue. Oh yeah, also make sure the wheels aren't pushed too far in so are rubbing against the chassis. Try these steps and let me know how you get on.
0
Reply
Replying to @neil3dprints :
The O-rings are installed and have been cleaned, but it’s still not working. The top light is off, and the unit does not operate. I have disassembled and reassembled it twice, and I have tried both recommended methods for assembling the electronics. The wheels are also not pushed in too far. Is it possible that the motor is defective?
0
Reply
Replying to @Deathroll :
It is possible the motor is defective, in which case you would need to log a support ticket I am afraid. Before that, I would try disassembly again, and check how the motor works when its not within the housing. If its still slow or defective, then I would suggest logging a ticket. I am hoping you get it working soon though.
0
Reply
Print Profile
Track Parts 0.2mm layer, 2 or 3 walls, 15% infill
My 3 year old son loves it. I see everyone here use the split in a way that creates a dead end track. I figured out a configuration where you can still have a continuous loop!
profile
3
Reply
I printed a lot of parts for some friends and we had a lot of fun putting it all together. Thank you so much for providing this!
The designer has replied
designer
1
Reply
Woah, you made the trucks crash into each other? lol. Its my pleasure, really glad you are having fun with them. The track looks great as well.
0
Reply
The black one had the motor the wrong way so it drove backwards. The other ones had to push him up the ramp ;) At some point we had all of them in a row. It really would be cool to have a train with different wagons.
0
Reply
Boosted
Print Profile
Track Parts 0.2mm layer, 2 or 3 walls, 15% infill
Sometimes the track parts fail, but still 5*. My kids haven't stopped playing with it, my oldest has taken it apart and rebuilt it about 6 times now. That's about 3/4 of the track, she's still working on it.
The profile uploader has replied
profile
2
Reply
very glad your children like it. Thanks. 😊
0
Reply
Boosted
I am having an off shift on some of the track parts. any recommendations on how to resolve this? only had issues with this print. I am printing with an x1c.
The designer has replied
0
Reply
First try the slicer settings allowing you to print inner walls before outer walls. Also try slowing the print down. If you still have issues send me a DM and we'll figure it out.
1
Reply
Boosted
Replying to @neil3dprints :
I will have that a try! thank you!
0
Reply
For anyone still having this issue, I've found a solution that worked for me. The track was failing on my A1 and my new P2S. I played with a bunch of solutions and found the slowing the speed settings for Overhangs and Bridges to 10 mm/s and changing the infill to Rectilinear solved the issue. I'm finally able to print with any PLA I've tried and not lost a single track piece.
0
Reply
Print Profile
Pick Up Truck - 0.2mm layer, 2 walls, 15% infill
Print flawless and works great Unfortunately, the car cannot be de-energized with a main switch, the batteries must be removed each time
Show original
0
Reply
Boosted
Hello, connect the jumper to the motor switch and one of the switches to channel 0.
0
Reply
Replying to @gabot3d :
Thanks
0
Reply
Replying to @gabot3d :
My 2 grandchildren (18 mths and 4 yr old) are loving this but are costing me loads of batteries because of this can you show a photo of this configuration please
0
Reply

License

This user content is licensed under a Standard Digital File License.

You shall not share, sub-license, sell, rent, host, transfer, or distribute in any way the digital or 3D printed versions of this object, nor any other derivative work of this object in its digital or physical format (including - but not limited to - remixes of this object, and hosting on other digital platforms). The objects may not be used without permission in any way whatsoever in which you charge money, or collect fees.