


Print Profile(2)


Description
Part 4 of 5:
Hello gardeners and 3D printing enthusiasts!
Since spring is just around the corner (publication day), I thought I'd revise my old Hydroponic Tower and make it available here for everyone. The model is based on the well-known tower by "boundarycondition". My model is compatible with it, so anyone who still has old parts can use them
You'll surely figure out what I changed from the original on your own. After a year of experience with the tower, I was able to fix small flaws and optimize it for myself. Maybe some of you need this too?
However, I cannot provide instructions on how to achieve maximum yield with a hydroponic tower. For that, I recommend checking the internet ;-)
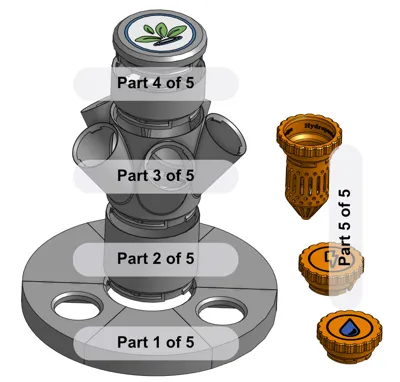
Since the project is a bit larger, I'm splitting it into five parts. This way, everyone can customize their own tower. As a small tip for selecting the necessary parts, I advise you to scale all parts to 50% and print them. This way, you can excellent test on the model whether your configuration works. Let's go…
The breakdown is as follows:
- Lid for the water reservoir
- smooth pipes and angled adapters
- Distributor for plants
- Top piece and screens
- Plant pots and caps
Bonus:
Matching your Hydroponic Tower, here are water level indicators


------------------------------------------------------------------------------------------
Part 4:
The print profiles include the lid with water distributor (Profile 1) and a screen insert for the water tank (Profile 2)
The lid can be printed in multiple colors with an AMS. If you don't want that, simply delete the colors. Alternatively, you can print all elements separately and glue them in - as you wish
The screen insert is available in two variants. For Variant 1 and 2, there is an assembly instruction below, as some tinkering is required
There's another special feature in the profile with the screen. I've included a "negative part". By shifting it along the Z-axis, it's possible to adapt the screen to your hose diameter. One step corresponds to 3mm along the Z-axis in the negative direction
For time-saving reasons, you can print everything with a larger nozzle than set in the profile
Assembly instructions screen with mesh:
You can see the required parts here

Use stainless steel screws (M4x15) for fastening. The screen should naturally not rust ;-)


Now insert into a pipe or distributor…


Assembly instructions screen without mesh:
No additional parts necessary. If you have not used the "negative part" option in the slicer, you can adjust the hose passage with pliers and a sharp knife. It's a bit more difficult, but it works without problems


Boost Me (for free)
*** Thank you for the support, Makerworld rocks! 🚀 ***
Membership
Your prints, your sales. Get your commercial license on MakerWorld now! Or simply support me and be part of my journey! 🚀🚀🚀
License
You shall not share, sub-license, sell, rent, host, transfer, or distribute in any way the digital or 3D printed versions of this object, nor any other derivative work of this object in its digital or physical format (including - but not limited to - remixes of this object, and hosting on other digital platforms). The objects may not be used without permission in any way whatsoever in which you charge money, or collect fees.
Comment & Rating (29)