Encanto Candle Lamp


Print Profile(1)

Bill of Materials
- Candle effects Led Diode - 5mm orange x 1: https://it.aliexpress.com/item/1005007352166539.html
- AC Connector 5.5x2.1mm x 1: https://it.aliexpress.com/item/1005007016195344.html
- AC 5v 3A x 1: https://it.aliexpress.com/item/1005005718699284.html
- Touch button x 1: https://it.aliexpress.com/item/1005006246380749.html
- Led stripe W2812B IP30 x 1: https://it.aliexpress.com/item/1005004289391906.html
- ESP8266 x 1: https://it.aliexpress.com/item/1005004289391906.html
- ESP32 x 1: https://it.aliexpress.com/item/1005005953505528.html
- Encanto Candle Lamp - Wled CFG x 1: https://drive.google.com/file/d/1jP-5EUoRj7PT2mbwGRosXIn0-bNrXeay/view?usp=sharing
- Encanto Candle Lamp -Wled Presets x 1: https://drive.google.com/file/d/1rLDc3uHxT-aqjdaUJrIlRQaSwB5NNqob/view?usp=sharing
Description
Greetings everyone, this is my inaugural upload of a design I created. It's a candle-shaped lamp inspired by the film Encanto. It boasts several unique features. It incorporates a candle-effect LED in the flame, an 80-LED W2812B strip along the body, and a touch button for controlling effects, all managed via the well-known open-source WLED program interface.
The Bambu Studio project file is ready for printing. There are four parts in total: the lampshade, the flame with adaptors for the touch system and the candle-effect LED, the LED strip support, and the cover for the electronics compartment housing the ESP8266 or ESP32. Printing is incredibly straightforward. For assembly, follow these instructions or devise your own improved method and let me know in the comments!
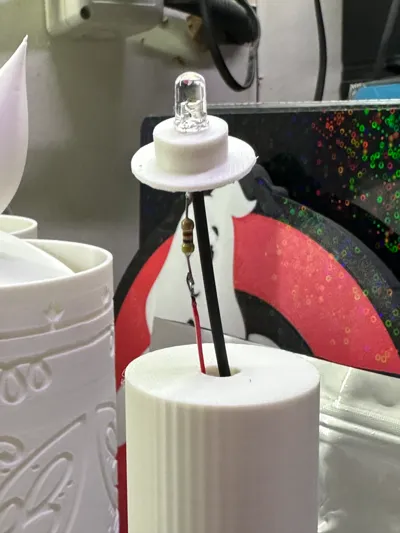
- Candle-effect LED: Insert it into the printed support. Solder a 470Ω resistor to the positive pin protruding from the holes. Solder two 25cm wires to the two polarities and set it aside.
- Touch button: It has three pins: VCC (5V), GND (-), and Data (center). Simply solder three 25cm colored wires and set it aside.
- Take the top part with the flame. Refer to the attached images for assistance in understanding the following steps. Insert the touch button into the recess in the cover with the pins facing the flame. Press firmly to ensure complete insertion. Once done, apply a small amount of hot glue to the button's body, adhering the small square to the opposite side of the pins.
- Take the LED with its support. Apply some hot glue around the hole and glue the support in place, as shown in the attached photos. The flame assembly is now complete. The five wires should be lowered into the central hole of the LED support.
- LED support and 80-LED strip: Cut an 80-LED strip. Check the strip's orientation—the arrow should point towards the last LED. Solder three 15cm wires (preferably colored for easy identification during assembly) to the initial contacts: VCC (5V), DATA, and GND (-). Feed the three wires through the hole at the base of the LED support and attach the LED strip to the support cylinder, slightly angled to allow for spiral adhesion. Refer to the photos for better understanding. Once done, I apply a bead of hot glue to prevent the strip from detaching from the cylinder over time. I recommend you do the same. Set the LED support aside.
- Lamp shade: You'll find a hole on the back for inserting the power connector. Solder two 15cm wires to the connector's VCC (+) and GND (-). Insert the connector into the lampshade, secure the latch, and bring it close to the LED support. Route the two power wires through the same hole where you inserted the LED strip wires. Apply some glue to the base of the cylinder and glue the lampshade to the LED support.
- Now take the flame. Feed the five longer wires through the central hole of the cylinder until they emerge from the bottom, where five other wires are already present. Once the wires are inserted, apply a bead of glue to the flame support and glue it in place.
- Now for the lamp's logic—we're almost there! Group all the VCC (+) 5V power supplies, strip the wires, and join them with another wire to power the ESP8266 or ESP32. Solder and insert the wires into heat-shrink tubing. Do the same with all the GND (-) power supplies. You'll then have four wires remaining: 1 VCC (+), 1 GND (-), 1 DATA from the touch button, and 1 DATA from the LED strip.
- Prepare your ESP8266 or ESP32, connect it to your PC, go to this webpage https://install.wled.me/, and upload the WLED firmware to your device. Once done, connect it to your network, visit your device, go to Security & Update in its interface, scroll down to Backup & Restore, download the two configuration and preset files attached to the model, and upload them to your device. The device will then restart and start a new HotSpot called ENCANTO-AP with password "wled1234". Access it, go to settings, WiFi, scan your SSIDs, select yours, enter the password, save one last time, and upon restarting, you'll have your ENCANTO CANDLE LAMP, manageable directly from your WiFi network!!!!
- Taking your ESP8266, on the left side of the power connector (which you no longer need), you have four pins: 5V, G, D4, and D2. Skip D3 (not needed). Solder the VCC (+) to the 5V pin, GND (-) to G, the DATA from the LED strip to D2, and the DATA from the touch button to D4.
- Apply a bead of glue to the cover of the ESP8266 or ESP32 compartment and you're done.
- Now your only limit is your imagination! Create the light effects you prefer, save them, and modify them from your touch button.
Photos are provided for each assembly step, but of course, I remain at your disposal for any clarification.
Due to technological limitations with the ESP8266, it's not possible to utilize all three states of the touch button for different functions. In the attached cfg file, the touch button only performs one function: changing the effect.
If you used an ESP32, you can modify the touch button's functionality in the WLED interface to perform three functions: ON/OFF, effect change, and brightness reduction. These three functions are already among the presets with values 90, 91, and 92. I've attached instructions on how to modify the cfg file for it to work with all three presets. You'll find preset 90 repeated three times; simply change one 90 to 91 and one 90 to 92 to have three functioning presets.
Boost Me (for free)
Help me grow! This is my first upload! Thank you!
Comment & Rating (18)