Search models, users, collections, and posts

Chair Tip Generator - Internal

Print Profile(1)

All
P1S
H2D
H2S
P2S
A1 mini
X1 Carbon
H2D Pro
A1
P1P
H2C
X1E
X1
X2D
A2L

0.2mm layer, 2 walls, 15% infill
Designer
2 h
1 plate
4.6(7)

Open in Bambu Studio
Boost
675
2061
32
30
941
430
Released 

Description

Chair Tip Generator - Internal

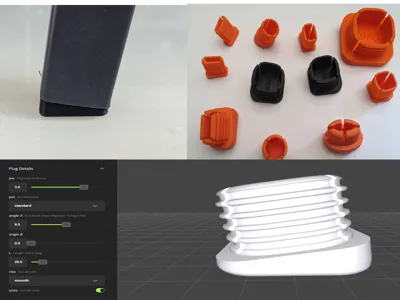
This easy-to-use generator will allow you to create a range of tips for chair or table legs.

The generator is based on the popular End Plug Generator but with additional features to control the angle, thickness and shape of the plug base.


Create circular, elliptical, square and rectangular end plugs of all sizes!

Angle the base so that the chair tip lies flat on the floor!


Easy to use


  1. Select “Customize”
  2. Select the shape of chair tip
  3. Measure the Outside dimension(s) of the chair leg
     

  4. Input the leg dimensions
    • A → primary external measurement (mm)
    • B → secondary external measurement (mm) (for elliptical or rectangular shapes)
  5. Measure the wall thickness of the chair leg
     

  6. Input tw, the wall thickness (mm)
  7. Open the Plug Details section
  8. Set the plug wall thickness (mm)
  9. Choose how thick you want the base to be
  10. Choose the base corner rounding (square / rectangular only)
  11. Select “rotate” or “skew" for the Angle Treatment (see below for explanation).
  12. Enter the angle for the base (degrees)
    1. Two angles are given - one for the “A” direction and one for the “B” direction
  13. Set the plug length (mm)
  14. Check the “ribs” box if you want ribs to be generated
  15. Select the rib type (none, smooth, sharp)
  16. Check the “slots” box to create slots in the plug - makes fitting easier.
  17. Select Generate
  18. Download 3MF and print

Notes

  • The dimensions are for the external chair leg. Just measure the outer dimension of the chair leg that is to be plugged.
  • The wall thickness (tw) is used to work out the plug size and head size - this needs to be correct!
  • The secondary dimension is not used for the circular or square shape
  • The angles can be determined by measuring the height of the gap between the leg and the ground. Divide this value by the leg width and, using a calculator, take the arc tangent in degrees - or just estimate and set it by eye :)
     

  • Angle Treatment - “rotate” will rotate the plug keeping the tube end square, “skew” will skew the plug making the tube end at the given angle.

    Rotate


    Skew
  • If the web page is “timing out” you can change the resolution of the model in the Advanced section
  • Other options are available in the Advanced section - please experiment!
  • If you want to print multiple caps use the “clone” option or “fill plate” in Bambu Studio


See my other “useful generators”…


If you like my designs and find them useful please

Boost Me (for free)

or even better Buy Me A Coffee

Comment & Rating (32)

(0/1000)

Thank you for sharing this. There is a problem with my model, the first layer of the model is not full length, its like 65% of it, which is causing issues during print. Any idea how can i fix this?
The designer has replied
0
Reply
That looks very strange. Does the model look correct in the generator?
0
Reply
Replying to @DuncanWardCons :
yes, it has problems only on slicer. Here are the settings: Rectangular, A: 42 B:21 tw: 1.4 Angle A: 5 Angle B: 17.5. It disappears when I reduce the Angle B to around 13-14.
0
Reply
Replying to @user_1329206748 :
I can't seem to reproduce you problem. Here is what I get using the values you showed after slicing...
0
Reply
Hello, I have a problem, with my seats, the rear ones have a stronger angle than the front ones (see photos). How do I lower the angle so that it also stands flush with the floor at the back? Both angles are arranged as follows: PW:4 and ANGLE A:20 ANGLE B:0. Black front (perfect), white rear (not so good, there's a gap).
(Edited)
The designer has replied
Show original
0
Reply
Hi - it looks like the angle on the second picture needs to be increased but as you used A:20 that will be the maximum. I have uploaded a new version that you can use with the maximum angle set to 30 degrees. This should allow you to fix the problem. Note looking at the photo I would guess an angle of 25 degrees would be needed.
0
Reply
Replying to @DuncanWardCons :
Hello, thank you very much :-) But don't be scared now, the angle was actually 35 degrees :-P Normal is different :-P
Show original
0
Reply
Replying to @Razzer41m :
I changed the limit to 40 degrees. This seems to work OK and generate good models. Note I tried going to 45 degrees but something in my geometry calculations did not like it and I didn't have time to diagnose the problem.
0
Reply
Thanks for this!!! I would like to be able to choose a flat base on this generator. As soon as an angle is specified, the base is no longer flat. I’d like to be able to set an angle while still keeping a flat base. Here’s a photo of my print test and the original nozzle.
The designer has replied
0
Reply
Thanks for the suggestion! I have uploaded a new version that allows you to select a "skew" option for the plug. This should generate the plug shape in your photo.
1
Reply
Unfortunately, I can only select one form for editing, and I've already tried different browsers. The result is always the same
The designer has replied
Show original
0
Reply
Hi. I'm not sure what you are trying to do. There is only one model available to customise here. If you want to use the other customiser models mentioned in the description click on their links. Please let me know more details on what you are trying to achieve and I will try and help. Cheers
0
Reply
Thanks! The generator is awesome!
0
Reply
Print Profile
0.2mm layer, 2 walls, 15% infill
0
Reply
Boosted
how do I use this? when I click customize nothing happens.
The designer has replied
0
Reply
Hi, To use the Customize you need to use the MakerWorld web site. It does not work from the handy app or from within bambu studio. Go to this link https://makerworld.com/en/models/1190119 and select the green "Customize" button, select the next "Customize" button on the popup and you will be presented with the parametric model maker window. Set the parameters as needed then use the download button to get the 3mf file - open this in Bambu studio and print. Hope this helps Cheers
1
Reply
Boosted
Replying to @DuncanWardCons :
thank you! got it working
0
Reply
‏Can you tell me please what is the filaments to be used? Can i use PLA, should i use TPU?
The designer has replied
0
Reply
I have used a variety of filaments PLA, PETG, ASA, ABS. Probably of those ASA or PETG were the best. I have not tried TPU but it should work well. Note by angling the base to match the leg angle the load on the floor is better spread. This probably means that you could use harder materials without damaging the floor. Hope that helps.
0
Reply
Replying to @DuncanWardCons :
Thanks for this detailed response, @DuncanWardCons !!!
0
Reply
Can you explain how the end thickness is calculated? I tried just to copy the 4.6mm I need to match the originals, but it comes out to thick.
The designer has replied
0
Reply
Hi, The end thickness is calculated based on the wall thickness (pw) multiplied by a factor depending on the "thin, thick, extra thick" chosen (pet). In the advanced settings tab you can select the multiplier for each of the "thin, thick..." settings. For example if you have 'pw'=2.0 mm, 'pet'=standard and in advanced 'pet standard'=1 then the thickness of the end will be pw * pet standard = 2.0 * 1 = 2.0mm Hope that helps. Cheers Duncan
0
Reply
Excellent
Show original
0
Reply