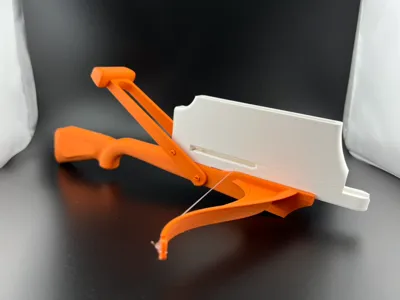
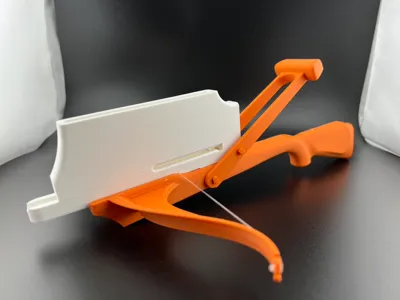
Zhuge Repeating Crossbow


Print Profile(3)


Description

Updated on 2025/4/4:I have tested PLA filament but haven't tested PETG or SILK in this project yet. However, if you have a choice, I think it's better to use PETG or PLA, especially PETG. I found that SILK has lower accuracy and lower strength in other projects.
Zhuge Repeating Crossbow – 3D Printable Model
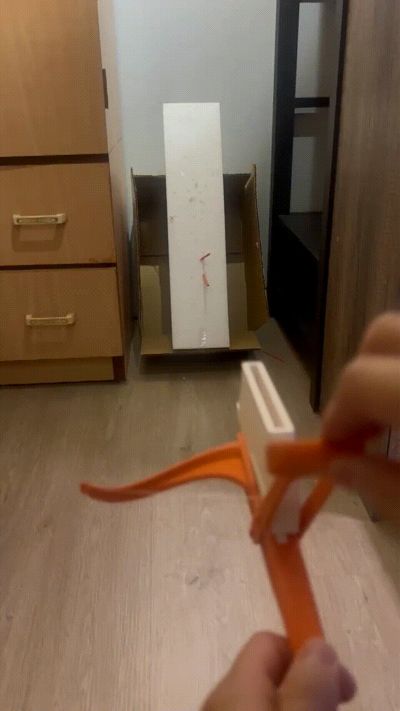
The Zhuge Repeating Crossbow, renowned for its rapid-fire mechanism, is a classic example of ancient Chinese mechanical weaponry. This 3D-printable version faithfully recreates its core functionality, allowing for actual loading and firing. Designed for history enthusiasts, mechanical structure researchers, and 3D printing hobbyists, this model offers both an educational and hands-on experience.
Features:
- Multi-shot Mechanism: The internal magazine holds up to 8 arrows, which can be fired sequentially by operating the lever, demonstrating the distinctive repeating design.
- Adjustable Tension: By modifying the bowstring (fishing line) tension, users can control the firing speed and range, making it ideal for parameter testing and experimentation.
- Structural Accuracy: Engineered based on the principles of ancient mechanical crossbows, this design retains its core firing mechanism while optimizing it for 3D printing and assembly.
- Assembly & Testing: All components are 3D-printable. The assembly process provides insights into the weapon’s structure and operation, making it an excellent hands-on example for learning about ancient mechanical weaponry.
This model is ideal for those interested in historical weaponry, mechanical engineering, or 3D printing applications, offering a deeper understanding of the mechanics behind this legendary repeating crossbow.
Updated on 2025/3/10: Added printing parameters specifically for A1 mini makers.
Due to the larger size of the model, simply rearranging the parts was not enough to fit within the A1 mini's printing area. Therefore, I split the main body of the crossbow near the grip and added appropriate tolerances and a locking structure to enhance its strength (I have tested the printing and assembly using my A1).
I hope A1 mini users will enjoy this project!
Updated on 2025/3/13: Model Updates and Installation of Bowstring (Fishing Line) & Methods to Increase Bowstring Tension
1. Model Adjustments Based on Feedback
If you encounter either of the following two issues, you can try the second Printing Configuration modified parts:
- Difficult assembly of the crossbow handle and main body. (Just print the Handle part)
If the handle slot is hard to slide into the main body or there is excessive resistance during assembly.
(The new part addresses this issue by increasing tolerances. However, this may cause the two parts to become too loose when assembled, so you might need to use additional glue to secure them.) - Failure to Fire. (Just print the Eject Block part)
If pushing the trigger linkage into position does not allow the ejector block to push out the bowstring (fishing line) and fire.
2. Installing the Bowstring (Fishing Line) & Increasing Bowstring Tension
Step 1: Cut a piece of fishing line, approximately 1.5 to 2 times the span of the crossbow limbs.

Step 2: Select one end of the line and tie 2–3 simple knots (3 knots recommended for better stability).

Step 3: Rotate the secured knot to the front of the crossbow, hook the line into the side notch, and thread it through the arrow magazine.

Step 4: Tie 2–3 simple knots (3 knots recommended) at the other end, securing it at the front of the crossbow.
※ Try to keep the line as tight as possible without deforming the crossbow.

Step 5: Prepare a thin, high-hardness metal rod (e.g., the hex key included with the A1 printer) and follow the steps shown in the GIF below.
★Objective: Insert the line into the side slot and increase its tension.

🎉 Congratulations! You have successfully assembled the repeating crossbow. 🎉
Updated on 2025/3/14: A small feature has been added to all crossbow models in the printing parameters to keep the bowstring (fishing line) centered. This feature is purely to satisfy my personal OCD and is not essential for firing functionality. Makers who have already printed the model can decide whether to update this part based on their needs.

⚠️ Final Important Notice: When playing or assembling, please double-check the safety of yourself and others. As the creator of this toy, I hope it brings joy, not pain or regret! ⚠️
Boost Me (for free)
If you also enjoy ACG, memes, cosplay, and related content, feel free to support me! Your encouragement will inspire me to continue creating more content like this!
Documentation (2)
License
You shall not share, sub-license, sell, rent, host, transfer, or distribute in any way the digital or 3D printed versions of this object, nor any other derivative work of this object in its digital or physical format (including - but not limited to - remixes of this object, and hosting on other digital platforms). The objects may not be used without permission in any way whatsoever in which you charge money, or collect fees.
Comment & Rating (83)