Footfinity - Gridfinity with smaller feet


Print Profile(1)

Description
Boost Me (for free)
Boosts mean points and points make prizes. Any support is most appreciated. This is all just stuff I create in my spare time.
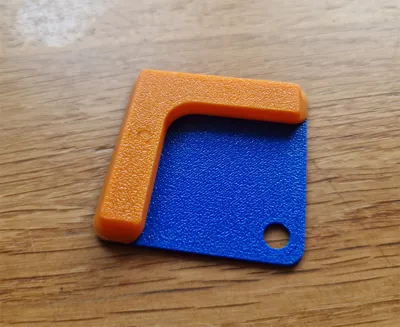
The Gridfinity system involves printing bins with feet for very 42mm square that the bin covers on a base plate. So a 4x1 bin would have 4 feet, a 3x6 bin would have 18 feet. This felt like a waste of time and material but I still wanted to use grids, so I chopped the feet off some bins and made new smaller feet that used a few of locator pins to attach to the right place on the bin.
This is a work in progress but since people on r/gridfinity have asked for files, I shall share where I'm at. I'll say up front, its probably not worth it at this time for small bins! I use the excellent Clickbase grids and these feet grip in there nicely and of course work with traditional base plates also.

Why did I do this?
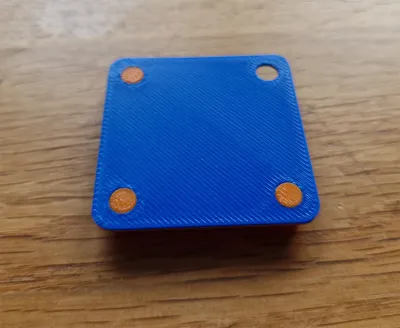
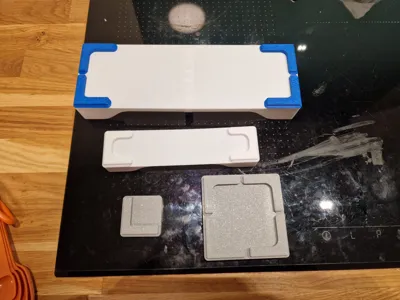
I didn't want to waste time and filament on bins with lots of feet, but still wanted to make use of the grids. I removed the standard square feet and made smaller feet that are only attached after the print using a few locating pins and holes in the bottom of the bins. A 1x wide bin has 2x U shaped feet with 4 pins (you might find that 2x L works fine for you!). Any other bin would use 4x L shaped feet with 3 pins. On my very first bin (a 3x6 for cutlery) printing the feet this way saved an hour on the P1S and 25% of the filament. Naturally, the smaller the bin the less of a saving this makes. All of my bins are very simple, again to save filament.
How does it work?
All bins have pin holes cut to 5mm. I suggest printing these as “polyholes” in your slicer and to enable polyhole twist. This option does not exist in Bambu slicer unfortunately so you'll have to so xy hole compensation to about 0.05. Polyholes helps maintain slightly better dimensional accuracy than printing them as regular holes.
The aforementioned feet come in 2 sizes so that you can use what seems to work best for you. The pins are sized to 4.9mm and 5mm and on the bottom of each is the size so you won't confuse them once printed. Print each and a test token and see which fit you feel works best. This may vary with your filament, printer and settings. If you download the 3mf file this initial plate is ready to go.
If you look closely at the model you will see that the pins are not a uniform diameter. For each 0.2mm layer, the pins increase and then decrease in diameter by 0.2mm. This variance allows the pins to pop home and not fall out, with no use of glue. This solution was a last minute addition and one I am particularly pleased with!


So what savings can we make?
To compare this, I have set the aforementioned print settings for all the Footfinity parts, and set the “normal” bins to have 5 top layers. This is to compare the same thickness bottom (1mm) of the bin. All bins are the same 57mm deep internally. As you can see in the image below, with a 3x1 bin there are actually no savings to be made that make this worthwhile at this time. WAIT COME BACK! This was expected as there are only 3 feet that would normally be printed anyway. Although with Footfinity you would be printing smaller feet, you have that whole base of the bin as a first layer which takes more time to print here than it does when printed on top of the normal feet at full speed rather than at first layer speeds.
By the time we have moved to a 3x2 bin there's a small saving, 10 minutes on the printer and a measly 7g of filament. It doesn't sound like much, but that's 12% longer print times and nearly 14% more filament if you print it the traditional way.
With a 2x4 bin we're now up to saving 13mins and 13g of filament, a pittance you say. But again that is 13% more time on your printer and 19.5% more filament.
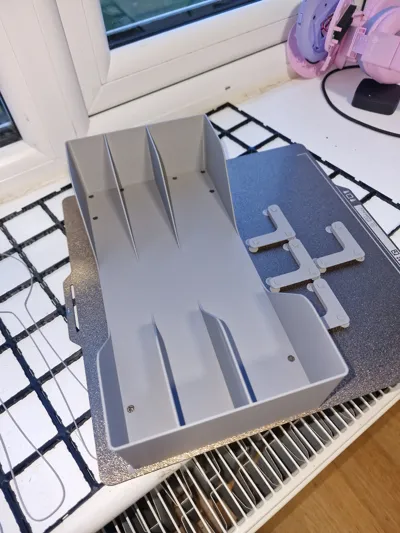
By the time we get to the 6x3 bin pictured below, that saving is now 60 minutes and 40g of filament. Or, 40% more time and 36% more filament!
A shallower bin of this style would see these numbers be even larger. A more complex bin needing more material in the first place would see them lower, as the saving is only in the feet.
I have included the smaller bin sizes in the files for the sake of completeness.

Files included
Initial Print: An STL with the test token and each of the 4 feet to print. See whether the 4.9 or 5mm feet fit best for you. I suggest trying the 4.9mm version first, but the 5mm works best for me. The size is printed on the bottom.
Test Token: A 1x1 token 1mm tall. Purely for testing fitment on your machine or different print settings. It has 4 pin holes in to test fitment of both the L and U shaped feet.
Feet for cutting: L and U shaped feet with 5mm diameter and 2mm tall pins. Import these into your CAD software of choice to align them with your own bins and cut holes as needed.
Feet for printing: L and U shaped feet with 5mm and 4.9mm diameter and 1.4mm tall pins. Print one of each to test fitment on the token before running a batch of whichever you find works best for you. on my P1S using 3 different filaments, the 5mm pins work best. They are a nice snug fit.
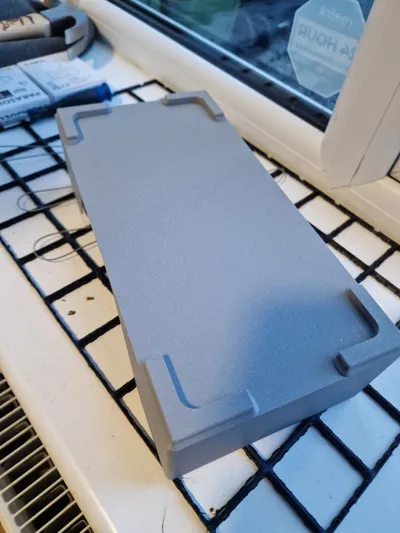
Bins with no side wall cutouts: 2x1 up to 6x6 bins with no side cutouts. All are 57mm deep. Cut them down to size as needed in your slicer. They are just hollow bins with no stacking lip.
Bins with side cutouts: 2x1 up to 6x6 bins with cutout objects included. Import the step file into Orca/Bambu and I guess Prusa slicer and you will see the bin and 1 or 2 additional objects. These will be labelled as cutouts. Select them, right click and choose “change type” and select “Negative”. This object will now cutout the side of the bin upon slicing. Move up and down as desired. Scale/move in X or Y to cover both walls if desired. They are just hollow bins with no stacking lip.
Print Settings: I have not included a file with print settings as it doesn't seem to play nicely between the 3 different Slic3r derivatives in Purusa/Bambu and Orca. I rarely use anyone else's profiles anyway, so on that basis I turned polyholes on as well as polyhole twist, 3 walls, 5% gyroid infill, 3 top layers, 3 bottom layers, arachne walls. Apart from that everything's pretty much standard. The only reason for only 3 top layers is because I don't need a 1mm top layer on a foot and then another 1mm on the base of a bin. Just saves a tiny bit of time and filament. A profile is included for Bambu Studio users that worked great on my P1S.
The master file: Everything. One fusion file that contains every part I have produced for this post. If you use the excellent Gridfinity addon for Fusion to make a bin with no base, it will make a new bin and align it with the feet for you. Simply make the feet you need visible and combine cut the feet from your new bin (remember to “keep tools”). It is not a perfect file buy any means, but it kind of kept growing.

Comment & Rating (13)