Meta Quest 3/3s Stand by LoneStarDesignz


Print Profile(2)


Description
*Finally, V2 of the Meta Quest 3/3s Stand by LoneStarDesignz is here! PLEASE READ at least the 2nd DESCRIPTION paragraph, there are a few new printing profiles and reading the description will help you to decide which profile to pick. Thank you.
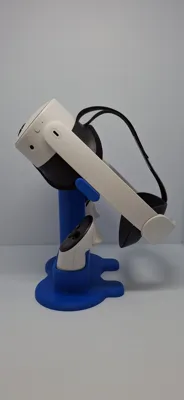
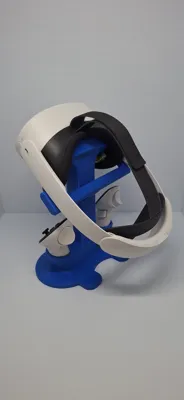
Thank you for taking interest in this model! This stand is an original design be me, LoneStarDesignz, with inspiration from Dandandu's Meta Quest 3/3s Stand. It has been specifically designed to have a clean, uniform look while still being strong and sturdy. V2 now has a larger footprint than V1 allowing for headsets with battery straps to be extended out all the way and still have the stand be extremely sturdy. The Meta Quest 3/3s Stand by LoneStarDesignz has 2 arms that stem out from the side of the stand that help keep the headset at a consistent 45-degree angle, setting it apart from others. With V2, these arms can now be printed separately from the main body reducing the supports needed to almost nothing. The controller docks are unique as well, with integrated canals that allow the stock controller lanyards to be tucked away for a flawless look. These docks have small tolerances between them and the controllers resulting in a seamless appearance but still allow the controllers to slide right in, no pressure need. Please note that this stand is designed for aftermarket head straps, (Official Meta, Bobovr, Kiwi Design, etc.), so this will not work with the stock strap that comes with the headsets as the headset will be front heavy on the stand and will fall off. Also, accessories on the controllers can fit in the docks, just not sit at the intended angle, (110 degrees), and will have to be pushed in rather than just being able to slide in. If 25 or more people comment “Make Controller Docks Larger”, I will make a new model with the controller docks larger for controller accessories like grips!
There are 2 new printing profiles of this model for V2. These include the 1 Piece Profile which requires supports and the 2 Pieces Profile which requires close to no supports and is recommended to use super glue to glue the arms and main body together, but it is not required, and the stand will still function just fine without it. I will post a picture of where to apply the glue below. Both of the V2 profiles have 5% gyroid infill taking up around a ¼ of a roll depending on which one you select instead of ⅓ of a roll with the V1 profile at 10% gyroid infill. Even though the infill is reduced by 50%, the V2 stand still remains just as strong as it needs to be. So, if filament consumption was an issue with V1, hopefully this change will help you out.
Suggestions for using the stand:
*It is highly recommended to place a microfiber cloth between the stand interface and the lenses of your Vr to prevent any damage. To help keep the microfiber cloth stretched tight while in between the Vr lenses and the stand, there are little knobs that are placed on the side of the stand interface that catch onto the cloth for those who may have had an issue related to that. If you want, you can poke holes into your microfiber cloth and place them over the knobs to keep it on the stand all the time.
*Although the stand is extremely sturdy, it is highly emphasized to keep this stand on a stable surface to prevent any accidental knock-overs as that would be devastating to your headset.
*Hold the base of the stand while removing the headset from it for a smoother user experience.
Assembly Guide (Only for 2 Pieces V2 Print Profile) :
*Locate the Meta Quest 3/3s Stand by LoneStarDesignz and the Meta Quest 3/3s Stand Arms by LoneStarDesignz as well as some super glue if you plan on using it.
*Notice how the arms have beams at the end of each side. When installing these arms, make sure that these beams point towards the stand interface (which is where the headset is placed on the stand).
*On the back of the actual stand, there is a large knob on the large pillar. This is what you slide the arms onto. If you are applying super glue, place the super glue on top of this knob like shown in the picture below.

*Now place the arm on top of that knob as shown in the picture below.

*Now everything is assembled, and it should look like this:

Thank you guys so much for looking into this model! I've dedicated a lot of my time while designing this stand and it means so much when you download and print this! I hope all of you have a wonderful rest of your day and that you have a splendid time with this model!
Happy Printing,
LoneStarDesignz
License
You shall not share, sub-license, sell, rent, host, transfer, or distribute in any way the digital or 3D printed versions of this object, nor any other derivative work of this object in its digital or physical format (including - but not limited to - remixes of this object, and hosting on other digital platforms). The objects may not be used without permission in any way whatsoever in which you charge money, or collect fees.
Comment & Rating (109)