Snap Trap—A Toy Only, Low Power, Single-Plate Print, Mobile Control


Print Profile(4)


Description
Boost Me (for free)
Every like, collection, follow, and boost from you is a great encouragement for me to persevere in creating original models, thank you!
For more interesting models, please visit my homepage: CuriousAnt | Home - MakerWorld
♦ ♦ ♦ ♦ ♦ ♦ ♦ ♦ ♦ ♦ ♦ ♦ ♦ ♦ ♦ ♦ ♦ ♦ ♦ ♦
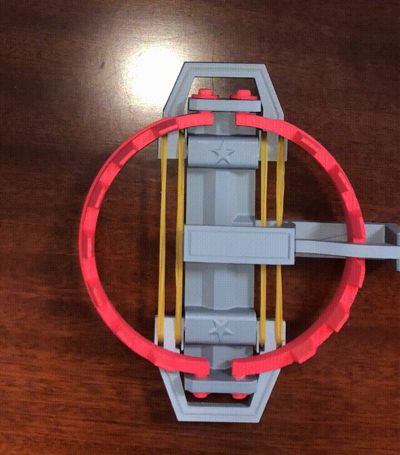
A miniature trap, intended solely as a toy and incapable of actually capturing small animals.
A deliberate half-centimeter gap is left between the two jaws, preventing closure to avoid injuring children. I used four rubber bands in the image; if you have children, I recommend reducing this to two.
Printing is straightforward, requiring minimal supports that are easily removed. A single plate suffices, operable directly from a mobile device.
I used two colors in the image, hence the two-plate print. If you prefer monochrome, simply select my single-color, single-plate print profile.
Assembly requires rubber bands—the type used for bundling money or produce. These are also included in the ToqBamboo basic kit B-ZC002.
Two areas utilize axles; these do not require printing. Simply cut appropriate lengths from 1.75mm filament. If significant axle-to-hole clearance causes the axle to slip, apply a small amount of adhesive or gently heat and compress the axle ends.
Boost Me (for free)
Your likes, saves, and boosts are greatly appreciated. Thank you for your support.
Some users have reported insensitivity or complete failure of the trigger mechanism. Consider the following points for optimal functionality:
- As shown in the blue box, the axle and hole must have a loose fit. If burrs or insufficient clearance exist, carefully smooth them.
- As shown in the green box, the jaw edges in my configuration feature a contacting print bed and a subsequent curved surface. Some prints may exhibit “elephant foot” or rough edges. Thorough smoothing is crucial, particularly towards the lower section where initial rubber band tension is minimal and lever arm is shortest; minor resistance can impede triggering.
- If the above steps fail to resolve the issue, increase the number of rubber bands or double-wrap the existing band to increase tension.

License
You shall not share, sub-license, sell, rent, host, transfer, or distribute in any way the digital or 3D printed versions of this object, nor any other derivative work of this object in its digital or physical format (including - but not limited to - remixes of this object, and hosting on other digital platforms). The objects may not be used without permission in any way whatsoever in which you charge money, or collect fees.
Comment & Rating (15)