Armored Fidget Spinner


Print Profile(2)


Description
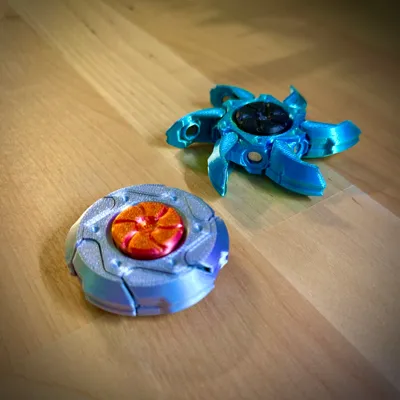
Armored Fidget Spinner
This is a mechanical Fidget Spinner design. The armored plates fan out when spun and close automatically when spinning stops. You can also slide your finger across the plates as it spins to shut the spinner in style!
Check out my latest version: https://makerworld.com/en/models/1490234-armored-fidget-spinner-x#profileId-1557464
Materials
- 12x 6×2 mm Magnets
Buy on Amazon - 1x 608 Ball Bearing (spinner-grade recommended)
Buy on Amazon - Glue (for securing magnets)
- (Optional) Lubricant (to reduce break-in time)
Printing
- Prints in 3 pieces.
- The main body and handle have there own color selector and print individually on the same plate to save time and filament with AMS.
- Create your own colorway by matching different filament to each color group.
- Use the AMS for multicolor, make it single color by selecting the same filament twice, or print parts separately.
- Use your fanciest or shiniest filaments for best results.
- Designed to be printed at a 0.2mm layer height with a 0.4mm nozzle.
- Printing times are around 1 Hour (0.2mm layer height with a 0.4mm nozzle).
Assembly
- Separate the armor plates from the main body and wiggle them until they move smoothly.
- Magnets - Magnet cutouts are found on the inside of the plate and correspond to a magnet hole on the outside of the main body.
- Magnets cutouts are countersunk to avoid the magnets from ever touching.
- You should expect a gap between the magnet and the surface.
- Glue in the magnets. Be super careful to get the polarity right! (they should attract)
- Ball Bearing - Push the Ball Bearing into the middle of the center cutout.
- Handles - push the “plug” side of the handle through the center of the ball bearing.
- Push the “socket” side onto the plug.
- Start using your spinner. You may need to loosen up the armor hinges a little for it to work smoothly.
It will Improve with time and use.
Please share your Colorways!
Boost Me (for free)
If you think this is cool
License
You shall not share, sub-license, sell, rent, host, transfer, or distribute in any way the digital or 3D printed versions of this object, nor any other derivative work of this object in its digital or physical format (including - but not limited to - remixes of this object, and hosting on other digital platforms). The objects may not be used without permission in any way whatsoever in which you charge money, or collect fees.
Comment & Rating (202)