Search models, users, collections, and posts

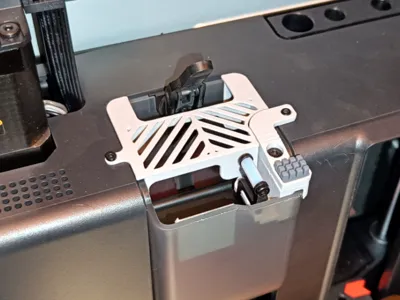
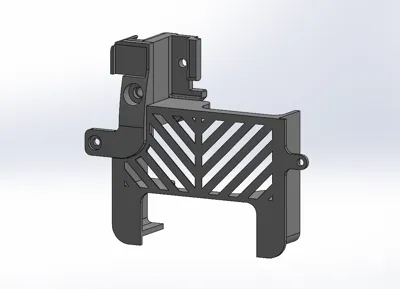
Nozzle Wiper with Purge Chute Cover for X1/P1

Remixed by

Print Profile(1)

All
X1 Carbon
A1
H2S
X1
P1P
H2D Pro
P1S
A1 mini
X1E
H2D
P2S
H2C
X2D
A2L

0.16mm layer, 3 walls, 15% infill
Designer
1.7 h
5 plates
4.8(114)

Open in Bambu Studio
Boost
449
1292
164
56
1.5 k
949
Released 

Description

Boost Me (for free)

If you liked my model, please support it with a boost if possible. Thank you.

Does NOT work if you have first layer scan enabled on the X1.


Update 17.09.25

Minor adjustments to the cover sizes.
Added "wiper top" versions with a silicone pad raised by 0.4, 0.8, 1, 1.2mm.

Changed acceleration in gcode from 30000 to 20000. This is especially important for the "wiper top+1.2mm" version.

IMPORTANT. No matter which version you use, first make sure that the nozzle will not catch on the plastic part of the model. The fact that +1.2mm works fine in my printer does not mean that it will work the same way in yours, as printer assemblies may differ.


==========


Minor size discrepancies have been fixed, but most importantly a purge chute cover has been made that fits this wiper.


Wiper uses A1 silicone pad. If the double sided tape on the pad does not hold it, then use a high quality cyanoacrylate glue.
 

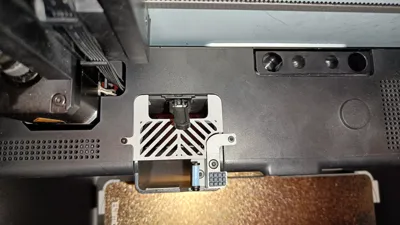
The original A1 pad are designed for a brushing motion with multiple passes, as is used in the A1 series of printers. Since the X1/P1 does not do this by default (it has no brush), do the following:

  1. In Bambu Studio or Orca Slicer, go to the Prepare tab and click the edit icon next to your printer.
  2. Navigate to the Machine gcode tab.
  3. In the Machine start G-code, paste 2 times code provided under the screenshots in the places highlighted in the screenshots below.
  4. Save.


Code for copy\paste:


;===== Scrubbler nozzle wipe start ABL_5/20/24 ==================

G90 ; ensure absolute mode (should already be in it, but here for safety)
G1 Z10 F1200 ; Make sure we don't hit the bed during wiping passes
G1 X128 Y265 F20000; start position, should be very close to where steel plate rub seq. ended
G91 ; relative mode
G1 X-45 F20000  ; run snake pattern from top back to front, run at max acceleration.
G1 Y-0.5 ; increment y slightly , and repeat back/forth while incrementing y.
G1 X45  
G1 Y-0.5
G1 X-45 
G1 Y-0.5
G1 X45
G1 Y-0.5
G1 X-45 
G1 Y-0.5
G1 X45  
G90 ; restore to absolute mode
G1 X128 Y265 ; return to start position.
G1 F3000 ; restore previous acceleration

;===== Scrubbler nozzle wipe end ================================

Comment & Rating (164)

(0/1000)

Nice setup, my only recommendation is to ensure that lower piece that holds the original wiper is really well tightened down. My first installation I had done with a clear PETG and I tightened it down to what I thought was snug, I didn't want to overtighten, but it was a good couple mm too high, though looking from the front it appeared ok. Not the case 😤. Thankfully I was watching and stopped it right away and then after a bit of looking and a probe with my Allen key I realized what I had pulled up too short when tightening it down and the clear PETG was playing tricks on me visually. So at any rate, make sure that one piece is really well seated against the chute itself.
(Edited)
designer
11
Reply
Hello everyone, Unfortunately, I have the problem that after scanning the first layer with the lydar sensor, the nozzle hits the wiper with the silicone tube exactly vertically. Collision with the screw head. Unfortunately, even after a long time I can't find where in the G-code I can adjust this.... Can anyone help me here? Many thanks in advance
The designer has replied
0
Reply
At the very beginning of the description it is written in bold. You need to be more careful.
1
Reply
Replying to @VkvitV :
Thank you very much, I have read it very carefully. I was just hoping that there is someone with more knowhow than me and that the G-code can be optimized so that the travel path after the scan is no longer made absolutely from the workpiece but absolutely to a desired machine coordinate. Thanks for the quick answer anyway PS. good design ;)
0
Reply
Replying to @me_Printing :
I haven't looked into this issue, but I think that the first layer scanning code is generated during slicing, which means it's closed. If it weren't so, someone would have done it long ago. Although I may be wrong, but logically this is true.
0
Reply
Boosted
Print Profile
0.16mm layer, 3 walls, 15% infill
Printed great and holds securely. I took the opportunity to line the chute with aluminum tape.
0
Reply
dose the tape make the poop slide easier. as in no blockage.?
0
Reply
Boosted
Replying to @user_386270929 :
It seems to, yes. I haven't had another blockage after another 200-300 hours. Honestly it's nice, but I'd pay for an upgraded chute that was fully coated with another slick material, if Bambu offered one. But, good enough for now.
0
Reply
Replying to @bluesy22 :
Try using Teflon tape. It has worked well for me with over 100 hours use
(Edited)
1
Reply
Print Profile
0.16mm layer, 3 walls, 15% infill
I used PLA supports, the model is good but weak
The profile uploader has replied
Show original
0
Reply
What is the weakness?
0
Reply
Print Profile
0.16mm layer, 3 walls, 15% infill
Great design!!
The profile uploader has replied
0
Reply
Thank you.
0
Reply
Print Profile
0.16mm layer, 3 walls, 15% infill
Perfect. 👍 But I ordered the wrong wipers and a few brushes broke off, but the Gcode and the print itself were flawless. 👌 I am now ordering the correct wipers. P1S - Stock Profile - ABS+ ESUN
(Edited)
Show original
0
Reply
Print Profile
0.16mm layer, 3 walls, 15% infill
Very good works perfectly printed in ABS
Show original
0
Reply
Print Profile
0.16mm layer, 3 walls, 15% infill
Passt hervorragend
0
Reply
Print Profile
0.16mm layer, 3 walls, 15% infill
works great, thanks. Printed from ASA
0
Reply
Print Profile
0.16mm layer, 3 walls, 15% infill
Thank you
(Edited)
0
Reply