Search models, users, collections, and posts

Halo 4 Needler / Needlegun

Remixed by

Print Profile(1)

All
X1 Carbon
P1S
P1P
X1
X1E
A1
H2D
H2D Pro
H2S
P2S
H2C
X2D
A2L

0.2mm layer, 2 walls, 15% infill
Designer
73.5 h
15 plates
4.9(8)

Open in Bambu Studio
Boost
295
865
36
36
436
137
Released 

Description

Content has been automatically translated.
Show original

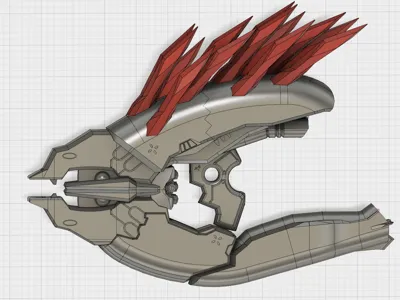
As a huge Halo fan, the Needlegun is an absolute MUST!! This version boasts LED illumination for an even more spectacular look.
My parts are currently undergoing painting, after which only the wiring remains.

I printed all parts in any color, glued and sprayed with filler, sanded, sprayed… you know the drill.


!!! IMPORTANT: THE NEEDLES MUST NOT BE SPRAYED, AS THE LEDS WILL NO LONGER BE VISIBLE !!!

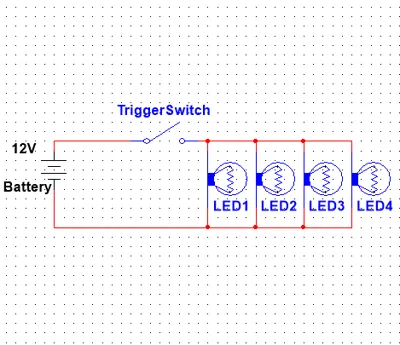
  • Electronics & Illumination:
    • Integrated, individual LEDs:
      • T10 LEDs in the "Needles"
      • T5 LEDs in the tip and rear area
    • Color selection: Pink and blue for the LEDs
    • Switch components, e.g., a 12×12×9 mm tact switch in the trigger


  • Printing Specifications & Material:
    • Estimated material consumption including support material: approx. 3 kg
    • Estimated print time: approx. 166–171 hours at 0.3 mm layer height
    • Print parameters:
      • 0.4 mm nozzle, 0.2 mm layer height
      • Support everywhere at a 35° setting
         
      • Optimization of the trigger assembly:
        • Use of a 12×12×9 mm tact switch
        • Addition of a trigger button that actuates the switch through a hole in the trigger


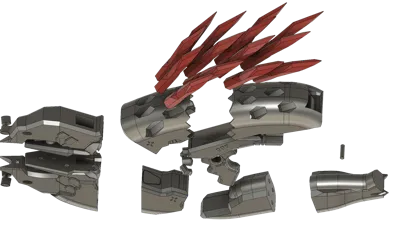
  • Parts and Piece Count Specifications:
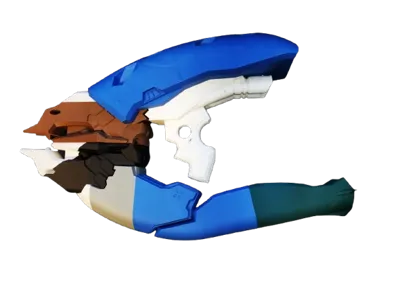
    • Individual parts subdivided into segments so that they can be printed in the colors depicted in the game (purple, pink, gray, black).


    • Specific quantities:
      • 14 Alignment Pins (9.5×38 mm)
      • 4 Alignment Pins (9.5×18 mm)
      • 4 LED holders for the front tip
      • 7 LED holders for the rear area
  • Power Supply:
    • A 12V DC AA battery pack (2×4 configuration) fits into the battery compartment of the top shell.

Comment & Rating (36)

(0/1000)

Boosted
Great print. Special request from my 5 year old grandson, so I made it in PETG. Printed it at 65%. Thanks! This is worth a boost!
5
Reply
Print Profile
0.2mm layer, 2 walls, 15% infill
Amazing! giving it 5 stars but would change some things about it to make it even better and easier to assemble. very impressive build and worth the time to print was simple to put together the use of the connection points for the larger pieces for the top and bottom very nice but I would have added some kind of connection points for where the front connects to the bottom parts and maybe where the trigger area connects to the front. it feels sturdy enough for my use but if you’re planning on cosplaying with it or something moving it around could be weak on the main connection points I look forward to any future designs
The profile uploader has replied
2
Reply
looks awesome!! I know exactly what you mean. Thanks for your feedback!
0
Reply
Boosted
Thanks for the photos! They were instrumental in assembly since there wasn’t any instructions for dummies like me. 😁
0
Reply
what is this piece for? can't find it anywhere in the picture with ask the parts exploded out.
0
Reply
It closes off the square hole in the back of the top piece behind the needles.
(Edited)
0
Reply
Boosted
Print Profile
0.2mm layer, 2 walls, 15% infill
Overall, excellent model! One of my favorite weapons from the Halo Universe (I wish I could find a decent Carbine model, too). Printed in Purple Silk PLA, Hot Pink PLA, and Grey PETG. This thing is bigger than expected and anyone wanting to print one without as much filament could easily scale it down if desired. I assembled the upper and lower purple portions first, then the Grey pieces, and then glued those together. I chose not to add LEDs. The only annoying part during assembly was that there is no dowel system to connect the upper purple to the trigger piece. I used a 2 part resin to bond everything together. 10/10 would recommend printing this if you like Halo stuff!
0
Reply
Loved this model, lots of fun to build and paint
0
Reply
what is the reason for the amount of crystals objects in the file? I'm counting 14 slots in the needler and there's 18 crystals. Just wondering why there's so many. also, for anyone else printing this, if you use transparent pink filament for the crystals....I'd suggest aligning them straight up and down with no support. there's no areas that would really need support, just give it a brim so it doesn't move too much. they didn't seem to like being printed the way they come in the file. maybe it was my printer but I think straight up will work much better.
(Edited)
1
Reply
does it need electrical stuff to stay together?
The designer has replied
0
Reply
No. The electrical stuff is just for the needles to glow. You can just glue it together. I prefer putting a coat of Spray Putty after glueing and then it can be painted. But glueing alone is also okay.
0
Reply
Replying to @Schiessboerger :
ye
0
Reply
One last question, sorry but what kind of LEDs are these because if I search for T10 or T5 LEDs on Amazon, car LEDs come up
The designer has replied
Show original
0
Reply
https://www.amazon.de/dp/B087RL7Y69?ref_=ppx_hzsearch_conn_dt_b_fed_asin_title_6&;th=1 Here is a german Link to it. But with that you will see which one you will need :)
0
Reply
Replying to @Schiessboerger :
Thank you so much!
0
Reply
Is it possible to get a photo of all the supplise needed to make this light up? I googled T5 LED and the amount of things I get is.. So much. I am not one for stuff like this but the needler was my childhood favorite Halo weapon so wanna do it justice!
2
Reply
I’m surprised this isn’t more popular
The designer has replied
designer
1
Reply
thanks! appreciate that! I'm still in building process (my needler fell down from a height and all my needles got broken. Have to reprint but it is worth lol
0
Reply