Search models, users, collections, and posts

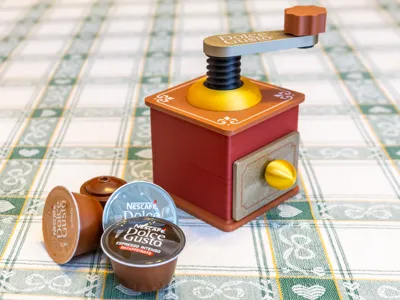
Coffee Grinder / capsule cutter

Print Profile(1)

All
X1 Carbon
P1P
A1
H2D Pro
P1S
P2S
H2S
X1E
H2D
X1
H2C
X2D
A2L

Coffee Grinder
Coffee Grinder
Designer
8.9 h
5 plates
4.7(3)

Open in Bambu Studio
Boost
94
187
23
6
98
23
Released 

Description

Membership

Do you want to sell 3D prints of this model? With a small expense you can earn big. Join the Membership program and choose the license that best suits your business!

Join


In countries like mine, where separate waste collection is mandatory, used coffee capsules cannot be disposed of as they are but must at least be emptied by separating the powder from the casing.

The Nescafé Dolce Gusto capsules remain sealed even after use and to remove the powder the simplest way is to cut them with a knife, but this is not a very safe system. I have designed various tools to open the capsules, improving them each time until arriving at what I believe to be the least dangerous system: the one which does not allow any contact between the blade and the human during use.

This model is made like a small coffee grinder and when cutting the capsule it is impossible to touch the blades.


Drawer assembly

  1. Mount the front panel on the capsule holder body (glue it if necessary);
  2. Insert the hook into the slot;
  3. Insert the knob all the way into the hole, aligning the rectangular notch of the hook with that of the knob;
  4. Make sure that the knob rotates freely, if not, check the alignment of the hole between the front panel and the capsule holder.

Body hinge assembly


For aesthetic reasons I did not use the usual hinges with the central pin (I should have placed them on the outside), but I used a sliding system that can be positioned hidden inside the grinder.

  1. Assemble one of the two semicircular guides (red on the figure) on the side of the lower body, fitting it into the appropriate slots (glue it if necessary);
  2. Place the upper body in the open position by inserting the sliding element into the slot of the guide you have just mounted;
  3. Assemble the second semicircle guide on the other side of the lower body in the same way as the previous one.

Crank assembling

  1. Insert the knob into the hole in the crank;
  2. Lock the knob by inserting the appropriate pin underneath.

Mounting crank in the body

  1. Insert the upper thread of the body from underneath, matching the notches with the slots;
  2. Place the dome from above, fitting it into the thread just inserted;
  3. Screw the rotating knob clockwise.

Blade group assembly


First, separate four segments with a 9mm cutter blade: these will be the blades that will cut the capsule. Be extremely careful when carrying out this and the following operations, because there is a risk of cutting yourself. Use protective gloves.


  1. Using tweezers, place the blades into the slots on the circular body as in figure 1 (do not do this with your bare hands, these blades are very sharp). The tip of the blades must protrude by approximately 4 millimetres;
  2. Position the four semicircles as in figure 2 so as to lock the blades in their seat;
  3. Insert the central element which will block the entire blade assembly. To do this you will need to use a bit of force, help yourself by tapping it with a small hammer or a piece of wood. Do not press it with bare hands as there is a risk of injury from the blades.

Assembling the blade group in the crank


Keeping the grinder lid open, insert the blade unit all the way into the appropriate hole on the crank thread (in collar if necessary).
Be extremely careful when carrying out this operation because there is a risk of cutting yourself with the blades. Use protective gloves and carry out the operation using a pair of pliers or any other tool that avoids contact of the blades with your body.

Your capsule cutting coffee grinder is ready!


How does it work?
1. Make sure the blades are fully raised. If they are not, turn the crank counterclockwise until it locks;

2. Place the capsule to be cut in the appropriate space in the drawer;
3. Insert the drawer into the base (be careful not to hurt yourself with the blades);
4. Close the grinder and lock it by turning the drawer knob 90° anti-clockwise;
5. Turn the crank clockwise until you hear the sound of the plastic being cut. If you have any doubts, rotate it until it stops (this means that the blades have reached the bottom of the capsule);
6. Turn the crank counterclockwise until it locks to raise the blades;
7. Unlock the grinder by turning the drawer knob 90° clockwise;
8. Open the grinder, remove the drawer and recycle the capsule by separating it from the coffee powder.
 

When you have finished, reinsert the drawer, close the grinder and lock it with the drawer knob before putting it away, to avoid touching the blades the next time you take it.
Everything can be rinsed off with tap water. If you want to wash the grinder in the dishwasher, make sure you have printed it with a material resistant to high temperatures!

Comment & Rating (23)

(0/1000)

Boosted
Print Profile
Coffee Grinder
great presets
The profile uploader has replied
profile
1
Reply
Thanks for sharing, you're doing a great job. I'd love to see the pics once you've finished assembling!
0
Reply
Boosted
Replying to @Officina23 :
not the best color choices but the print itself is clean
(Edited)
profile
1
Reply
Replying to @Krischun :
Colors are subjective, but you printed it well!
0
Reply
Hi, maybe a piece is missing.. can't find the capsule holder body 
The designer has replied
0
Reply
Hi, the capsule must be inserted directly into the drawer (drawer is the capsule holder, you can find it in the second print plate)
(Edited)
1
Reply
Replying to @Officina23 :
perfect, thank you
0
Reply
Unfortunately, I can't assemble it, the hinges can't be installed :(
The designer has replied
Show original
0
Reply
Hi, if you explain the difficulties you encountered, I'll help you solve them. 😉 Hinges are apparently the most difficult thing to assemble, but it's actually easier than it seems.
0
Reply
Replying to @Officina23 :
I shortened the marked part by 2 mm and reprinted it Now the assembly works
Show original
designer
1
Reply
Replying to @Cursten :
Thanks for the report, I'll check the project because I want to make sure it's not a design error.
1
Reply
Really cute, I saved it as a gift idea. Or in case I feel like printing it for myself ;-)
The designer has replied
Show original
designer
1
Reply
Thank you for feedback 😊
1
Reply
hello, the capsule holder body is missing please thank you
The designer has replied
Show original
designer
1
Reply
Hi, the capsule must be inserted directly into the drawer (drawer is the capsule holder, you can find it in the second print plate)
0
Reply
Print Profile
Coffee Grinder
Perfekt
The profile uploader has replied
profile
1
Reply
Thank you again ;-)
0
Reply
Bellissimo !
The designer has replied
designer
1
Reply
Grazie!
0
Reply
Boosted
The hinge could be better, but everything else is perfect
The designer has replied
designer
1
Reply
Hi @Thonorio yes the hinge isn't the best... I wanted to make a classic one but I didn't want it to be visible or too complicated to assemble, so I experimented this method! If you have already finished printing and assembling I would be happy to see some photos if possible
(Edited)
0
Reply
Boosted
Print Profile
Coffee Grinder
The profile uploader has replied
profile
1
Reply
Thank you for Boost
0
Reply
No more

License

If you want to use this model commercially, please join my membership.
Join Now
This user content is licensed under a Standard Digital File License.

You shall not share, sub-license, sell, rent, host, transfer, or distribute in any way the digital or 3D printed versions of this object, nor any other derivative work of this object in its digital or physical format (including - but not limited to - remixes of this object, and hosting on other digital platforms). The objects may not be used without permission in any way whatsoever in which you charge money, or collect fees.