Search models, users, collections, and posts

Krups Nespresso Essenza Mini Camper Wall Mount

Print Profile(1)

All
A1
H2D Pro
H2C
P1P
X1E
H2S
H2D
X1 Carbon
P2S
P1S
X1
X2D
A2L

0.2mm layer, 2 walls, 15% infill
Designer
10.4 h
3 plates
4.9(10)

Open in Bambu Studio
Boost
118
431
20
16
415
165
Released 

Description

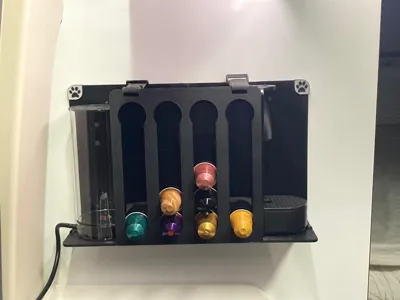
This wall mount allows you to safely secure your Krups Nespresso Essenza Mini in a camper van or else. 

It is symmetrical and allows you to take your coffee from the left or right side. The water tank is on the opposite side. 

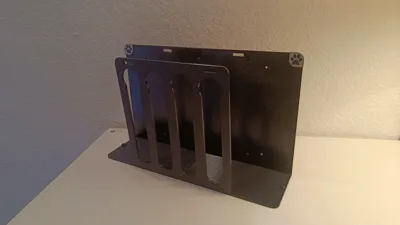
The front plate has slots to store your capsules. 

I use two velcro fasteners, but one on the machine backside is enough. This makes it possible to lift the lever on top of the machine. For transport I recommend using two fasteners. 

To eliminate vibration noise I left space to glue 2mm thick rubbers on each side of the coffee machine. You can also apply it on the holder itself. The STL file for a TPU print is attached, but you can also purchase it. 

I applied design corners because the holder fall down my table and broke on one of the corners. They are not included. If you like, I can upload them later. 

I left 4 holes to screw the holder against the wall. I left them fairly small, but you can always make them bigger, but not smaller. 

If you print the separate parts (like me) because your printer is just not big enough, you can print the separated parts. Only the left backplate needs support for the glue edge. 

Glue the back plates together and later glue the front plate. 

If you screw the holder to the wall, the glued parts will stay in position very well. 

Because of the big print volume I had to deal with warping. I recommend an enclosure and lower printing speeds with fan set to lower speeds. 

My sample is printed in PETG, but PLA should also work great. 

The print settings are really up to you. 

Please share your experience with this print and let me know if you have any improvements. 

Comment & Rating (20)

(0/1000)

perfect model with a pro inslogic nikel petg print 👍 I put the first layer in concentric on the front which gives a nice wire pattern too 👍 I printed the 3 parts at once on my creality HI in about 13h with the front flat and the other two parts vertically to optimize vertical strength when the coffee maker is inside. in short, I validate this model 99% 😁 the 1% is that I might have made chamfers on the fixing holes so that the screws are completely flush and avoid "possibly" scratching the coffee maker over time 😊 thanks for sharing 🤟🙏✨ here is the result in photo:
Show original
0
Reply
super design and print
Show original
0
Reply
Great design! I made a matching fixture that can be mounted on a pegboard (https://makerworld.com/zh/models/2139519-pegboard-hook-and-fixture)
Show original
0
Reply
Works great 👌 Thank you for the model ☕
0
Reply
Print Profile
0.2mm layer, 2 walls, 15% infill
Perfect, thank you.
Show original
0
Reply
Very nice model, what did you glue your PETG parts with
The designer has replied
Show original
0
Reply
Hello thanks for liking it :) I used standard all-purpose glue from Uhu Unfortunately that didn't last very long Afterward I attached the back to the wall with double-sided tape In the front the holder is held together by the front plate I plan to design an improved version that can be printed in one piece on, for example, the X1C For this, however, I still need the dimensions as I don't own the machine and the holder was a gift At that time, I found the rough external dimensions online However, to achieve an accurate fit, I need all external dimensions, including radii
Show original
0
Reply
Great idea and beautiful realisation ;) I would like the same unfortunately I don't have a 3D printer...
0
Reply
On YouTube, Antonio Hobby Puglia is the channel. Leave a comment on one of my videos. I will help you
Show original
0
Reply
Good morning I am new, I would be interested in this piece, do you know who could print it for me
Show original
0
Reply
*note. I would recommend you to widen the overlap for the backplates. The overlap is a bit small and flimsy
0
Reply
Print Profile
0.2mm layer, 2 walls, 15% infill
Good quality model, no issues were found
Show original
0
Reply

License

This user content is licensed under the MakerWorld Exclusive License.

You may create derivative works based on this object, provided that all such derivative works are published exclusively on the MakerWorld platform and include proper attribution to the original creator. You may not share, upload, host, distribute, or publish this object—or any derivative work of this object—on any other digital platform, marketplace, or distribution channel. Commercial use of this object and any derivative works is strictly prohibited. This includes, but is not limited to, selling, renting, sublicensing, or using the object in any context in which you receive monetary compensation or other financial benefits.