BBQ Spit Automaton


Print Profile(1)

Description
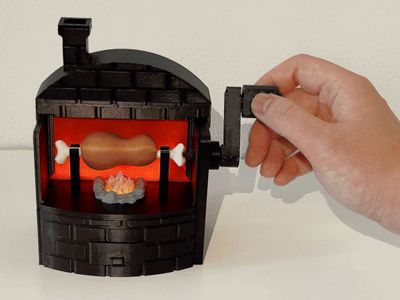
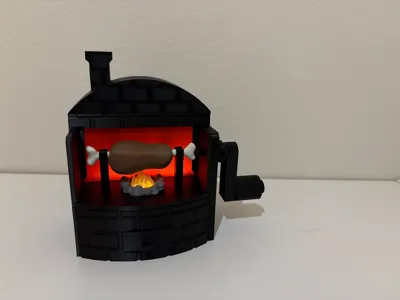
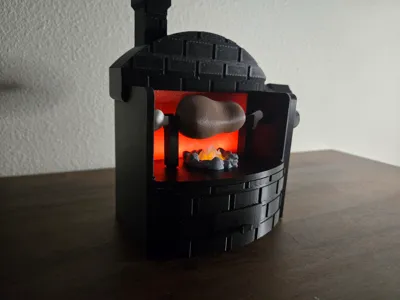
BBQ Spit Simulator Toy – powered by LED Tealight
A small toy that simulates a BBQ spit. By rotating the handle, it creates a realistic fire visual effect. The toy is powered by two LED tealights, which you can purchase from the Bambu store or Dollar Tree (or from other places like Amazon, as long as <4cm in diameter).
Printing Guide
- I used black PETG for most parts since I didn’t have black PLA, but I think PLA should work fine as well, as not much force required.
- The red screen is thin, so allow it to cool down before removing it from the print bed to prevent warping.
- Overall, it’s easy to print, and I didn’t encounter any major issues.
Assembly Guide
Prepare the Rolling Axis
Roll a sheet of foil paper onto the rolling axis. It reflects light onto screen, to provide the jumping flame visual effect.
Insert the Rolling Axis
From inside the box, insert the rolling axis into the holes on both sides of walls, ensuring both ends are securely positioned, and the rolling axis can roll. Be aware of the direction as later we will install a gear on the right end of the axis. (Note: The assembly animation does not show the foil paper wrapped on the axis.) There are also a back door for easy access to the tealight, and a front drawer, for an optional third LED (not necessary). Install both as well. It might be tight the first time, but will become smooth as use.
- Install the Gears
- Attach the smallest gear to the rolling axis.
- Place the gear with a single hole in the middle slot.
- Install the bottom gear, which has an axis attached to it, into the lower hole.
While installing the bottom gear, insert its axis through the elliptical cam, ensuring the cam is positioned between the pillars inside the box. The cam controls the up and down motion of the fire model.

- Install Additional Components
- Slide in the plate in the middle of the box.
- Put in the transparent flame model and the stones model.
Slide the thin red screen into the box along the slots on side, and insert to the bottom of the slot on the plate.

- Assemble the Meat and Bones
- Attach the meat and bones onto the plate.
- Install the driving gear on the right side.
Use the small connector piece to link the driving gear and the bone.

- Attach the Right Panel
- Insert the foot section of the panel into the box first.
Then, slide the top gear through its corresponding hole on the panel.

- Install the Roofs and Handle
- Secure the roofs and handle in place to complete the assembly.
Optional third LED in front drawer:
You can put an extra LED in the front drawer if you have one at hand, and if you want brighter fire even under daylight. It is designed to work with Bambu store's Magnetic Controlled LED Light. The fire will becomes much brighter, but maybe too bright in dark.


License
You shall not share, sub-license, sell, rent, host, transfer, or distribute in any way the digital or 3D printed versions of this object, nor any other derivative work of this object in its digital or physical format (including - but not limited to - remixes of this object, and hosting on other digital platforms). The objects may not be used without permission in any way whatsoever in which you charge money, or collect fees.
Comment & Rating (3)