Search models, users, collections, and posts
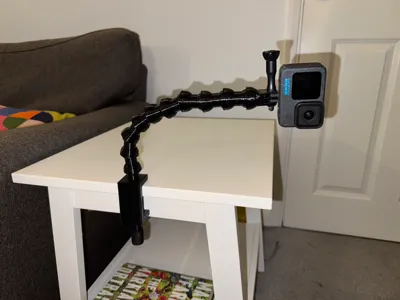
GoPro Clamp Mount with Flexi Arm
Remixed by
IP Report


Print Profile(3)

0.2mm layer, 2 walls, 15% infill
Designer
4.8 h
1 plate

Even Stronger Clamp 0.2mm layer, 5 walls, 40% infill
Designer
5.4 h
1 plate

Stronger Version 0.2mm layer, 3 walls, 15% infill
Designer
5.2 h
1 plate
Open in Bambu Studio
Boost
218
540
60
21
840
493
Released
Description
If you liked my GoPro Clamp Mount (https://makerworld.com/en/models/749047#profileId-682480) but wanted a bit more flexibility, then this might be the model for you. This model adds a flexible segmented arm to the clamp, to allow for adjustable positioning of the camera to get just the right angle and shot. The camera can be tilted and moved and (subject to getting the print right) will hold in position where you put it.
This should be considered a relatively advanced print though, and you might need to make adjustments based on your printer and the filament you are using.
Some guidance:
- I've printed this in PETG and it workings with the settings in the file. PLA or other filaments might not be strong enough for this model. I have also done a test print of the Arm Segments using a 72D (hard) TPU, and that worked OK and might be a good alternative to prevent loosening of the joints with repeated movement.
- Each type of object has different settings in the 3MF file including:
- The Clamp Body is set to print vertically so that the partial globe on the top prints with the right geometry, so this part will need supports for the top part of the clamp - they are set to tree supports which will ‘grow’ from within the threaded hole and will need cutting for removal (note: this means that the upright section of the clamp body relies on good layer adhesion - you could add more walls if you are concerned about strength, and you should avoid overtightening the clamp)
- The Arm Segments are set to print with Random Seams so that the fit of the segments together is less dependent on the orientation of the segments and whether they are seam-to-seam or not. They also have XY Hole Compensation (https://wiki.bambulab.com/en/software/bambu-studio/xy-hole-contour-compensation) set to -0.2mm. This is the main way to adjust how tightly the segments fit together to work well with your printer and filament. I recommend printing 3 segments at a time, and aiming for a fit that feels too tight when the segments are initially assembled, as they will loosen somewhat as they are moved - you might need to use considerable force to put them together, and bear in mind that they will adjust more easily when they are part of a longer assembly.
- The Arm Segments and the GoPro Mount Segment are set to print with brims - you might not need this, so experiment and see how good your bed adhesion is.
- The GoPro Mount Segment is also set to use supports, though if you select “Critical Areas Only” the Bambu slicer suggests you don't need them - you can decide whether you want to risk it or not. You might also need to open up the hole in the GoPro Mount a little - either with a small circular file, or with a 5mm drill. Otherwise the GoPro screw will still screw through the mount, but won't spin independently for securing the GoPro. You will need to add a captive nut from another GoPro mount or a hardware supplier - I used an M5 Cap Nut that I bought online.
Feel free to ask questions, and all the best with your printing!
This remix is based on


License
This user content is licensed under a
Creative Commons Attribution-Noncommercial-Share Alike
Comment & Rating (60)