Search models, users, collections, and posts

Hogwarts Castle Night Light & Stand

Remixed by

Print Profile(6)

All
A1
A1 mini
X1 Carbon
H2D
P1P
X1
P1S
X1E
H2D Pro
H2S
P2S
H2C
X2D
A2L

Castle (0.4 hotend)
Castle (0.4 hotend)
Designer
2.5 h
1 plate
4.8(25)

Castle (0.2 hotend)
Castle (0.2 hotend)
Designer
8 h
1 plate
4.5(8)

Stand
Stand
Designer
1.8 h
1 plate
4.6(16)

Stand (No AMS)
Stand (No AMS)
Designer
1.9 h
3 plates
5.0(4)
Click to see more

Open in Bambu Studio
Boost
291
700
116
34
586
309
Released 

Bill of Materials

Maker's Supply Kits and Parts
Select all

Description

This display stand is designed for the iconic Hogwarts Castle model and can also serve as a night lamp. It works with both LED flame tea lights and RGBW puck lights.

You don’t need an AMS to print it — just slice the model in Bambu Studio. For the castle itself, a 0.2 mm hotend is recommended for the best detail.
There are dedicated print profiles included to make printing without an AMS easy — one for the A1 mini and another for all other printers.


Parts included:

  1. Main body – the castle stand
  2. Bottom cap – closes the opening for the tea light or puck light
  3. Inner perimeter ring – supports the castle from inside the stand

Print instructions for profiles without an AMS:

  • Print the first plate with the HP logo.
  • Change the filament to your second color.
  • Keep the logo plate on the build plate — do not remove it.
  • Start printing the second plate with bed leveling disabled.

Assembly Instructions:

  1. Insert the inner perimeter ring
    • Gently squeeze the ring and insert it through the top opening of the main body.
    • Once inside, let it expand so it sits snugly against the inner wall.
    • If the fit feels loose, apply a small amount of glue from the inside to secure it.
  2. Mount the castle
    • Place the Hogwarts Castle model onto the top of the stand.
    • The castle should rest securely on the inner perimeter ring.
  3. Add the light
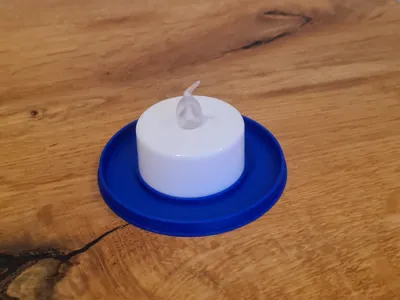
    • Insert an LED tea light or puck light into the bottom opening.
    • Close the opening with the bottom cap.

Now your castle has a sturdy display stand and a magical glow! ✨

Boost Me (for free)

If you find this model useful, a quick Boost helps others discover it too.

Comment & Rating (116)

(0/1000)

Print Profile
Castle (0.2 hotend)
Simply a beautiful print, thank you for sharing☺️
The profile uploader has replied
Show original
0
Reply
Thank you for the rating!
(Edited)
1
Reply
used support?
0
Reply
Replying to @Vishu_0911 :
no
0
Reply
hi I have a small problem here where it was stringing during printing as I've seen others also have this kind of error can this be fixed somehow it starts stringing there the castle printed great
The designer has replied
Show original
0
Reply
Hi! This looks like an under-extrusion issue. You are the first to report this issue. I assume your filament is already calibrated, but I’d recommend cleaning the nozzle — or swapping it out if you have a spare. What filament are you printing with?
0
Reply
I also have this problem
Show original
1
Reply
I also have this problem
Show original
0
Reply
Print Profile
Castle (0.2 hotend)
Such a beautiful print, one of my favorites Thank you
The profile uploader has replied
Show original
profile
1
Reply
Thanks a nice one!
0
Reply
Print Profile
Castle (0.4 hotend)
great design
The profile uploader has replied
profile
1
Reply
Thank you for the rating!
0
Reply
outstanding results, well done 👏
1
Reply
Print Profile
Stand
I printed it with a 0.4 mm nozzle and it went wrong, the print, I changed to 0.2 mm and the result was perfect. Thank you so much 😊
(Edited)
Show original
profile
1
Reply
Print Profile
Castle (0.4 hotend)
Second time printing it, this time in black and the result is still spectacular, thank you again
(Edited)
Show original
profile
1
Reply
Speechless it's IMPRESSIVE super meticulous details a perfectly fitting piece with unparalleled purity a million thanks
(Edited)
The designer has replied
Show original
0
Reply
Looks awesome in pink as well. I am glad you like it!
0
Reply
Thanks for the print, turned out amazing. I printed the A1 mini stand( in single colour) and not sure if this is the right way to put it. Can someone guide( the way others have assembled seems to be different). I put the perimeter ring like structure from the inside of base to support the castle( Please correct if I am wrong). Thanks!
(Edited)
The designer has replied
0
Reply
Thanks for the boost! You got it right, this is the right way to assemble it!
(Edited)
1
Reply
Great with a 0.4 nozzle, aside from a few minor imperfections
Show original
1
Reply

This remix is based on


License

This user content is licensed under a Standard Digital File License.

You shall not share, sub-license, sell, rent, host, transfer, or distribute in any way the digital or 3D printed versions of this object, nor any other derivative work of this object in its digital or physical format (including - but not limited to - remixes of this object, and hosting on other digital platforms). The objects may not be used without permission in any way whatsoever in which you charge money, or collect fees.