Hueforge Frame—221x156—Image-less


Print Profile(1)

Description
Please read the entire text beforehand, as it contains important information.Sorry about that!
For some, this information will be familiar, and for others, it might be new, offering something to learn.
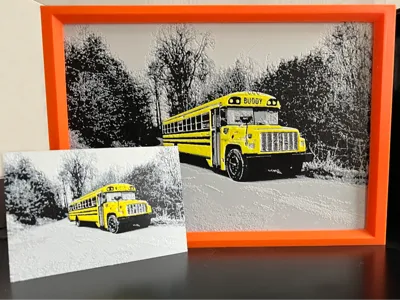
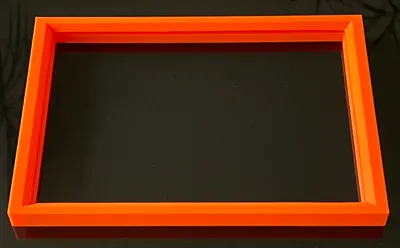
Here I have the matching Hueforge frame made of PLA for my Hueforge pictures, without the picture itself.
This frame is, for example, for the Hueforge US Bus picture in my profile.
This frame has a size of 221x156, and you can also print it in PETG.
(The frame for 100x100 and 150x150, as well as 200x200, is also in my profile.
Regarding the information:
The Hueforge pictures are simply inserted from the top, ensuring a quick change.
I have adapted the 3mf file so that you only have one tree support at the front of the slot. Just slice the file, and you'll see it. Since everyone prefers a different method for fastening or hanging, I've omitted that here. My pictures stand on the cabinet.
IMPORTANT‼️‼️
However, since it's not yet clear to all users how the PETG Support interface works, I have omitted it here and ask you to
1. either set it up yourself or
2. If you want the file (i.e., the pre-configured file with the PETG or PLA interface) from me, feel free to send me a message here on MakerWorld, and I will gladly send you the modified file & its brief instructions.
What is the PETG interface? I'll briefly explain that at the very bottom.
Furthermore, please note, that since I made the other 3 inner edges without supports, some threads might run across during printing.
You can easily remove these later; this was the case in some of my test prints.
However, I advise against doing the support all around the inside, as it was not easy to remove the support there after the test prints. Even though I used a slender tree support and the PETG interface as a separation. Also, if Bambu Studio gets stuck during slicing, it's because you are using an old Bambu Studio version.
And as always, if my 3mf file changes your colors in the slicer, simply click on "resync," and your set colors will reappear. The printer must be on for this.
My best print profiles for PLA & PETG are also stored and apply to Tex Pei.
That should be all, and I hope you like the frame and that I continue to receive
such nice feedback or a rating.
I would also like to thank Kris (@laanaar) for his tireless help with this project
and all users who support my models/pictures. Thank you very much for that.. you are amazing.
EXPLANATION of the PETG-PLA INTERFACE:
The PETG interface or PLA interface is always used when you want to cleanly remove the support structures from your models. As mentioned, you can use PETG as a separation layer for PLA, or vice versa, PLA for PETG, because both filaments do not bond during printing. This results in clean and beautiful surface finishes for the support structures.
A detailed German video about this is available on YouTube on the channel: Manbo and it is called
Ultra Smooth Surfaces.
License
You shall not share, sub-license, sell, rent, host, transfer, or distribute in any way the digital or 3D printed versions of this object, nor any other derivative work of this object in its digital or physical format (including - but not limited to - remixes of this object, and hosting on other digital platforms). The objects may not be used without permission in any way whatsoever in which you charge money, or collect fees.
Comment & Rating (0)