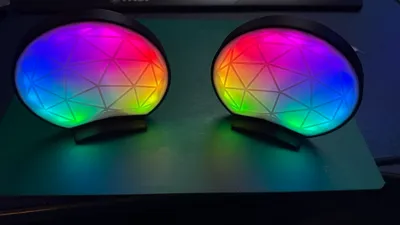
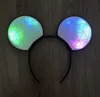
Disney Ears - Magnetic clip on and customizable


Print Profile(4)


Description
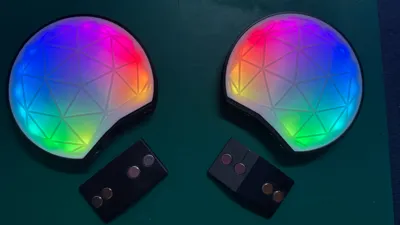
I've redesigned these v2 ears from the start to include 4 magnets for better hold as well as interchangeable front plates.
v1 - https://makerworld.com/en/models/214694#profileId-275648
We're off to Disneyland and I wanted a pair of ears that I could customize depending on the day and characters we were meeting.
These have a magnetic clip that you have under your hat and the ears simply clip on.
*I've added a 2nd style clip that is thicker and can house 9 x 5 mm magnets - and slightly protrude to help with going through thicker material.
I am currently working on a stronger magnet system that could be used for thicker items like beanies - updates to follow.
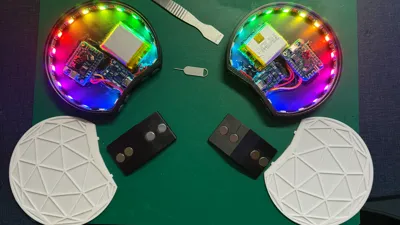
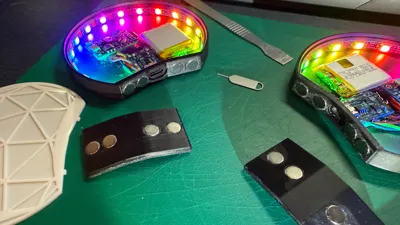
The front interchangeable plates are clipped together using a couple of little notches.
To release the front plate, you can either use a paper clip or sim eject tool to push through the little hole or a thin pry tool between the face plate and the body. (paperclip / sim eject tool is a little fiddly)
I plan to release plenty of different face plates so keep an eye on my page for releases - or give me a follow.
If there is a particular design you'd like, drop me a message and I will see what I can do for you.
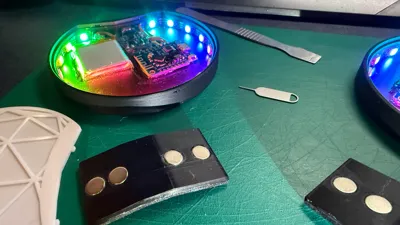
The ears have Neopixels to light the front design.
Each is run from it's own Wemos d1m1 microcontroller board with a 500mah battery + lithium charger.
Utilizing WLED to program the Wemos, you can connect to each controller and change the light show to any one of many presets available.
I chose to glue everything in place with contact adhesive, but this takes much longer to dry so be patient.
Else using hot glue will get you the same result - just quicker.
Hardware used
5mm WS2182b Neopixel strip - I chose 16 led's as that fit quite well
500mah lithium battery
- https://www.ebay.co.uk/itm/264945824530
Lithium battery charging module (Type C 18650)
Mini switch
8x3mm Neodynium magnets
https://www.amazon.co.uk/dp/B07JGT9ZP8?ref_=cm_sw_r_cp_ud_dp_9T69G61B60P5MVEHT4KJ
or
9x5mm magnets for the thicker clip
Some wire for connecting everything together (26AWG)
WLED Installer
This installer is web based and really easy to use.
Simply plug the Wemos to you pc via USB and then hit “install” on the web page.
It will show you a list of available connected hardware and allow you to flash the program to the Wemos controller.
Once flashed, you have the option to connect to your home network wifi - but I chose not to as I wouldn't use these ears at home.
(you can do this again later in the config)
WLED broadcasts it's own wifi AP which you can connect to via your mobile and then both program and control.
*Under LED Preferences, you need to update the no of LED's you have per ear and then hit save.
I also chose to change the wifi settings so each ear was broadcasting either left or right with my chosen SSID and password.
There are plenty of WLED setup guides available on Youtube if you need, else let me know and i can try make a video on the process.
Keep a look out for more face plates or give me a follow.
License
You shall not share, sub-license, sell, rent, host, transfer, or distribute in any way the digital or 3D printed versions of this object, nor any other derivative work of this object in its digital or physical format (including - but not limited to - remixes of this object, and hosting on other digital platforms). The objects may not be used without permission in any way whatsoever in which you charge money, or collect fees.
Comment & Rating (84)