Search models, users, collections, and posts

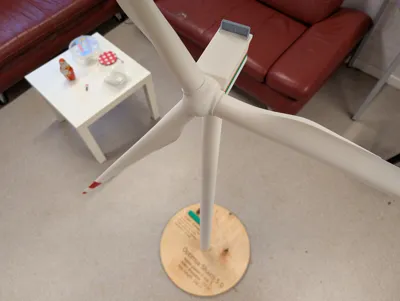
Wind Turbine Model 2.3 Meter height

GIF
GIF

Print Profile(1)

All
P1S
P1P
X1
X1 Carbon
X1E
A1
H2D
H2D Pro
H2S
P2S
H2C
X2D
A2L

All Parts
All Parts
Designer
47.6 h
11 plates
4.9(16)

Open in Bambu Studio
Boost
313
580
80
40
898
138
Released 

Bill of Materials

List other parts
  • Roller Bearing 608 2RS 8x22x7 mm x 1:
  • Roller Bearing MR-18307-2RS 18x30x7 mm x 3:
  • Round Magnets Ø 30,0 x 3,0 mm x 6: get high quality and strong ones, otherwise blades may fall of
  • M8 nut x 2:
  • M8 bolt x 2: Length depending on base plate width.

Description

Wind Turbine Model to the scale of 1:100

  • Hub height 1,4 m
  • Total height 2,3 m
  • Rotor diameter: 1,8 m

The model is fully functional with 3 degrees of freedom.

  1. Yaw (with roller bearings)
  2. Rotor rotation (with roller bearing)
  3. Pitch (via strong magnets)

The model can be disasembled in to 5 parts with the blades of 0.87 m as the longest part.

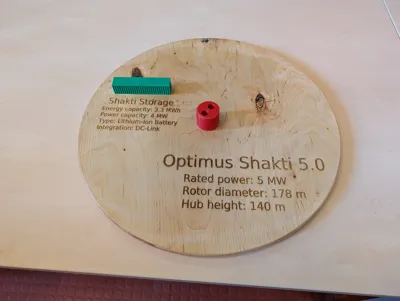
The tower has a thread in the middle in order to make transport easier. There is also a thread at the bottom and a tower mount which can be bolted down to a plate with two M8 bolts and nuts.

The magnets are getting press fitted into the hub and the blade ends and allow full pitch adjustment and easy disassembly.


Assembly

  1. The tower sections with the threads are on a seperate build plate. Play around with your settings in order to make them fit nicely. A small layer height is key to make the threads work.
  2. Print nacelle and fit bearings. Remove the support thoroughly. Now press in two of the 30 mm bearings.
  3. Print the top tower section (section 7). Press fit first the smaller 22 mm bearing into the bottom. Than the 30 mm bearing on top.
  4. Print the spinner.
  5. Print the shafts. Try to fit them into bearings and spinner. They should be fitting tight in there. If it doesnt fit adjust the size by scaling. Printing ABS with 10% cooling can be tricky. Take your time and get it fit nicely.
  6. The Yaw shaft is suppposed to be press fitted into the nacelle. If it is not holding tight help with a little bit of glue (epoxy)
  7. Before assembly press the magnets into the spinner.
  8. Assemble the top tower section, the yaw shaft, the nacelle and the spinner. 
  9. Print all other tower sections and the connection pins. Glue them together with epoxy. The connection pins help with the aligment.
  10. Print all blade sections and the connection pins. Glue them together. The connection pins help with the aligment.
  11. Press fit the magnets into the blades. Pay attention that the magnets are in the right orientation. Otherwise they will counteract each other.
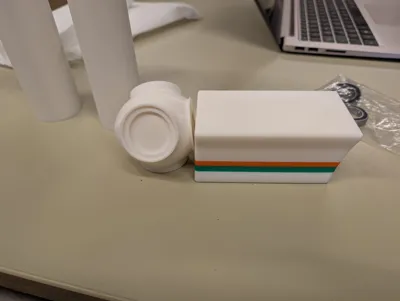
  12. Print the cooler and glue it onto the nacelle.
  13. Print the tower bottom mount and screw it onto a wooden base plate or something similar.
  14. Assemble everything and smile at the really nice model.


Parts List:

  • Bearings:
    • 1x  608 2RS 8x22x7 mm
    • 3x MR-18307-2RS 18x30x7 mm
  • Magnets:
    • 6x  Ø 30,0 x 3,0 mm (get high quality and strong ones, otherwise blades may fall off)
  • Screws:
    • 2x M8 bolt
    • 2x M8 nut

Transparency hint:

The original turbine was developed in the wind energy engineering master program of the university of applied science Flensburg (Germany) in 2025. This is the down scaled model for the final project presentation.

Comment & Rating (80)

(0/1000)

Boosted
Printed really well! We modified the hub part and the nacelle and included a motor + rpm detection to drive the turbine with up to 30rpm. It's very stable and works incredibly well for our usecase. Thank you for publishing the model!
(Edited)
The designer has replied
designer
4
Reply
Thats really nice. Thanks for sharing. :)
1
Reply
Replying to @The account has been deleted :
This is the down scaled model for the presentation of the Optimus Project 2024/2025 from the Wind Energy Engineering Master of the University of Applied Sciences Flensburg, Germany. The turbine was developed during the project. So to say there is no "real" model. This is the original one.
(Edited)
1
Reply
Replying to @The account has been deleted :
I uploaded the step file. Have fun =)
2
Reply
Thanks to the drawings provided by the author, it is not easy to print the original size of A1mini. It is suggested that the hub and blade should be connected by bearings, which will not only increase the strength but also change the pitch.
The designer has replied
designer
2
Reply
The magnets allowing pitch change as well. In my opinion the disadvantage with bearings is they will move freely and the pitch settings will most likely not stay during rotation. Which would be quite unrealistic. Also disassembly with bearings is quite difficult, with the huge diameter of the rotor. These are my arguments against bearings for the blade connection. But feel free to suggest a solution, do a remix of the model and share you idea.
(Edited)
0
Reply
Remote control impeller power upgrade
GIF
1
Reply
Replying to @The account has been deleted :
This is the interior of the cabin
2
Reply
Print Profile
All Parts
you made my son's birthday! he loves all things windturbins, we have about 30, this was his favorite...
3
Reply
Should I print the parts lying down or standing up?
The designer has replied
0
Reply
and can I put 0% infill, so PrusaSlicer puts the necessary supports and I save material and the turbine is lighter? I managed to slice 3 blades and the tower, requiring 532000mm³
0
Reply
Replying to @Davizera :
I would not recommend to do that since it is a functional model. The leaver arm of the tower alone is 1,4 m. I would have the concern that it will break really easy. Of course you can try to save material but it will be most of the time a trade of between strength and cost. :)
(Edited)
0
Reply
Tower and blades were printed standing up. Nacelle was bottom plane onto build plate and printed with variable layer heigh. Spinner was printed auto oriented with variable layer height.
0
Reply
Hello, I printed the parts one by one but I can't put them together. Are there any installation details?
The designer has replied
0
Reply
Look at the model description under assembly. Looks also like your are missing a lot of pieces. Check if you got everything printed before final assembly.
0
Reply
Replying to @julezz :
ok thank you🙏🏻
0
Reply
Print Profile
All Parts
Quite a project! I used PETG exclusively. two issues. Those blades aren’t about to stay on with magnets outdoors in real use, so I had to glue them on. Also the post connecting the tower to the nacelle should be printed solid. Mine broke where it goes into the nacelle. Nice model though! Thanks!
profile
2
Reply
Top Thanks for providing it
Show original
designer
1
Reply
@julezz Thanks for this prototype, I loved the model but I modified the hub and the nacelle, I put a motor on the nacelle, and for the connection between the hub and the blades, I threaded them, the bad thing is that I took away a degree of freedom, but I left them with an angle of attack so that they would give a visual of natural movement
GIF
Show original
0
Reply
Hello! Love the idea for this print and am excited to print it! After reading the comments I ordered several spools of filament specifically for this. Sorry if I'm missing it, but do you have a link to all of the bill of materials? That way I can be sure to order the proper fit and best quality bearings/magnets for this project? Thanks again!
The designer has replied
designer
1
Reply
The necessary items are listed in the description.
0
Reply
Replying to @julezz :
Hey! I did see them listed, I was only asking because when I saw it on the Bambu Handy app it said, "Bill of Materials: Please go to MakerWorld for a one-click purchase of the BOM." So I was just hoping that maybe somebody had the best quality ones all compiled in a one-click amazon cart/page or something. No worries at all, I'll just order some. Thank you for replying!
0
Reply
Replying to @BryceTy182 :
You can enter them in to the makerworld BOM but I didnt do that because BambuLab does not sell all the items required.
0
Reply
Boosted
Was the depicted model printed using the provided 3MF file? Are all the settings in the 3MF file accurate? I would like to commission the model and therefore find it difficult to readjust anything if something is amiss
The designer has replied
Show original
designer
2
Reply
The files include the settings used for this model No guarantee is provided The result always depends on factors such as printer, filament, and environment
Show original
0
Reply
Boosted
Replying to @julezz :
Certainly! Thank you for the information!
Show original
0
Reply