Silicone Wound Packing Trainer Mold - Laceration


Print Profile(1)

Description
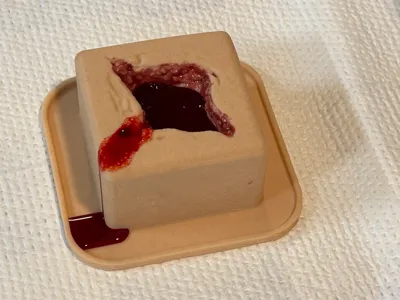
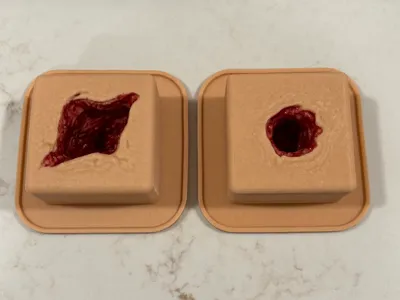
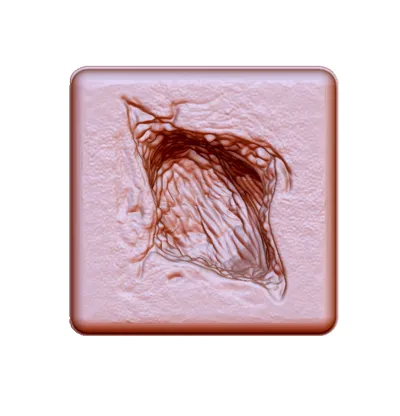
DIY silicone wound packing trainer mold designed for Stop the Bleed, EMS, and trauma simulation training. This model creates a durable, reusable trainer with realistic depth and resistance for practicing proper hemorrhage control and wound packing techniques.
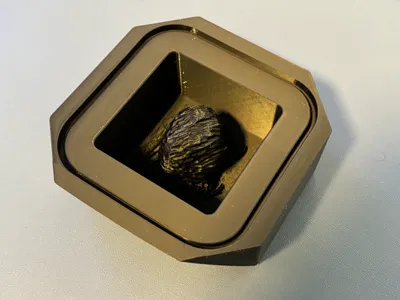
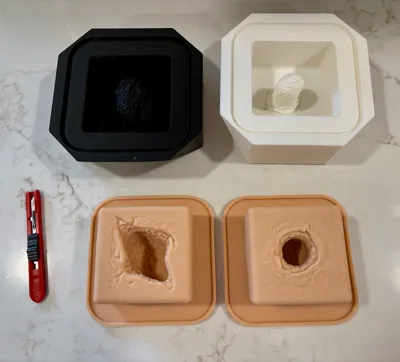
This is a 3D-printed mold for silicone casting, not a finished trainer.
🔥 Why This Trainer Works
- Deep wound cavity for realistic packing resistance
- Durable silicone allows repeated use
- Low-cost alternative to commercial trainers
- Scalable for group training (make multiple units easily)
🎯 Ideal For
- Stop the Bleed courses
- EMS / paramedic training
- Nursing & medical education
- Simulation labs and skills training
🩸 Optional Enhancement (Highly Recommended)
This model can be modified to simulate active bleeding:
- Add tubing to the base
- Connect to a syringe or IV bag
- Create realistic bleeding during training
👉 This significantly improves realism and learner engagement
🧰 Materials Needed
- Ecoflex 00-20 or 00-30 silicone
- Silicone pigments (flesh + red tones)
- Mold release (Ease Release 200 or similar)
- Flocking (optional, for added realism)
A 2 lb kit will produce multiple trainers
🖨️ Printing Notes
- PLA or PETG
- 0.2 mm layer height
- 2–3 walls
- ~15–25% infill
Ensure smooth print surfaces for easier demolding.
⏱️ Difficulty & Time
- Difficulty: Intermediate
- Active build time: ~1 hour
- Cure time: ~4–6 hours
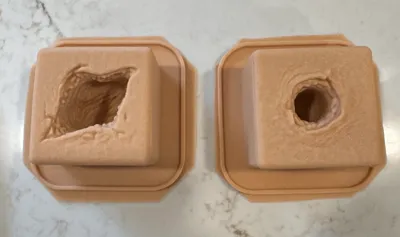
✅ Expected Result
The finished trainer provides realistic tactile feedback and resistance for repeated wound packing practice, making it ideal for both individual and group training environments.
🔗 Related Models
Check out the Bullet Bullet version for additional training scenarios.
🧪 Casting Instructions (Simplified for MakerWorld)
1. Prep the Mold
- Clean and dry mold
- Apply light, even coat of mold release
- Let sit ~5 minutes
2. Plan Your Batch
- ~300 mL total silicone per trainer
- Split evenly:
- Part A: 150 mL
- Part B: 150 mL
3. Mix & Color
- Add pigment to Part A and Part B separately
- Match color before combining
- Add flocking for realism (optional but recommended)
4. Combine & Mix
- Mix 1:1 (A + B) thoroughly
- Scrape sides and bottom
- Mix for 60–90 seconds until uniform
5. Pour
- Pour in a thin stream to reduce bubbles
- Tap mold lightly to release trapped air
- Slight overfill is OK
6. Cure
- ~4 hours at ~73°F
- Longer if cooler
- Do not disturb during cure
7. Demold & Trim
- Gently flex mold to release
- Trim excess silicone (flash)
- Keep outer lip for fluid containment
🩸 Optional: Add “Blood Layer”
- Mix SIL-Poxy + NOVOCS to thin
- Add small amount of red pigment
- Paint inside wound cavity
- Let cure ~1 hour before handling
- Full cure ~24 hours before use
🩸 Optional: Add “Active Bleeding”
- Insert 1/8" silicone tubing through side of trainer and into cavity.
- Use metal rod or awl to create tract and introduce tubing
- Attach syringe, accessory IV bag, or ketchup bottle as blood source
💡 Pro Tips
- Tint A & B separately → prevents color streaking
- Avoid latex gloves → can inhibit silicone cure
- Pour slowly → reduces bubbles
- Add slight color variation → improves realism
⚠️ Common Issues
Sticky or uncured silicone
- Likely contamination (latex, sulfur, etc.)
Color streaking
- Not mixing pigments evenly
Air bubbles
- Pour too fast or too thick
🧼 Cleanup & Reuse
- Wash finished trainer with mild soap + water
- Reapply mold release before each use
- Store molds clean and dry
License CC BY-SA
Wound packing - molds for silicone casting
by decentsimulators is licensed under the Creative Commons - Attribution - Share Alike license.
This remix is based on


Comment & Rating (17)