Search models, users, collections, and posts

Magnetic Connector for Electronic Projects

GIF

Print Profile(1)

All
P1S
H2D
X1
X1E
X1 Carbon
A1 mini
A1
P1P
H2D Pro
H2S
P2S
H2C
X2D
A2L

just choose plate with size you need
2.8 h
8 plates
4.8(15)

Open in Bambu Studio
Boost
1026
2306
38
21
522
186
Released 

Description

Features

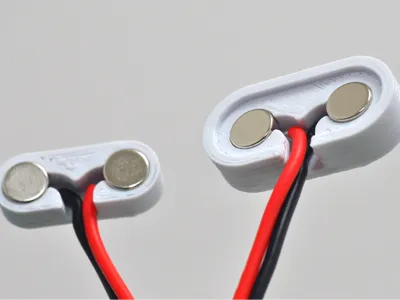
  • A magnetic connector for low-powered, removable electrical connections
     
  • Fits two neodymium magnets (See below for sizes supported)
     
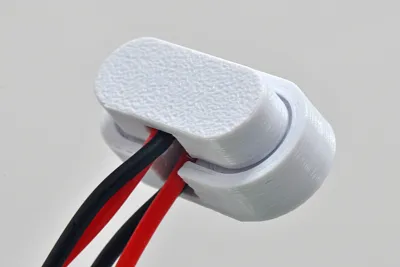
  • Compact and easy to build into your models - roughly 10mm tall and 25mm wide when connected
     
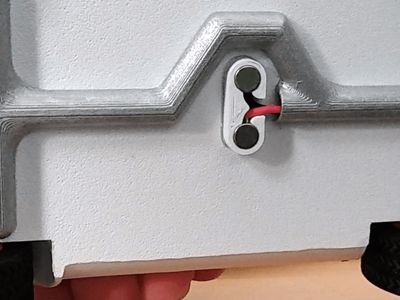
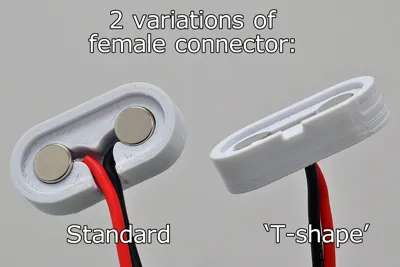
  • 2 different “female” connectors depending on if your wires go alongside the connector, or out the back and through what it's attached to
     
  • Supports a wide variety of magnets - feel free to leave a comment if you want a version designed for a different size!

Parts Needed

Printing Guidelines

  • Layer height: 0.2mm
    Supports: No
    Brim: No
    Walls: 3+
    Infill: 10%+

Assembly

  1. Solder wire to your magnets - I used this guide (SuperDork42 recomments this guide that helps keep your magnets' strength!) Soldering your magnet will reduce its strength slightly, but provided you work quick as in the video, it'll remain fairly strong.

    Note: If you solder the wires so that the magnets' poles connect like this:

    N-S on male connector
    S-N on female connector

    the magnets will repel if you try to connect them the wrong way round!
     
  2. Insert the magnets into the connector, bending the wire to follow the guides. It should be a press-fit, but if not (due to filament etc.), run some superglue round the edge, where the magnet presses against the connector. If you're using large or strong magnets, superglue is highly recommended.

If you need to carry data as well, check out the 3-pin version!

Comment & Rating (38)

(0/1000)

Very clever design, I used it in a mobile robot connection so it could connect to the power supply when it gets near the other half. Whith reverse polarity of the magnets and some small modification in the female part of the connector, now it is connecting every time in the correct orientation without a miss :) thank you
(Edited)
The designer has replied
4
Reply
Oh wow that is so cool, definitely the best use I've seen for my crappy little connector so far! Good idea on the modifications as well - does that help 'funnel' the connector into the socket?
1
Reply
Print Profile
just choose plate with size you need
Perfekt
0
Reply
I have 6x2 magnetes and wated to use this kind of connector for a LED strip. Why does the 6x2 plate don't have the male connector?
The designer has replied
0
Reply
I found it, had to split into objects (they where grouped up) and it was hidden under one of the females
0
Reply
Replying to @Valforte :
My apologies, I didn't make any of the plates, i just uploaded the STLs. Glad you were able to find it though!
0
Reply
do you think this can be used on normal 9v batteries and can you fit 8x5 magnets
The designer has replied
0
Reply
I think it would be OK with a standard 9V, since those batteries can only supply a few hundred milliamps before they drain rapidly. 8x5 magnets might be a bit strong IMO, and make the connector difficult to pull apart. If you scale the 8x3 up to 166% on the z-axis they should fit!
1
Reply
ok thanks
0
Reply
Is it compatible with 12v
The designer has replied
0
Reply
I mean it's not 'compatible' or 'incompatible' with anything, it depends on how you solder them, how well they connect for you, and how much current you're passing. Personally, I try to stick to 5V and a few hundred milliamps.
1
Reply
Replying to @TamiyaGuy :
Thanks
0
Reply
index the print so you can only connect the two parts together without crossing them. a simple dowel will work. just an idea to help others that could make a mistake and reverse polarity and cause harm to something or fire
The designer has replied
0
Reply
Thanks for the comment! I do agree (and the three-pin version fixes this) - the way I worked around it was by arranging the magnets so they connected N-S on one pole, and S-N on the other pole. If you try to connect it the wrong way round, the magnets will repel. They might still be able to be forced together, but if anyone's forcing two repelling magnets together then hopefully they should know that something's wrong :P
0
Reply
Replying to @TamiyaGuy :
oh cool, that’s so smart too. I didn’t think of that. if you mentioned that in description I must of not seen it. thanks for sharing your model and replying to me
1
Reply
I used the method in this video to solder without losing strength, maybe link it instead? Also I'm using this in a waterproof magnetic connection, so I'm using sugru to waterproof it once I glue it together and to make the charger cable head, I'll let you know how that goes. https://www.youtube.com/watch?v=G4MdrRXfb1M ALso, I would love to see the smaller connector also in a rear access version like the bigger one.
(Edited)
The designer has replied
0
Reply
Thanks for the link, I'll add that to the description! Very clever solution.
1
Reply
When I open it in studio and set it to my A1 Mini the 6x2 shows as a single item instead of 3 separate ones and the one that should be in the middle isn't there. I have a bunch of 6x2 magnets and would like to use this but without the right pieces in that size I'll have to think of something else to do.
The designer has replied
0
Reply
I'm afraid I didn't make the "Open in Studio" version, so I can't speak to what's included there. If you download the STL/CAD files there should be 3 files in each folder, hopefully they should contain what you need? Noticed your comment about the rear-access version, and I'll look into it, thanks! I'm afraid the project file I have is a complete mess so it's actually surprisingly difficult to edit them again :(
1
Reply
@TamiyaGuy I don't know much about electricity, what would you call the limit for 'low-power'? Something I'm looking at using this for runs on 24v, and I don't know I want to make sure this design can handle that load.
The designer has replied
0
Reply
I'll admit I don't know much about electricity either! Personally, with my knowledge (and particularly my soldering skills...) I was comfortable with 5V USB but that's about it. I've seen other people use this with 12V with success, but 24V, particularly if it's something high-current like a fan, I think you might be better off with a more traditional connector I'll admit. Of course, if you have the wherewithal to test it out safely, feel free to give it a try and report back! But y'know, a bit of convenience and a fancy 3d print isn't worth burning your house down. Stay safe and have fun :D
0
Reply
Print Profile
just choose plate with size you need
sometimes it works others less the magnets detach easily but I like the project!!
Show original
0
Reply