Search models, users, collections, and posts

Mini Suspension Rail: Build Your Own Skyway

GIF
GIF
GIF

Print Profile(1)

All
A1 mini
P1S
P1P
X1
X1 Carbon
X1E
A1
H2D
H2D Pro
H2S
P2S
H2C
X2D
A2L

All Parts
All Parts
Designer
22.8 h
13 plates
5.0(4)

Open in Bambu Studio
Boost
886
1616
32
69
810
99
Released 

Bill of Materials

Maker's Supply Kits and Parts
Select all
20x20mm (10PCS) - NB001
Bambu Filaments
Select all
Jade White (10100) / Refill / 1kg
Black (10101) / Refill / 1kg
Red (10200) / Refill / 1kg

Description

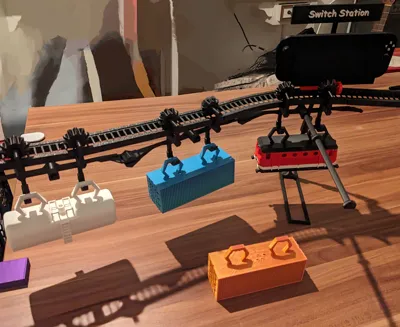
Mini Suspension Rail: Build Your Own Skyway! [Original Design]

The Mini Suspension Rail system lets you create a customizable suspension rail network. 

This design is not compatible with common toy brands.


Features:

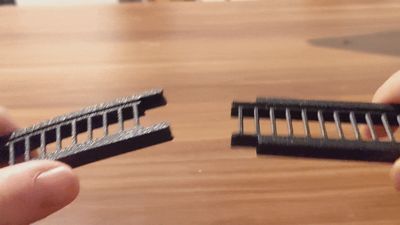
  • Modular and printable without supports: Design and print your own miniature railway with straight, left and right track sections, plus 10% inclines and -10% declines. (Designed for PLA)
  • Flexible Installation: Mount your Mini Suspension Rail System anywhere! Suspend your rails freestanding, clamp it to furniture, mount them to walls with tape or screws, or use the weight of everyday objects.
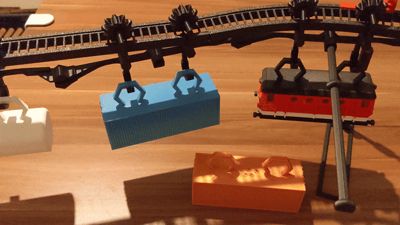
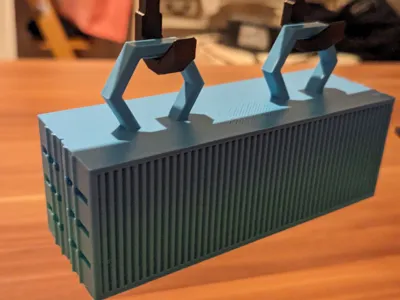
  • Expand Your Railway with Printable Cars: Expand your railway with a variety of printable train cars, including small and large container cars as well as tank cars.
  • Flexible Support Structures: Achieve the desired rail height and create custom support configurations with extensions and L-connectors. Build adaptable support structures to match your unique track layout.


Feedback is very much appreciated! Please share your experience and improvement suggestions for this project.


Safety Information: This product contains small parts. The smallest detachable part is approximately 30x25x7mm. Exercise caution around babies and young children.

Part List

Rails

  • Rail Straight: 15 cm length
  • Rail Turn A: 30° Turn
  • Rail Turn B: 30° Turn, recommended for loop railways
  • Rail Incline: +10% incline
  • Rail decline: -10% decline
  • Rail Stop A: End piece for a rail 
  • Rail Stop B: End piece for a rail

Support Structures

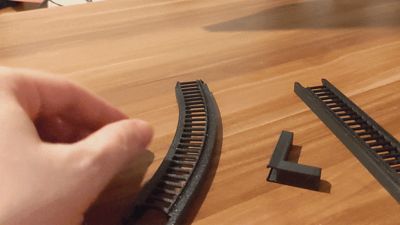
  • Rail Clip On: Slide onto a rail to strengthen a connection and/or connect to other support structures. (See video above)
  • Extension Long: Extends the support structures
  • Extension Short: Extends the support structures
  • Extension L: 90° angled extension for support structures
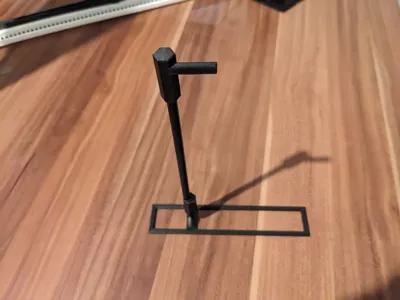
  • Free Standing: Support that stands on a flat surface
  • Clamp: Clamp to attach to furniture or other stable objects. (Recommended to have at least a few camps per railway to ensure stability)
  • Wall Mount: Support to attach to a surfaces/walls, by mounting tape, screws or magnets
  • Weighted: Thin plate that can be placed under heavy objects to support the rails.

Train

  • Rail Guide: Attaches to rails. One is needed for each train & car.  Includes hooks to hang trains or cars. Features train coupling with the next and previous Rail Guide. To attach it to the rails either add it at the end/beginning of the rail or clip it on with some light force.
  • Train: Inspired by the Class 1144
  • Manual Steering: Can be plugged into the Rail Guide for the Train and can be used to steer the train
  • Container: Car, needs Rail Guide to attach to rails
  • Container Small: Car, needs Rail Guide to attach to rails
  • Tank Car: Car, needs Rail Guide to attach to rails

All Cars & Trains are stackable for compact storage.

Train Station

  • Train Station: Features a slot for attaching the Train station Name Plate. Has a Stop sign that can be engaged or disengaged to stop the train. For installation see Rail Clip On. 
  • Train Station Name Plate: Features the name of station. Use the slicer to edit/add the text on top of it. 


Release Log

  • 1.0: Initial base set of parts

Comment & Rating (32)

(0/1000)

I have experimented with electrifying your design, incorporating the CyberBrick kit. Further optimizations are underway
The designer has replied
Show original
2
Reply
This looks absolutely amazing! Great job in incorporating the CyberBrick inside the train.
1
Reply
Do think you could share the print files for that? i would greatly appreciate it.
0
Reply
This is a really cool design, would it be possible to create an "engine" cart that uses a small motor to automatically propel the train?
The designer has replied
4
Reply
That's a great suggestion. I could think of adding a special rail guide that also has a small motor and a gear to propelling it forward. The Battery could be hidden inside the train itself. Starting and stopping is a bit tricky as you would still be manual, but there are options to either make it remote controlled or use the existing train station stop signs as a physical trigger to turn off the power supply. Thanks for the suggestion! I will put on the improvement list.
7
Reply
Replying to @ObsidianScarlet :
a big +1 for having a powered version. this is an awesome design and should be continued :)
0
Reply
Just commenting to say, I think your design should have gotten first in this competition compared to the actual winners. At minimum, it should have won a top 3 slot. it’s creative and it’s obvious that you put some time and effort into this. Competition fail by Bambu!
The designer has replied
3
Reply
Thank you for your kind words, I appreciate it. I think in this case it was the the correct decision by Bambu as the theme of the competition was to create "designs that work with popular toy train brands". All the winners did a wonderful job in that area. I am glad that, although it did not match the theme, it still got honored through the Excellent Participation Award.
0
Reply
I also agree with this .
0
Reply
you should try and meake it motorized really cool!
5
Reply
First of all, thank you for this amazing design. Is it possible to add one or more photos showing the fully assembled version? So that we can see the area it covers and what size it is when installed. I remain grateful. Kind regards
The designer has replied
1
Reply
Thank you. The tracks are modular, allowing for a wide range of layout variations. You can construct a single track with multiple stations, connecting point A to point B, with the train traveling back and forth. For a loop, the minimum area required is a circle with a diameter of approximately 60cm (or 24 inches), utilizing 12 Rail Turn B pieces.
2
Reply
Replying to @ObsidianScarlet :
Definitely a very satisfactory answer. I think I will start with a small model and enlarge it as much as my wife allows. :)
1
Reply
Amazing design! I love it!
2
Reply
amazing design, making tunnels and cars going around sons room, he is wondering why so many black sticks (mounts and supports) are in his room. Im before putting track up, waiting till school starts to finish as a back to school gift
1
Reply
Hello, your design is incredibly impressive, I love it. May I electrify your design as a basis?
The designer has replied
Show original
0
Reply
Glad you like it. Feel free to electrify the design yourself!
0
Reply
Would it be possible for the containers to open and close to make them usable for small things like pencils or pens?
1
Reply
I come from the city of the "real" suspension railway and I think that's great
Show original
1
Reply

License

This user content is licensed under a Standard Digital File License.

You shall not share, sub-license, sell, rent, host, transfer, or distribute in any way the digital or 3D printed versions of this object, nor any other derivative work of this object in its digital or physical format (including - but not limited to - remixes of this object, and hosting on other digital platforms). The objects may not be used without permission in any way whatsoever in which you charge money, or collect fees.