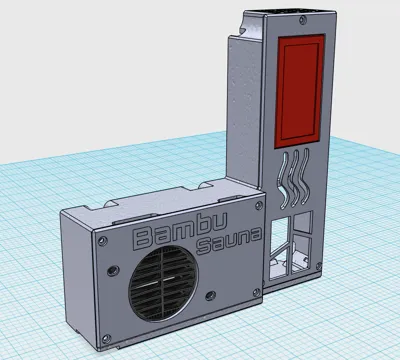
BambuSauna - X1C (P1) Chamber Heater remixed 24VDC


Print Profile(1)

Description
This is a remix of BambuSauna! The ultimate chamber heater for the BambuLab X & P Series and some ideas of the remix Bambu Sauna Higher Airflow.
PDF Assembly Guide with more pictures, hints and instruction below.
The Issues I have had with the origin sauna:
Part design did not fit on actual Bambulab X1C printer due to updated left panel
The Sauna can now be installed and removed from the inside if you have a newer X1C with threaded sockets on the left panel. Nevertheless you have to remove the left panel to install the cabling or drill a hole in the printer bottom (not recommended😉).
PTC fan stopped working after a few minutes due to lack of air flow until cooled down again
When reading orgin comments looks like that I am not the only one experiencing this issue. Distance to left panel is 10mm only and IMHO to small to ensure a good airflow. Unfortunately relocating the origin fan will not do job as the 6015 is too big. An additional, GOOD 4020 fan is required. Also designed a better airflow for the new fan position.
If you can better source a 4028: P05CHI did a remix of the front plate to accommodate the bigger fan. Can be found here.
Mains power inside a metal shielded printer
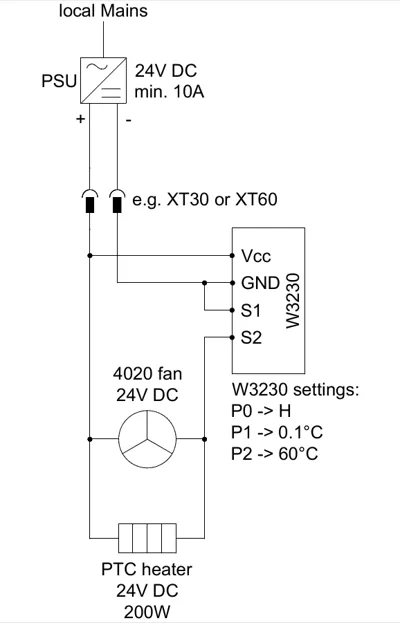
In the beginning my biggest concern. Therefore I use a 24V PTC heater only. This version eases the electric installation due to elimination of the AC/DC converter and enables an open design of the Sauna logo to get a better airflow. You need an additional 24V PSU which could be used also for powering a Bentobox or extra LED on a riser. Preferred in combination with a home automation stuff.
I assume that my remix will also fit on P1S or upgraded P1P series but I cannot guarantee as I only have a X1C machine.
The origin design has been done to improve the reliability and quality of ABS/ASA and Nylons. As many others I also have a Bentobox installed on the right-hand side in the chamber. Therefore the chamber heater has to be on the left-hand side.
Nevertheless I want to mention that I experienced some strange things when the chamber is heated up to more than 57°C on my X1C chamber temperature sensor. It seems for me that you can heat up the printer higher than the parts are designed to work for.
Additionally be careful when doing higher prints as the heater blows directly on the head bed. So, please check with your model and consider to switch off the heater when printing parts higher than 150mm e.g. by home automation.
Printing:
Needless to say that you shall use ABS or more temperature-stable materials for the printed parts. The front covers look nicer when printed on an effect plate😎.
BOM:
- PTC Heater 24V 200W w/ 24V Fan – e.g. https://www.aliexpress.com/item/1005007442989854.html choose the right one with 24V
- W3230 Thermistor 24VDC - e.g. https://www.aliexpress.com/item/1005007558716513.html
- 4020 fan 24VDC - I use a SUNON MF40202VX-1000U-A99 via local amazon with 10.8CFM or 4028 with this front plate
- 11x (X1C) / 13x (P1) M3xD4.5xL3 Heated Inserts - e.g. https://www.aliexpress.com/item/1005007653131713.html (D5 might do the job also)
- 24VDC PSU min. 240W
General supply (if not already on hand, it is not a bad idea to purchase some fastener sets):
- 7x M3x5 or 6 machine screws (I used red aluminium BHCS) - fix covers on housing
- 2x M3x8 machine screws (e.g. SHCS) - Connect housing to printer bottom
- 2x M3x12 machine screws (e.g. SHCS - I used red aluminium BHCS) - Connect ‘cover heater’ and PTC heater housing
- 2x M3x25 machine screws (e.g. SHCS) - Replacement for the lower aux fan screws; mounted from inside chamber
- 4x M3x25 machine screws (e.g. SHCS) - Hold new 4020 fan on ‘cover heater’ - app. M3x35 if 4028 is mounted (not checked)
- 4x M4x6 machine screws (e.g. SHCS) - Hold the PTC without fan in position (thread fits without cutting)
- 2x M3 washer large size 3xD - Connect ‘cover heater’ and PTC heater housing
- 4x M4 washer large size 3xD - Hold the PTC without fan in position (thread fits without cutting)
- 2x M3 self-locking nut - Connect ‘cover heater’ and PTC heater housing
- app. 2x2m 14AWG Silicone Wire - e.g. https://www.aliexpress.com/item/1005007805610467.html - Please recheck if the diameter is suitable for your installation
- min. 1 set XT30/XT60 or MPX connector - Just for easy mounting and disconnecting of the whole unit
- Shrinking tube in several sizes
- Soldering skills 😁
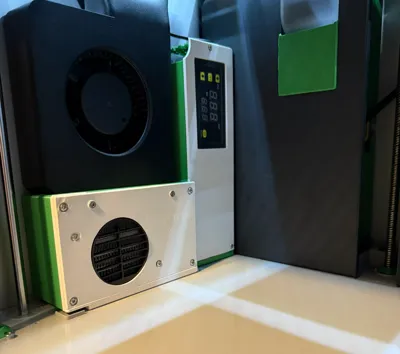
More pictures, hints and instruction in the Assembly Guide.
Any additions, comments or corrections welcome.
2025-02-13: Step file added
2025-10-21: W3230 guide added to Docs / 4028 fan option added

Comment & Rating (80)