Scifi Crate - Short


Print Profile(1)


Description


[Intro]
I would like to introduce to you my fancy Scifi Box! Or crate? Treasure chest? Do I need to model some gold coins for you to fill this thing up with? Hehe.
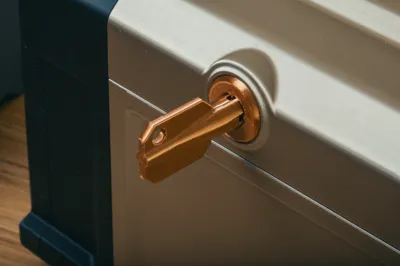
A variation of my Sci-Fi Crate! This one large. It will accommodate up to 5 spools of filament and can stack in line with the other crates, although it's a little wider.
[What you'll need]
Tools:
Hex Driver #3 & #2.5
File for cleaning up edges where berm is used, or whatever tool you like for that job.
Hardware:
16 M4 Nuts (Used for connecting the End Caps, Ends, And Mid section together.
8 M4x25 (Used to connect the Ends to the Mid section)
2 M4x30 (Used for the hinge)
2 M3x5 (Used on the Lock. You can Use M3x6 screws, but don't over tighten them, as it'll push through and show on the front)
14 M4x10 (6 for the Lock, and 8 are used to connect the End Caps to the Ends)
Filament I used: (For reference! Use the colors you see fit!)
Mid - Bambu PLA Iridium Gold Metallic
Ends - Bambu PLA Matte Charcoal
Hardware - Bambu PLA Silk Copper
[Assembly]


-------
If you like my work, consider showing your love by Buying me a coffee. Additionally, if you're looking to sell prints of my design, please check out my Patreon page for more information.
License
You shall not share, sub-license, sell, rent, host, transfer, or distribute in any way the digital or 3D printed versions of this object, nor any other derivative work of this object in its digital or physical format (including - but not limited to - remixes of this object, and hosting on other digital platforms). The objects may not be used without permission in any way whatsoever in which you charge money, or collect fees.
Comment & Rating (73)