Search models, users, collections, and posts

World Of Warcraft Ashbringer

Print Profile(4)

All
P1P
P1S
X1
X1 Carbon
X1E
A1
H2D
H2D Pro
H2S
P2S
H2C
X2D
A2L

0.2mm layer, 2 walls, 5% infill
Designer
28.7 h
5 plates
5.0(5)

Ashbringer Multicolor X, P and A1(L)
82.4 h
8 plates
5.0(4)

Ashbringer Multicolor H2D Optimized
46.8 h
8 plates

Ashbringer, optimized for multi-part printing with color separation, saving you significant time and filament
34.3 h
8 plates
2.5(2)

Open in Bambu Studio
Boost
292
762
65
42
488
104
Released 

Description

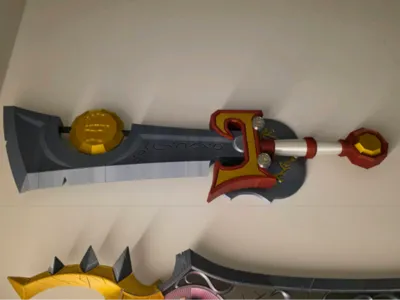
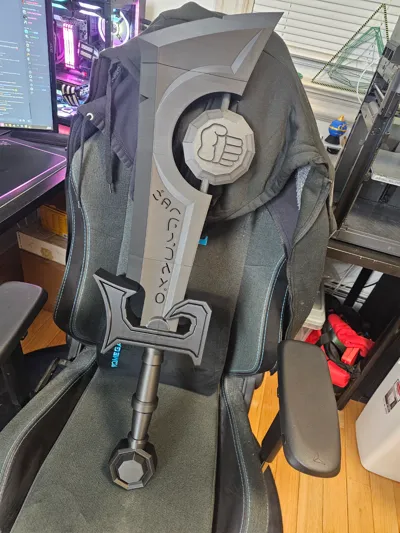
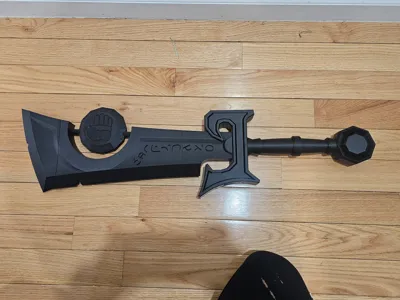
Another addition to our WoW Collection today we have Ashbringer! According to the Wiki this sword is around 4ft tall and while I modeled it that way I only printed/posted the profile for a 75% version. Since the sword has been scaled down traditional wooden dowels wont work this time. I used the fully printed ones for my test and they provided more than enough strength/stability. If using wooden dowels please be aware that the angle requires some slight flex to make sure the pieces fit well together. Happy Printing!

Commercial seller rights over at https://www.patreon.com/Llambland3D

Boost Me (for free)

Like my models? Consider leaving a boost!

Comment & Rating (65)

(0/1000)

Thank you for the model, great work! Painted it manually in Bambu Studio, added profiles for it! :)
The designer has replied
3
Reply
looks awesome! thanks for the colored print profile!
0
Reply
I would love to know which filaments you used <3
1
Reply
Replying to @dethleffson :
Esun silk silver Esun silk gold Esun red PLA Esun Black pla Esun white PLA
1
Reply
I am printing the optimized profile and just have issues with quality. I do not recommend using this. if you want to have it quick, so go for it. but the quality will suffer. all glossy silk finishes of the golden parts are broken. I lost so much filament to figure until i started to use the original ams profile
The designer has replied
0
Reply
when you say the optimized profile what exactly are you referring to? the colored one that a user uploaded?
0
Reply
Yes, exactly. the last one on the list which also should save filament. also, I managed to print the medallion vertically.
0
Reply
Replying to @dethleffson :
that profile wasn't tested by myself and is just something that someone uploaded, I just went to go look at the profile I believe the speed is set way too high for a silk profile that's probably the issue. Uploader chose speed over quality but it could also just be slightly wet filament
0
Reply
love it ! I think it came out great ! nice model,easy and succesfull print ,straithforward assembly.Thank you.Boosted x2 p.s wall mount i found and made some simple changesnto fit ashbringer,all in all looks grest
The designer has replied
0
Reply
this came out amazing and I love the collection!!!
1
Reply
Boosted
Do you have the print file for the mount you would mind sharing. I found one close but i am not as skilled at editing.
1
Reply
Replying to @Nollars :
i need too please
0
Reply
Any guess what happened with my print?
The designer has replied
0
Reply
I printed that with the project settings. The filament was eSun Dual Color Silk Gold and Purple. It seems to be, that either an ironing setting or top layer setting failed here as well as the layer-flow-speed changed. Could also be a blop or or something. What do you think?
0
Reply
looks like printing too fast using silk filament, could also be a slight moisture issue in the filament
0
Reply
Boosted
Print Profile
0.2mm layer, 2 walls, 5% infill
looks great, I love it. done on the Mini
The profile uploader has replied
1
Reply
AWESOME!
0
Reply
Getting close to complete. The handle is left for detailing along with color on the hilt/pommel
The designer has replied
1
Reply
awesome! cant wait to see it finished!
0
Reply
anyone who has successfully assembled this can you please send me instructions or tell me how you found out about what goes where.
The designer has replied
0
Reply
sorry for late response the assembly should be pretty straight forward just line everything up based on the photos with the proper dowels in the middle
0
Reply
Replying to @Llambda :
how am I supposed to know what goes where.
(Edited)
0
Reply
Replying to @PigKingOfLegend :
print the parts, put them all on the floor in front of you pull up the photos above see what goes where based on the photos then just slide the dowels in the hole and glue together
0
Reply
Print Profile
0.2mm layer, 2 walls, 5% infill
My son loves it!
0
Reply
Awesome design, but the dowels included are pretty badly organized & marked. Some ends have markings, some of them do not. Trying to play lego with someone else's design is a pain. You are going to s pend more time figuring out how the dowels are laid out than anything else. That was a nightmare. Once it's figured out though, it's great! Will definitely be printing another for a friend.
(Edited)
The designer has replied
1
Reply
appreciate the honest review, yes I know the dowels on some of my models are a mess I apologize I'm glad you got it figured out in the end. will definitely make more of an effort to organize better for next models
0
Reply
how did u figure this dowel mess out I can’t seem for the light of day to
0
Reply
Replying to @mugen.1320 :
I ended up printing extra ones of different sizes and just Jerry-rigged it. I printed like 3-4 each of small medium and large ones and just trial and error Ed different combos until I got it to work. The dowels that came with it were a pain in the ass and I eventually gave up on trying to use only them.
0
Reply
Love it came out great and fairly easy to assemble.
0
Reply

License

This user content is licensed under a Standard Digital File License.

You shall not share, sub-license, sell, rent, host, transfer, or distribute in any way the digital or 3D printed versions of this object, nor any other derivative work of this object in its digital or physical format (including - but not limited to - remixes of this object, and hosting on other digital platforms). The objects may not be used without permission in any way whatsoever in which you charge money, or collect fees.