Search models, users, collections, and posts
Monitor Wall Mount
IP Report


Print Profile(1)

0.2mm layer, 3 walls, 25% infill
Designer
8 h
3 plates
Open in Bambu Studio
Boost
99
278
14
5
249
71
Released
Description
Content has been automatically translated.
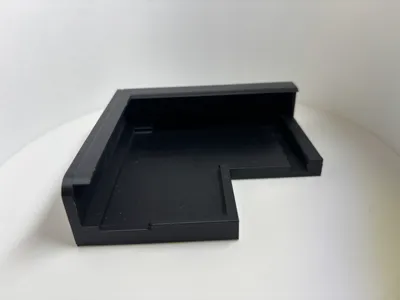
Wall mount for a portable touchscreen monitor
This mount is specifically designed to wall-mount a touchscreen monitor. It is optimized for a monitor without significant weight or stress and can be customized as needed. The design provides secure and stable mounting for a monitor with side ports.
Material and Print:
- Printed from PLA, as the monitor is not heavy and isn't subjected to high stress.
- If greater stability is required, other materials like PETG can be used.
Components:
- Two wall mounting rails that attach to the wall.
- Side brackets that slide onto the monitor.
- A mechanism that allows the monitor to be slid onto the wall mounting rails from above.
Installation Instructions:
- Securely fasten the two rails horizontally to the wall.
- Connect the cables to the monitor. Ensure that all cables have sufficient slack to accommodate movement when inserting the monitor.
- Slide the brackets onto the monitor's sides.
- Position the monitor onto the wall mounting rails from above and gently slide it downwards.
Notes:
- The mount is designed so that the monitor has a 1 mm gap without cables, however, it sits firmly with cables attached.
- Ensure cables are routed neatly to prevent damage.
Technical Details:
- Monitor: https://amzn.eu/d/4fa7kkA
- Mini-PC: https://amzn.eu/d/cMAV0Ov
- Flush-mounted electrical box: https://amzn.eu/d/0pIkuSn
- Power Supply: 3A Flush-mounted LED power supply
Concluding Thoughts: This design offers a practical solution adaptable to individual needs. If inspired to develop an improved version, I welcome your ideas and designs! Share your implementations to increase utility for others.
HomeAssistant
homeassistant
homeassistantpanel
smarthome
smarthomedevices
dashboard
monitor
monitor accessory
monitor holder
monitor mount
wand holder
monitor wall mount
portable monitor
portable monitor wall mount
wall mount
monitor wall mount
smart panel
touchscreen
touchscreen mount
touchscreen monitor
touchscreen-monitor
touchscreen-monitor wall mount
touchscreen monitor wall mount
License
This user content is licensed under a
Creative Commons Attribution-Noncommercial-Share Alike
Comment & Rating (14)